The EVGA Z370 FTW Motherboard Overclocking Review – the Road to 5.0 GHz
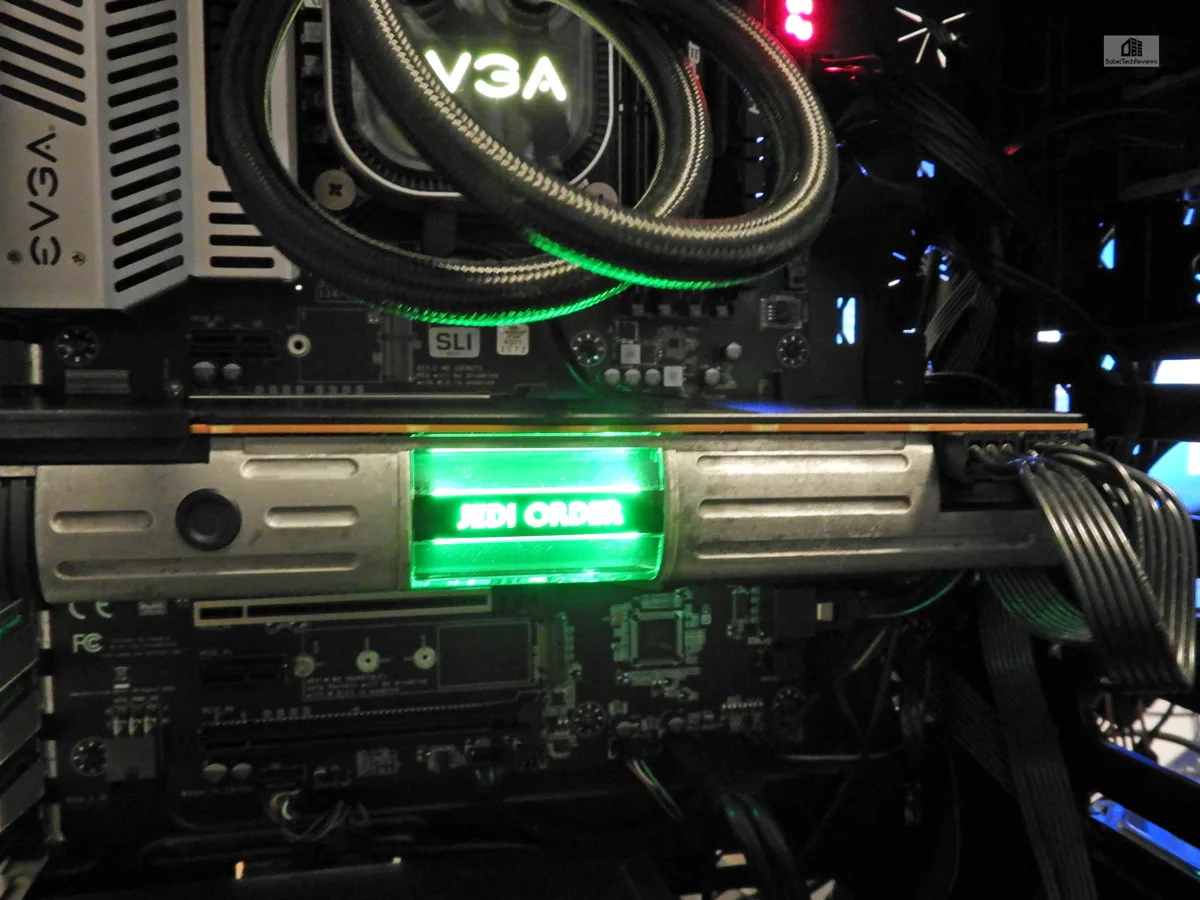
We have recently upgraded our Core i7-6700K Skylake platform to Coffee Lake’s i7-8700K, and have been benchmarking at 4.6 GHz with both CPUs each running on ASRock motherboards. Since the maximum stable overclock for our i7-8700K topped out at only 4.7 GHz, we asked EVGA for a review sample of their new Z370 FTW motherboard to see if we could achieve a higher overclock. The last EVGA motherboard that we evaluated was the Z77 FTW which allowed us to reach 5.0 GHz with our Ivy Bridge i7-3770K. We are going to review the EVGA Z370 FTW motherboard by primarily focusing on gaming performance as we benchmark our Star Wars TITAN Xp and our GTX 1080 Ti using 35 games at 3 resolutions to see how well modern games scale with CPU overclocking.
Coffee Lake is Intel’s latest platform and it brings new features over the Skylake platform although the IPC for gaming is very similar. So far, we have found that the biggest advantage to the Coffee Lake flagship CPU over Skylake’s flagship processor are the extra two cores of the i7-8700K. A Core i7 Coffee Lake gamer using 6 cores plus HyperThreading no longer has to concern himself about background processes while gaming, and the extra two cores over Skylake’s CPU may be helpful for the few games that can use them effectively. In addition, we are also looking for a higher clockspeed above the 4.6 GHz day-to-day overclock of our i7-6700K.
Overclocking
Core i7-8700 “K” CPUs are multiplier unlocked and can easily be overclocked beyond 4.3 GHz with a decent air cooler. We have observed that at stock, although all 6 cores are rated to run at 3.7 GHz, all of the cores turbo to 4.3 GHz under PC gaming load. When we overclock our i7 8700K to match our i7 6700K, we raise the multiplier to 46 for all cores which force them to run at 4.6 GHz. At this overclock, our CPU is effectively running +300 MHz over stock values, and temperatures are barely affected. Our goal was to raise the multiplier to 49 and then to 50 which will give us 4.9 GHz and 5.0 GHz respectively 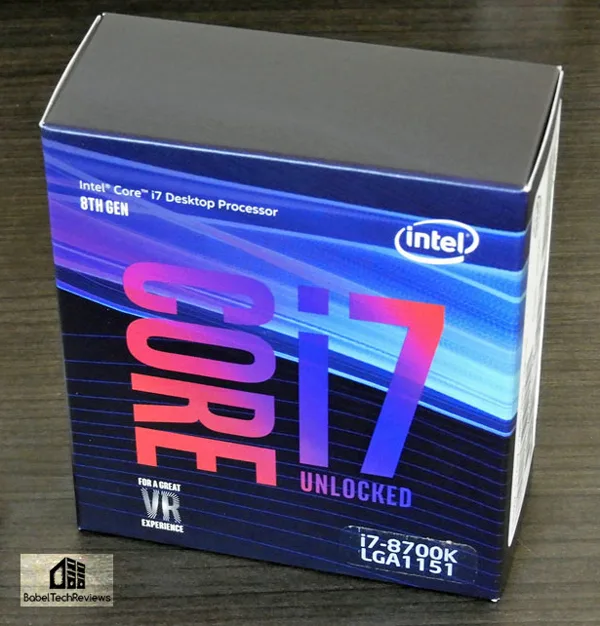 We tested 35 games’ framerate scaling with increasing CPU clock frequencies above 4.3 GHz using the the two top video cards at maximum details and at the primary three resolutions that gamers use. And we used our EVGA CLC 280mm CPU cooler to keep temperatures under control with an absolute self-imposed Vcore limit of 1.45V.
EVGA’s Z370 Motherboards
EVGA has introduced two new Z370 motherboards in addition to the FTW that we are reviewing – a Z370 Micro and their top board, the Classified K. The Z370 FTW is currently on “auto-notify” from EVGA for $199, while the EVGA Z370 Micro is available for $179, but the Classified K is not yet available. The primary difference, besides several added features between the two motherboards, are a 13 phase power delivery system for the Classified K while the FTW is 11 phase.
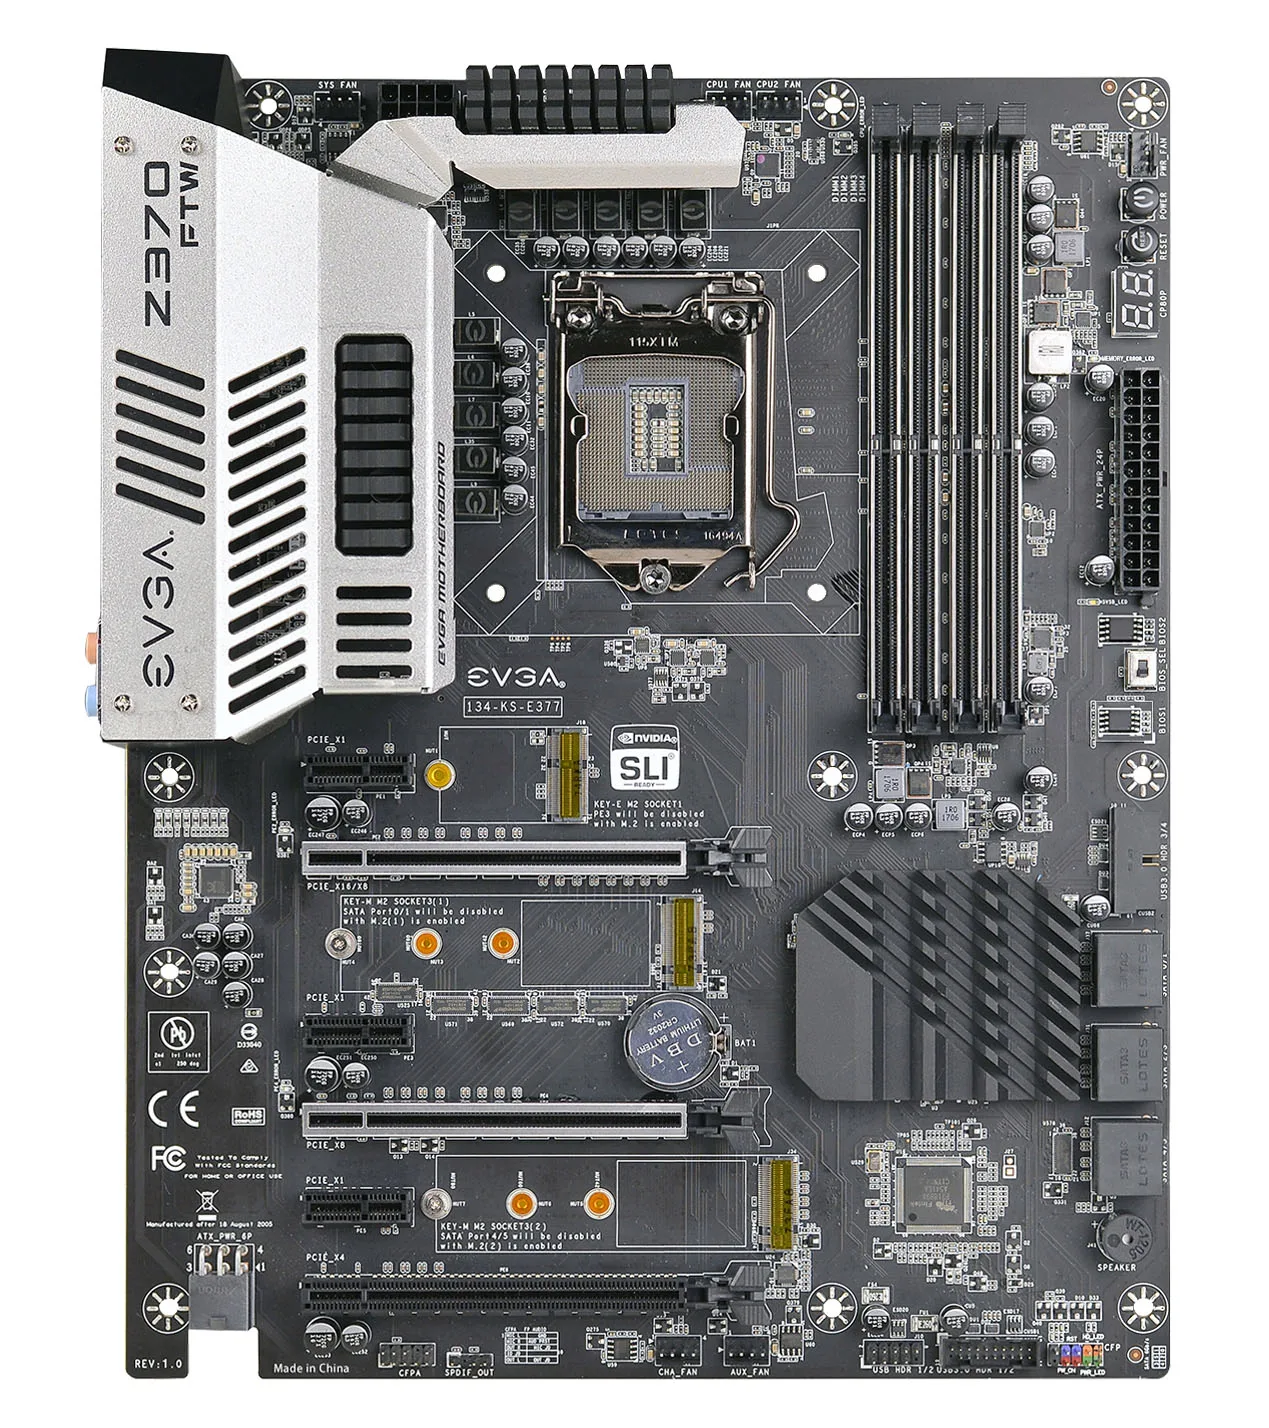
The EVGA Z370 FTW is a very small step down from the Classified K. Besides using a 11 phase power delivery instead of 13, the FTW uses a HDMI 1.4 jack instead of the K’s HDMI 2.0 output while also dropping the front panel USB 3.1 header. The dual Ethernet adapters of the Classified K have been substituted for a single Intel solution, and its Creative Labs audio has been replaced by the Realtek ALC1220. These are not really downgrades for most users.
If you are looking for ultimate overclocking with an extreme watercooler or for LN2 overclocking, the Classified K may offer more stability. The Z370 FTW and Micro motherboards are both designed with an 8-Phase VCore design and an external clock generator to provide power and stability. And a motherboard may make a difference to achieving a higher CPU overclock as we found out. The FTW Z370 MB was able to take our i7-8700K to 5.0 GHz with complete stability while our overclock only topped out at 4.7 GHz with our ASRock Z370 Killer SLI/AC motherboard!
All EVGA Z370 boards include cable cutouts to make cable arrangement easier. These boards also feature metal-reinforced PCIe and DIMM slots for supporting very heavy video cards, 2-Way SLI/CrossFire support, multiple RGB headers, M.2 slots, Intel or Killer Gigabit NICs, and switchable dual-BIOS. Realtek’s upgraded 7.1 Channel audio is used for the Classified K, or Creative’s Sound Core 3D Audio is used for the Micro and FTW motherboards. Here are the EVGA Z370 motherboard features from their website.
Features
- Intel 8th Generation Core i7/i5/i3 Coffee Lake-S Processors – Discover the power of a 6 Core/12 Thread processor for the first time on an Intel Z-Series motherboard!
- Intel® Optane™ Memory Ready – Accelerate your PC with Intel’s latest solutions for blistering fast boot times and increased performance for gaming and everyday tasks.
- Reinforced PCIe and DIMM slots – Use today’s latest, greatest…and heaviest graphics cards and memory and still have Peace of Mind Gaming.
- Dual BIOS chips on all EVGA Z370 motherboards – Easily switch between BIOS configurations to use a custom BIOS, troubleshoot a problem, or fix a failed BIOS update!
- Optimized power connector layout for cable management – All EVGA Z370 motherboards feature a new layout for some power connectors to avoid compatibility issues with cases and tight spaces.
- Killer DoubleShot™ Pro* – Killer DoubleShot™ Pro helps you maintain your network performance while gaming or streaming, so you won’t miss any part of the action.
- Integrated HDMI 2.0* – The EVGA Z370 Classified K features an HDMI 2.0 port to allow 4K gaming or streaming at 60fps with supported Intel HD Graphics.
- External Clock Generator** – The EVGA Z370 Classified K and Micro feature an external clock generator to improve overclocking stability and increase your overall performance.
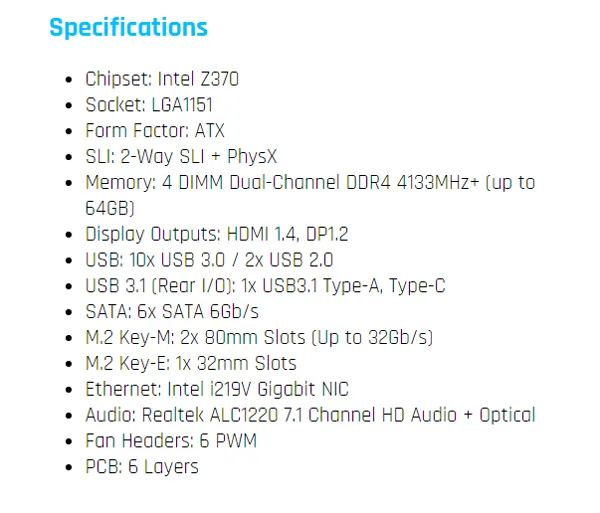
Specifications
Here are the EVGA Z370 FTW motherboard specifications from EVGA’s website:
Warranty & Support
EVGA’s Z370 motherboards come with a 3 year warranty, and registration is recommended. In addition, EVGA provides truly outstanding support including a 24/7 telephone hotline staffed by English-speaking professionals who are very helpful. We have had several opportunities to use their hotline over the past few years, and we have always received fast and helpful service even on the weekends.
The EVGA Z370 FTW is a good-looking motherboard with excellent specifications, so let’s unbox it for a closer look before we install, test, overclock, and benchmark it.
The EVGA Z370 FTW motherboard
Unboxing and Installation
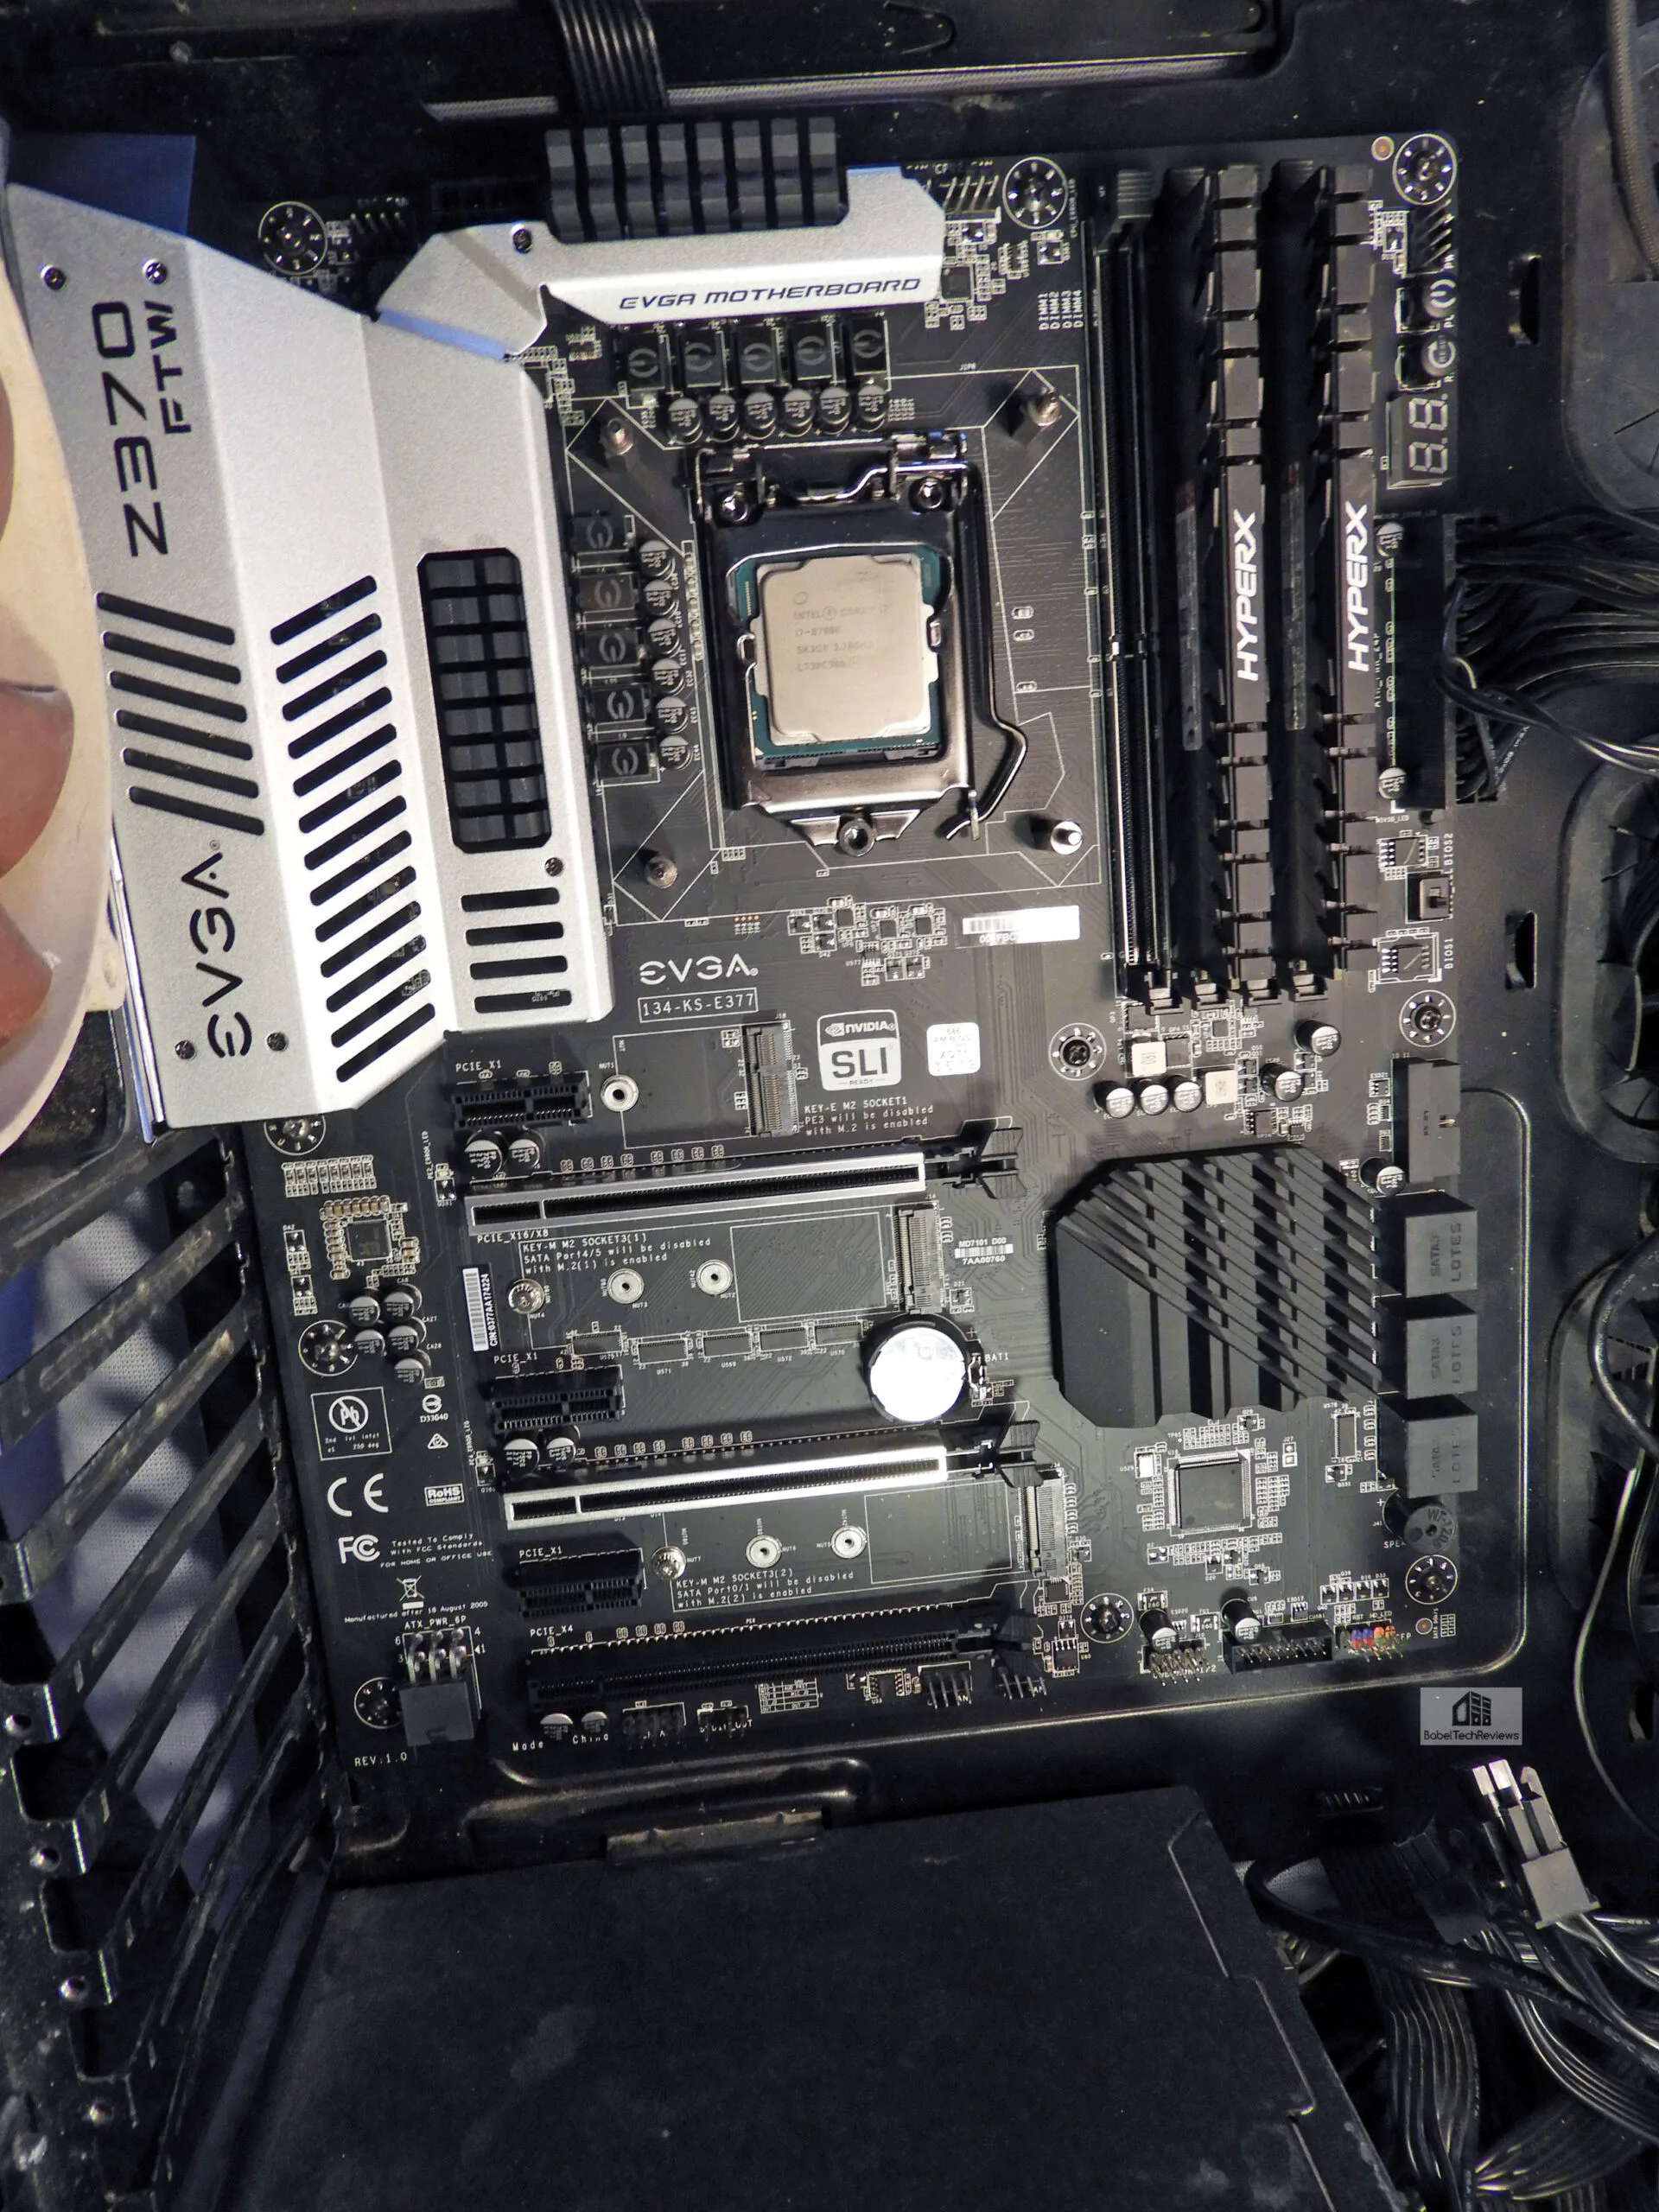
The EVGA Z370 FTW motherboard is a good-looking board using silver components to contrast with a black PCB without any stenciled designs on the board. There are visible outlines for the component placement and some of the traces are visible. The FTW includes a silver shroud over the back panel with vents that extend to the VRM heatsinks. There are 4 RAM slots supporting up to 128GB DDR4, and 3 PCIe slots; two of them are full X16 slots that will support mGPU in an 8x+8x configuration. If you need a high bandwidth (HB) SLI bridge for two GeForce cards, make sure to get the bridge with the 2-slot spacing. The SLI ribbon bridge that is included is only OK for resolutions 2560×1440 and below.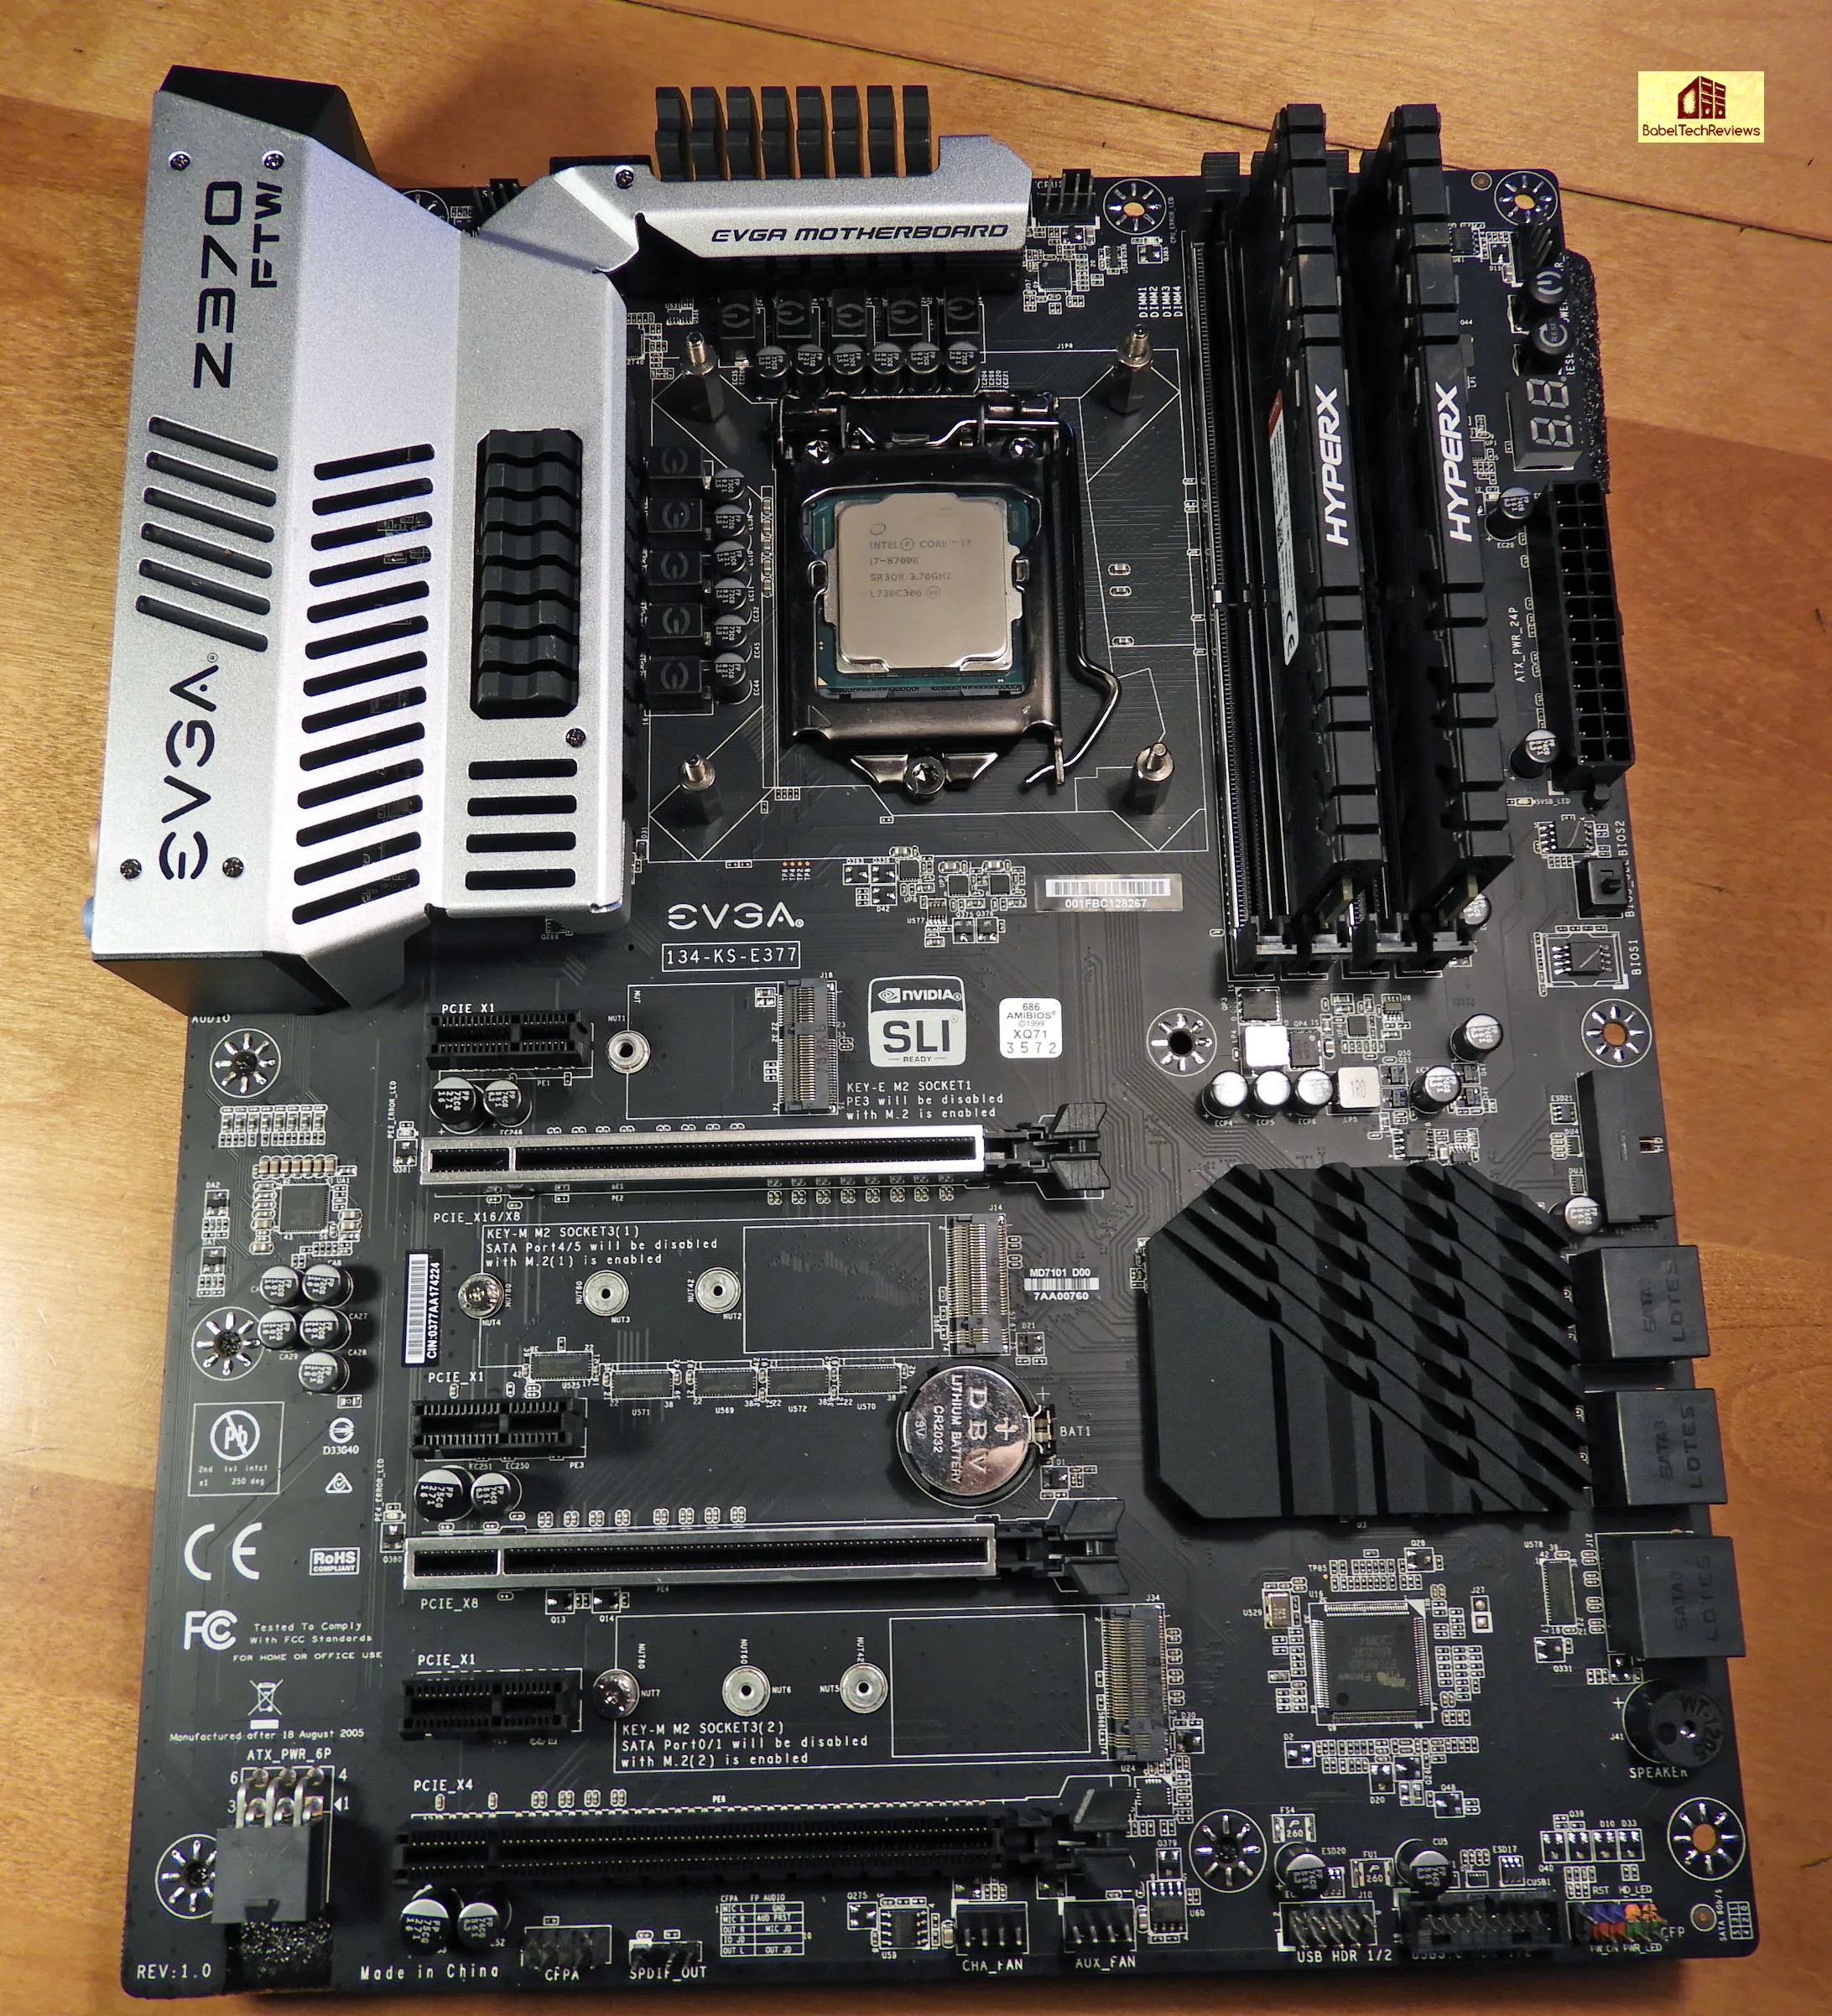
There are headers on the board for RGB strips. The memory slots as well as the two primary x16 PCIe slots (or x8/x8 in dual graphics mGPU mode) are reinforced in order to support heavy graphics cards. And the 6-pin PCIe power lead at the bottom of the board is thoughtfully notched out for improved cable management. There is also a third full-length PCIe x4 slot at the bottom using the bandwidth from the the chipset. There are also three PCIe x1 slots from the chipset. Storage options include six SATA ports (RAID 0, 1, 5, and 10 support). There are two Key M M.2 slots for PCIe storage up to 80mm, and one Key E M.2 slot.
For convenience, there are six 4-pin PWM fan headers, and four are close to the CPU socket with the other two at the bottom of the board. For audio, the FTW uses the Realtek ALC1220 and for networking, the FTW uses a single Intel I219-V controller.
The EVGA Z370 FTW motherboard arrives in a rather plain box with the necessary components for a bare bones installation.
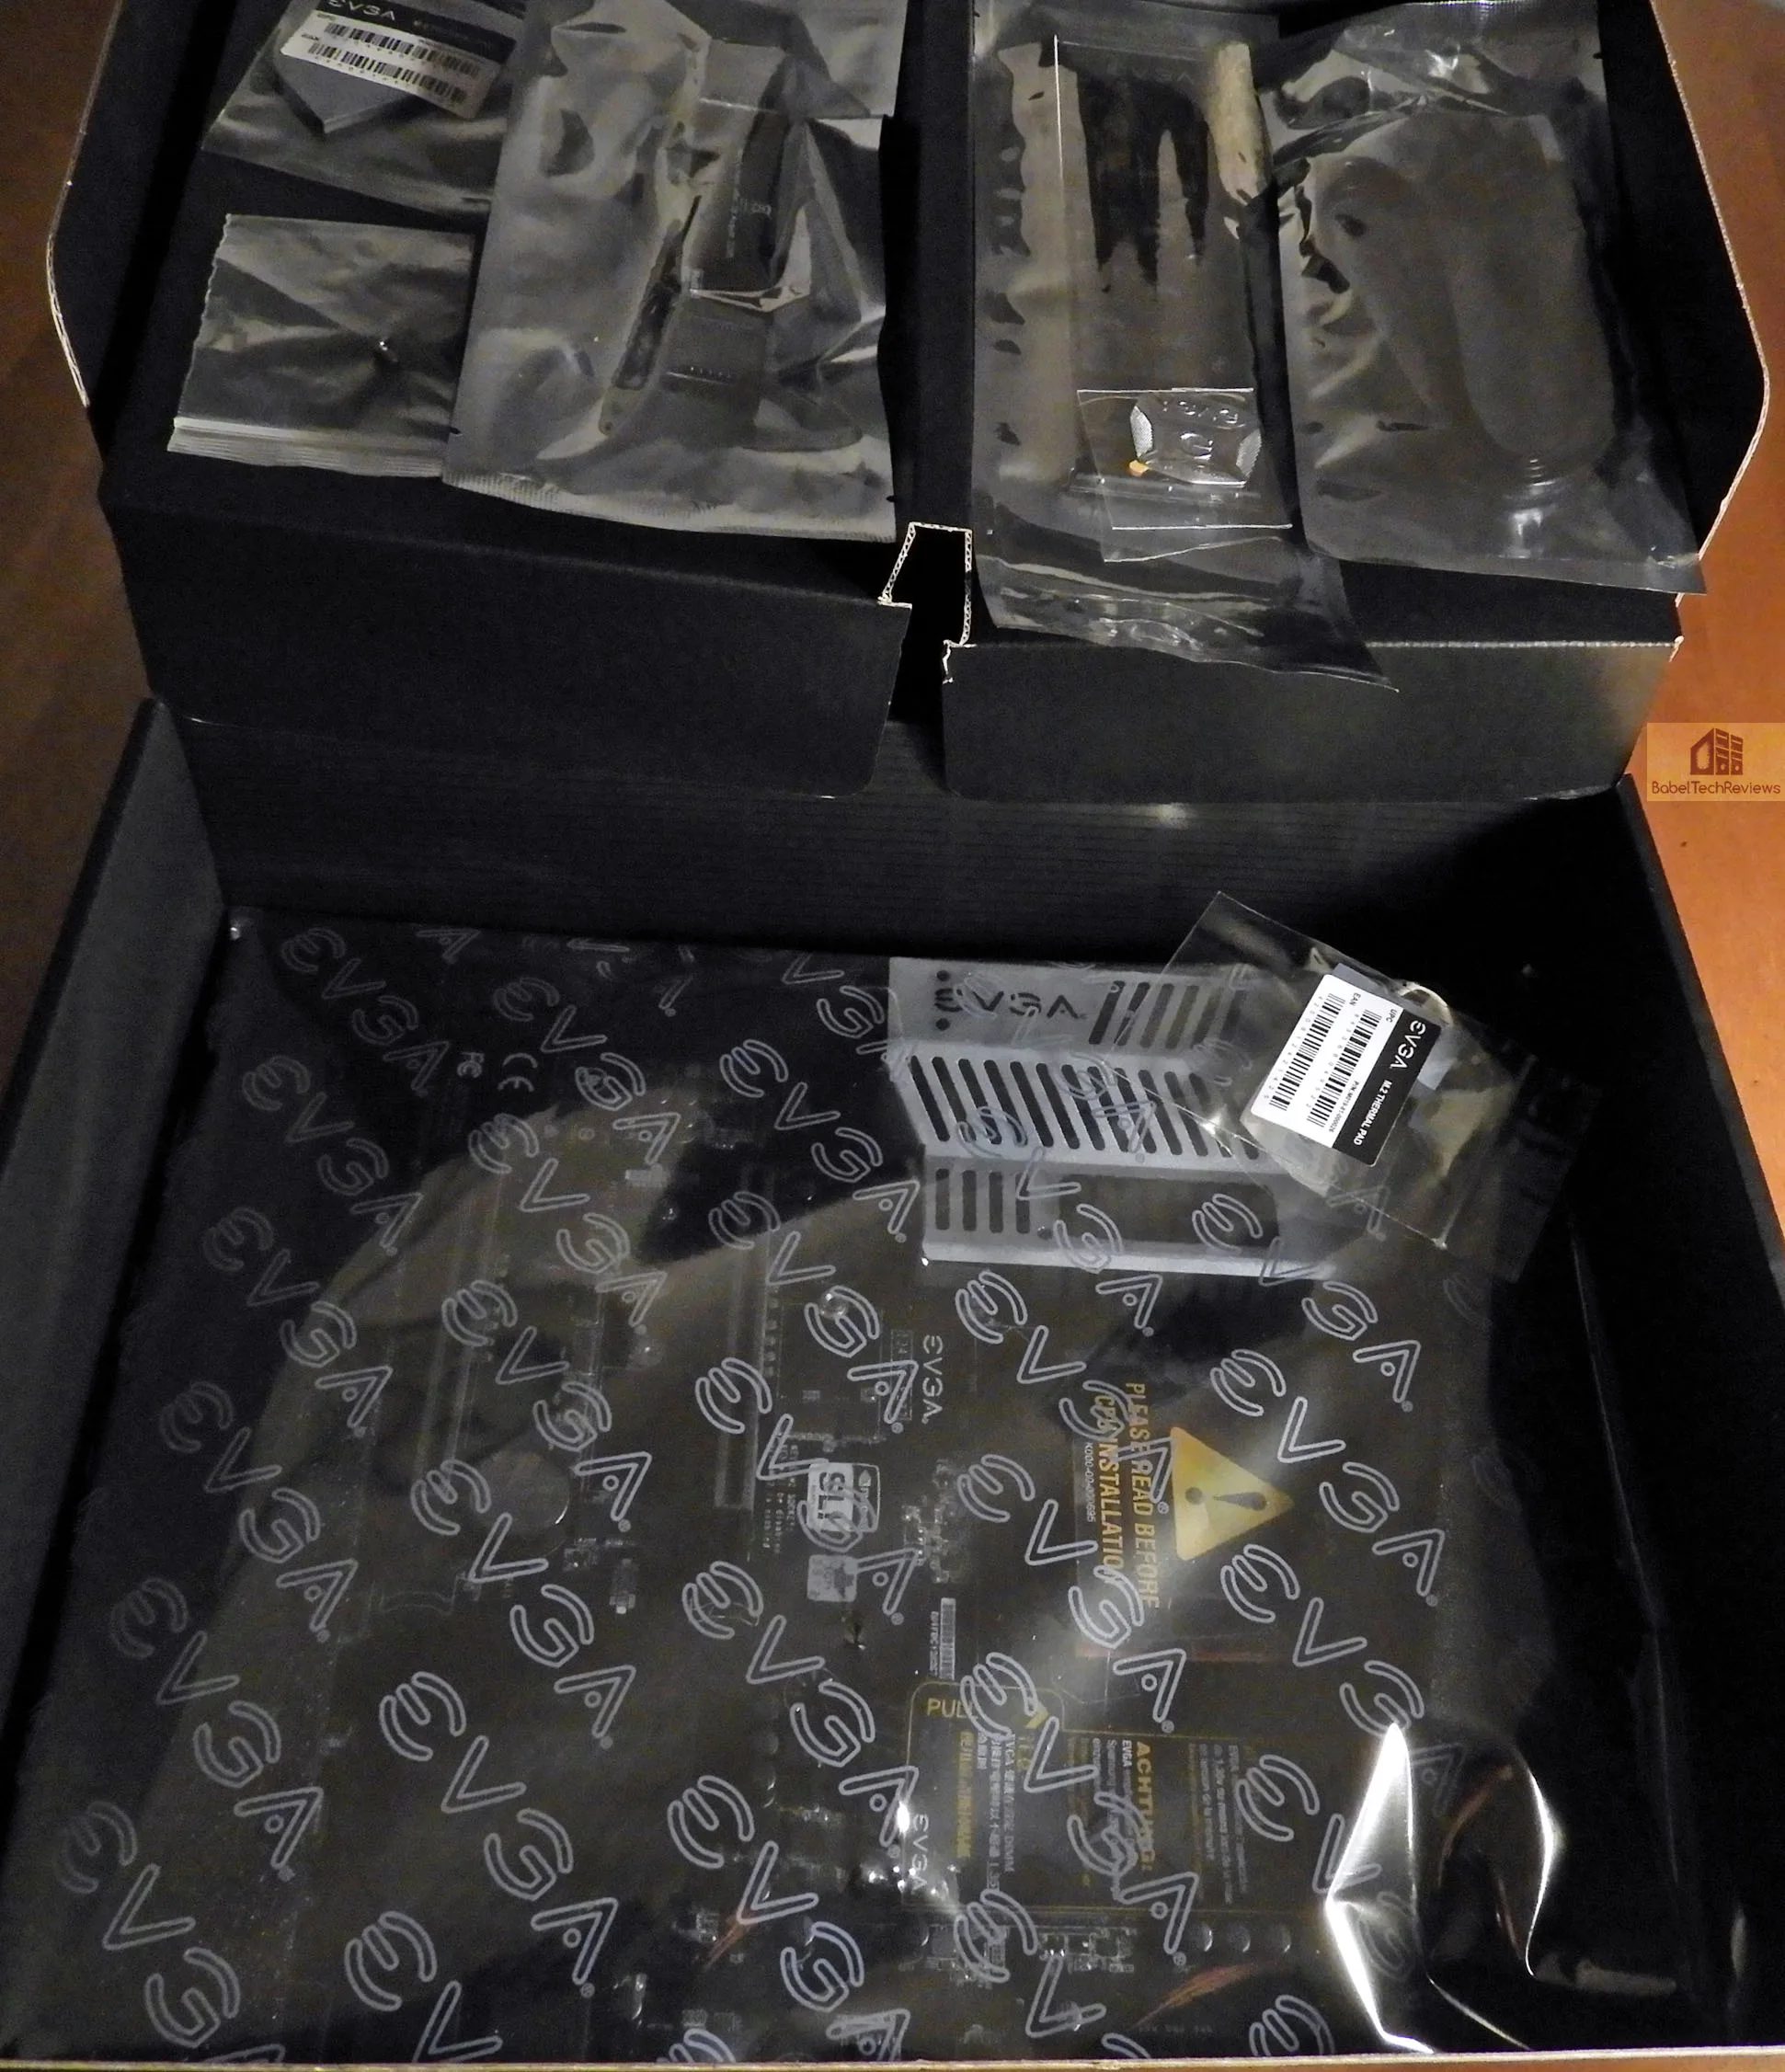 Upon opening the box, we see everything is packed securely. Here is everything out of the box, aside from the motherboard.
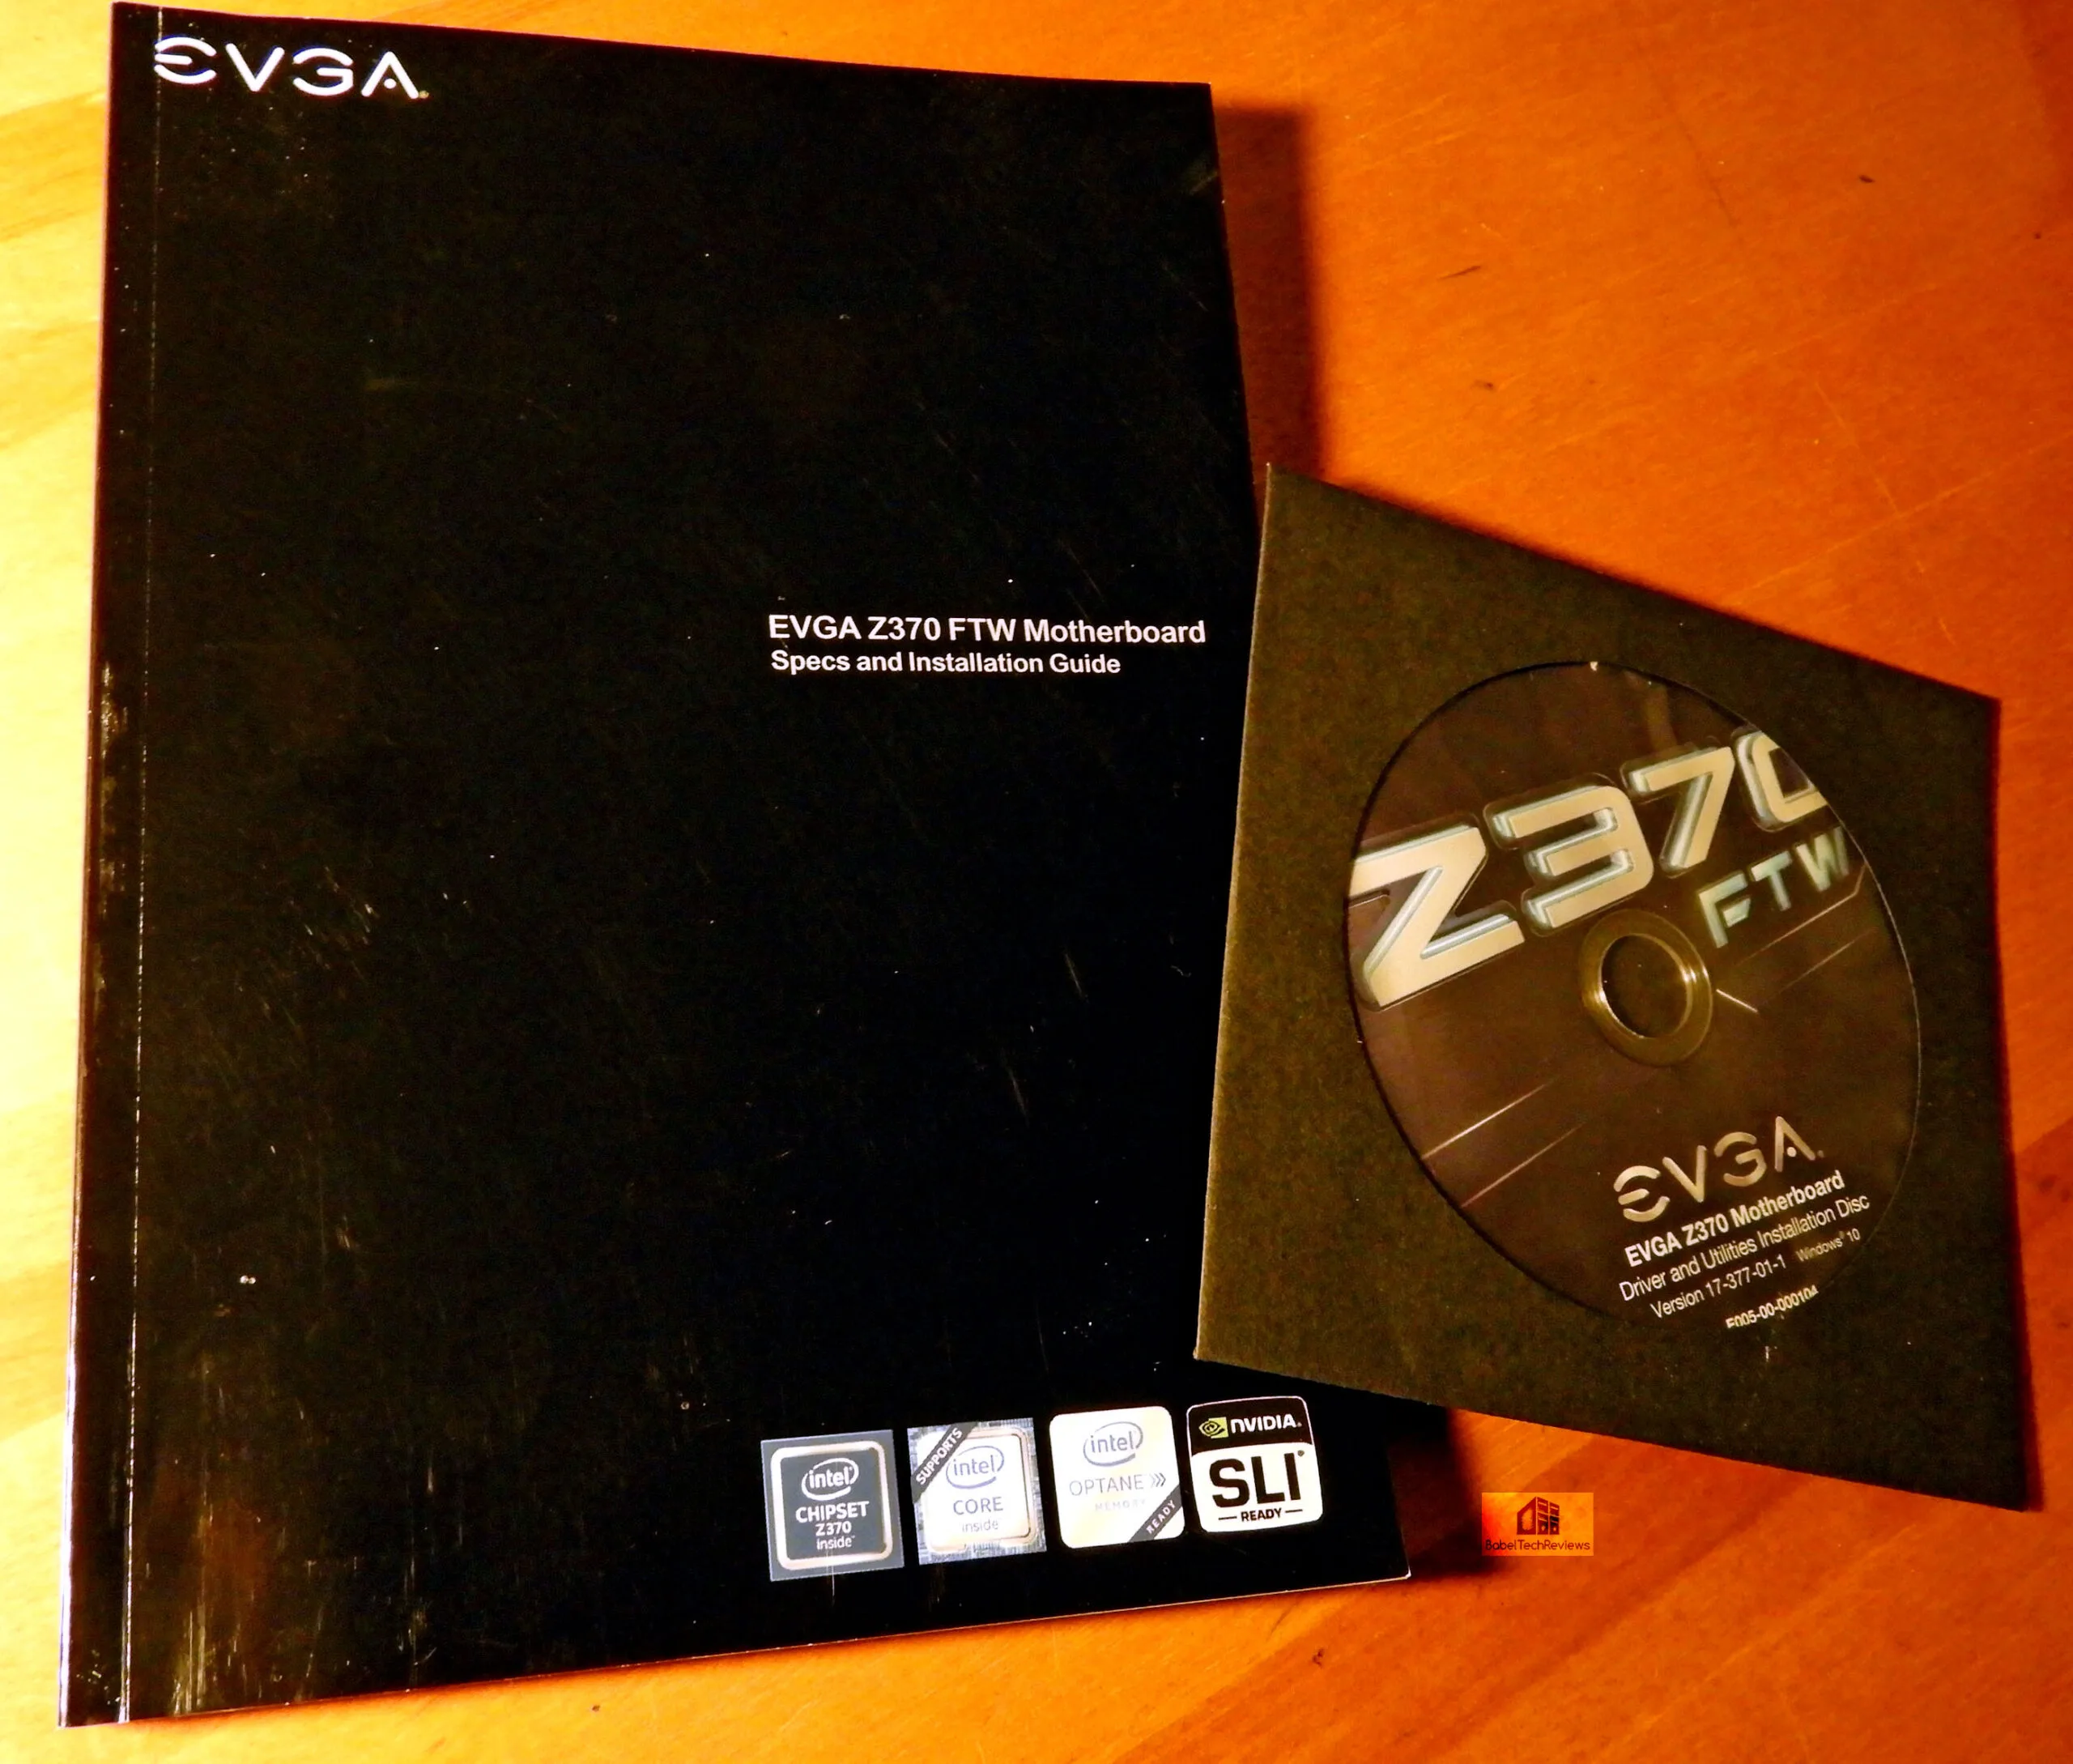
 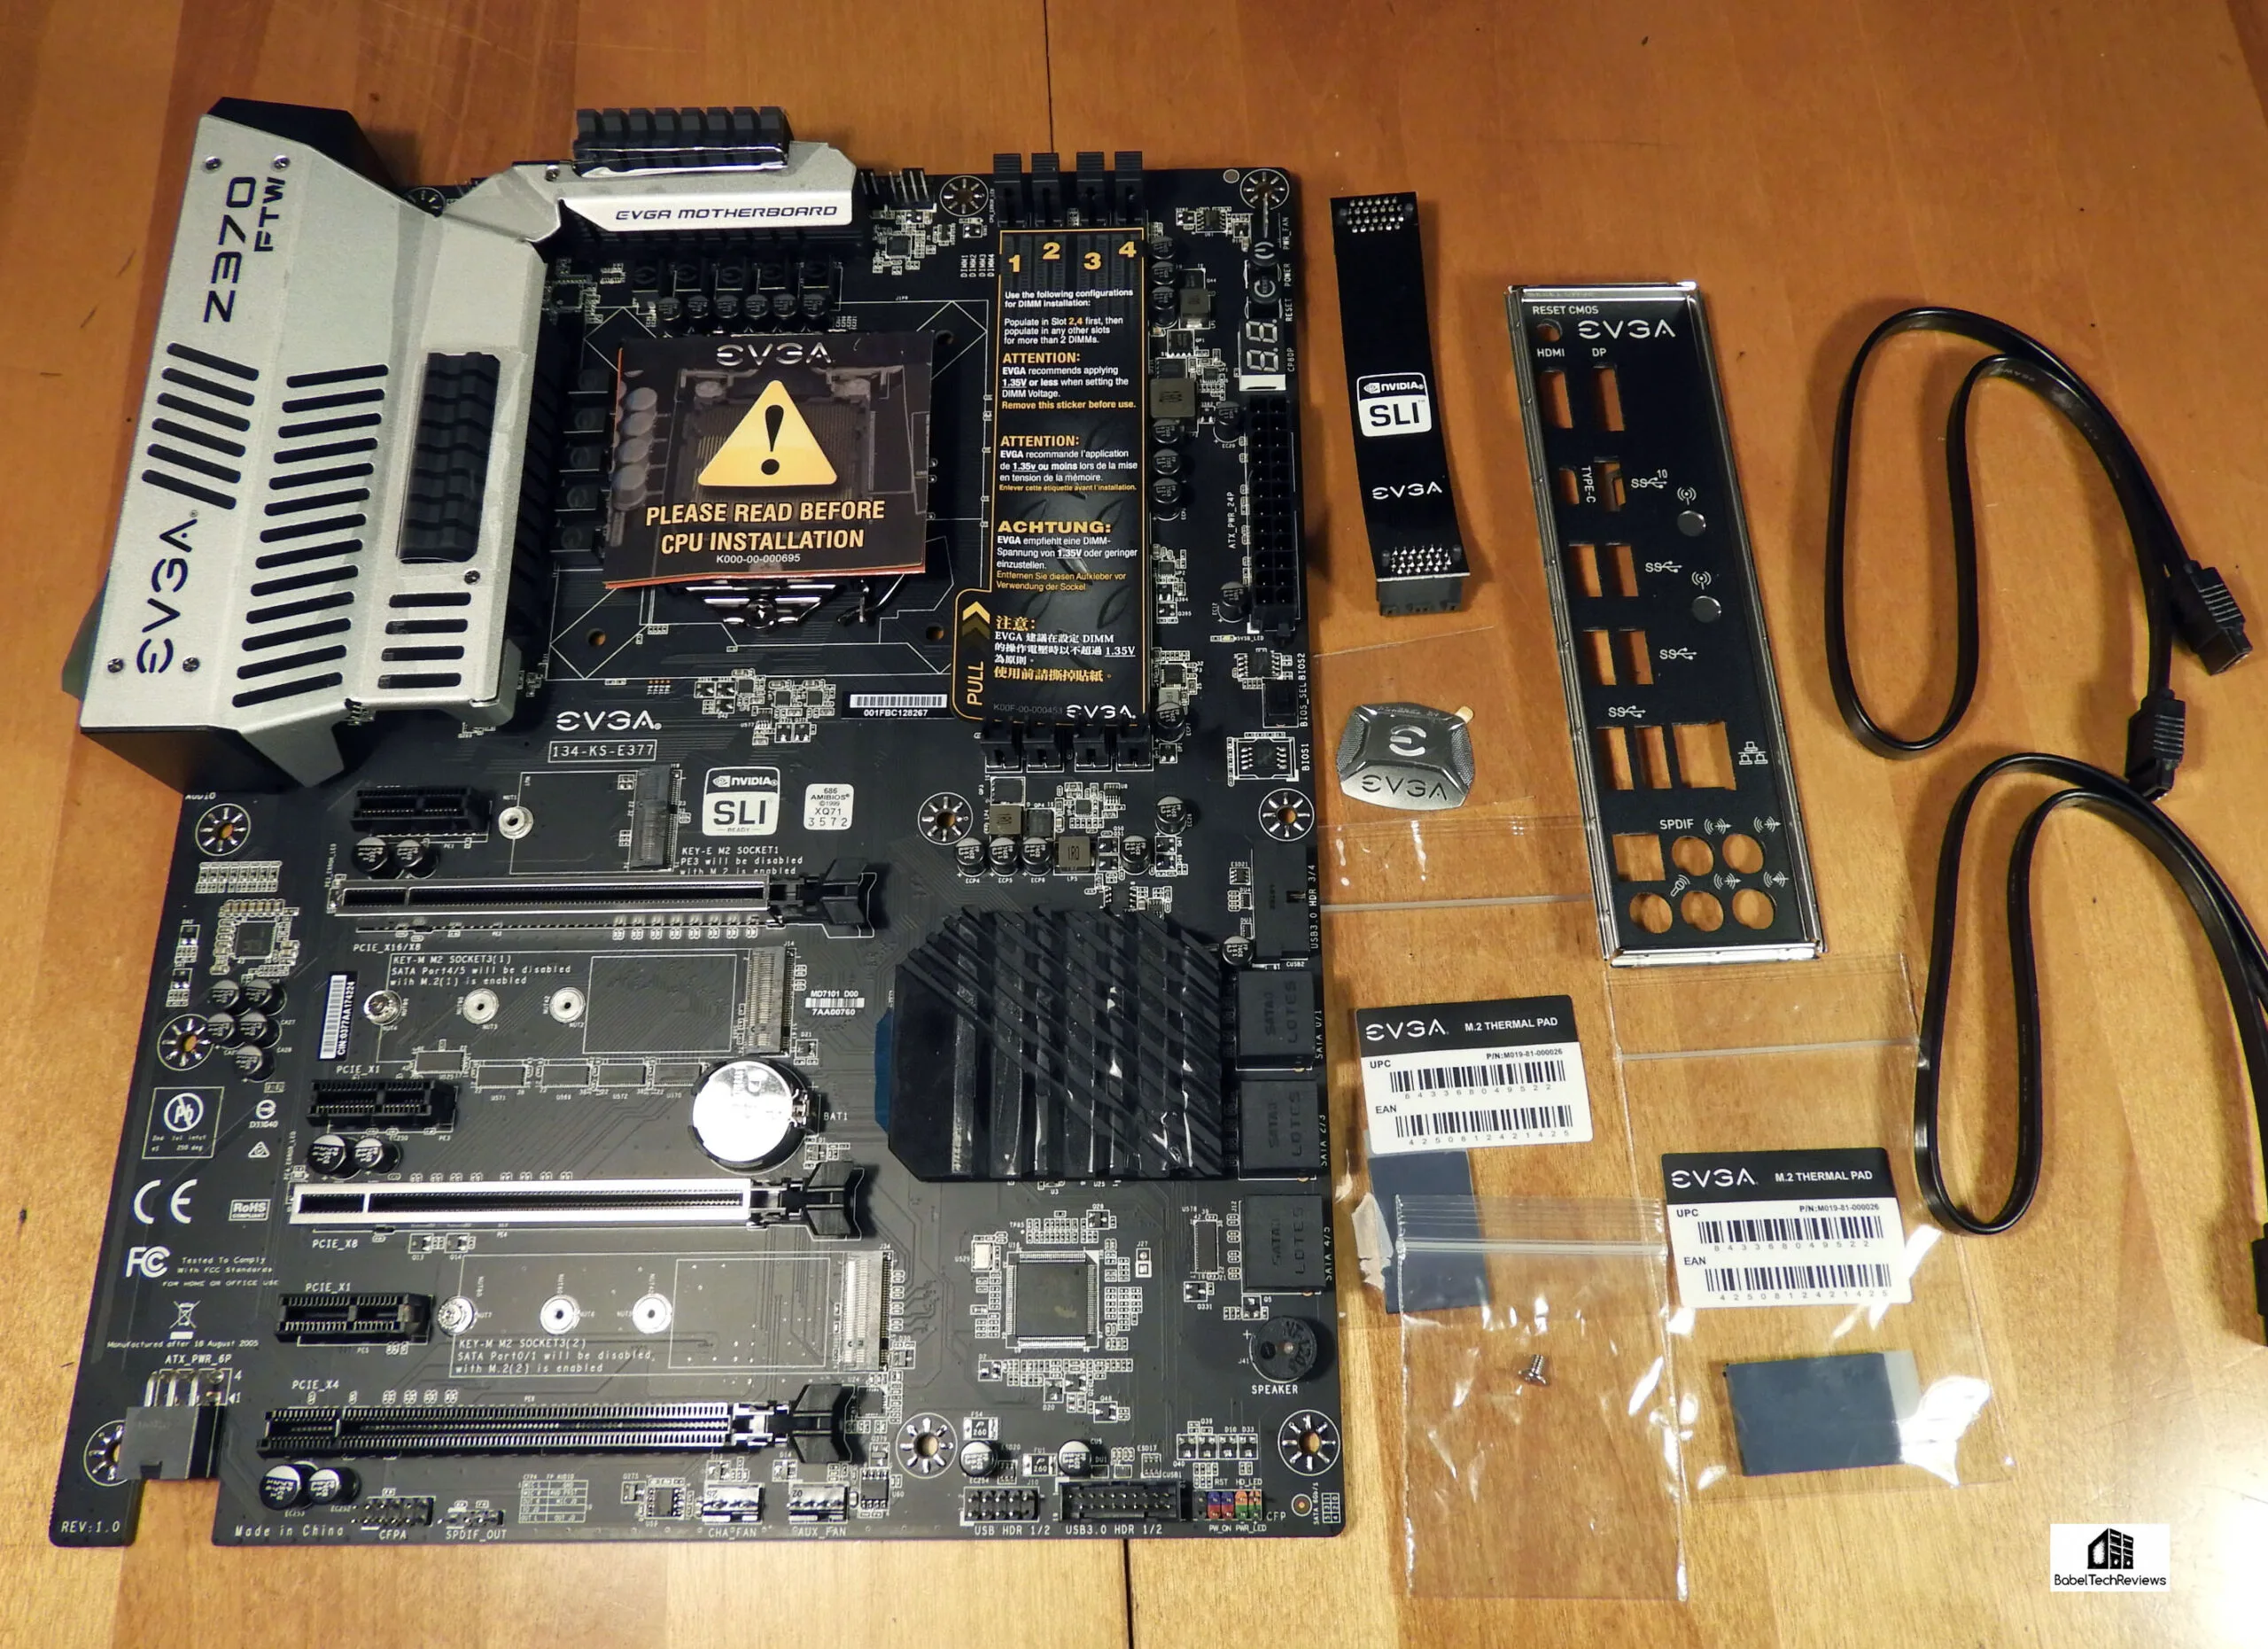 Besides the 2 SATA cables, thermal pads, SLI ribbon bridge, EVGA badge, mandatory manual, CD, quick-start guide and cover, the bundle is a little sparse.
Here is the back of the FTW motherboard.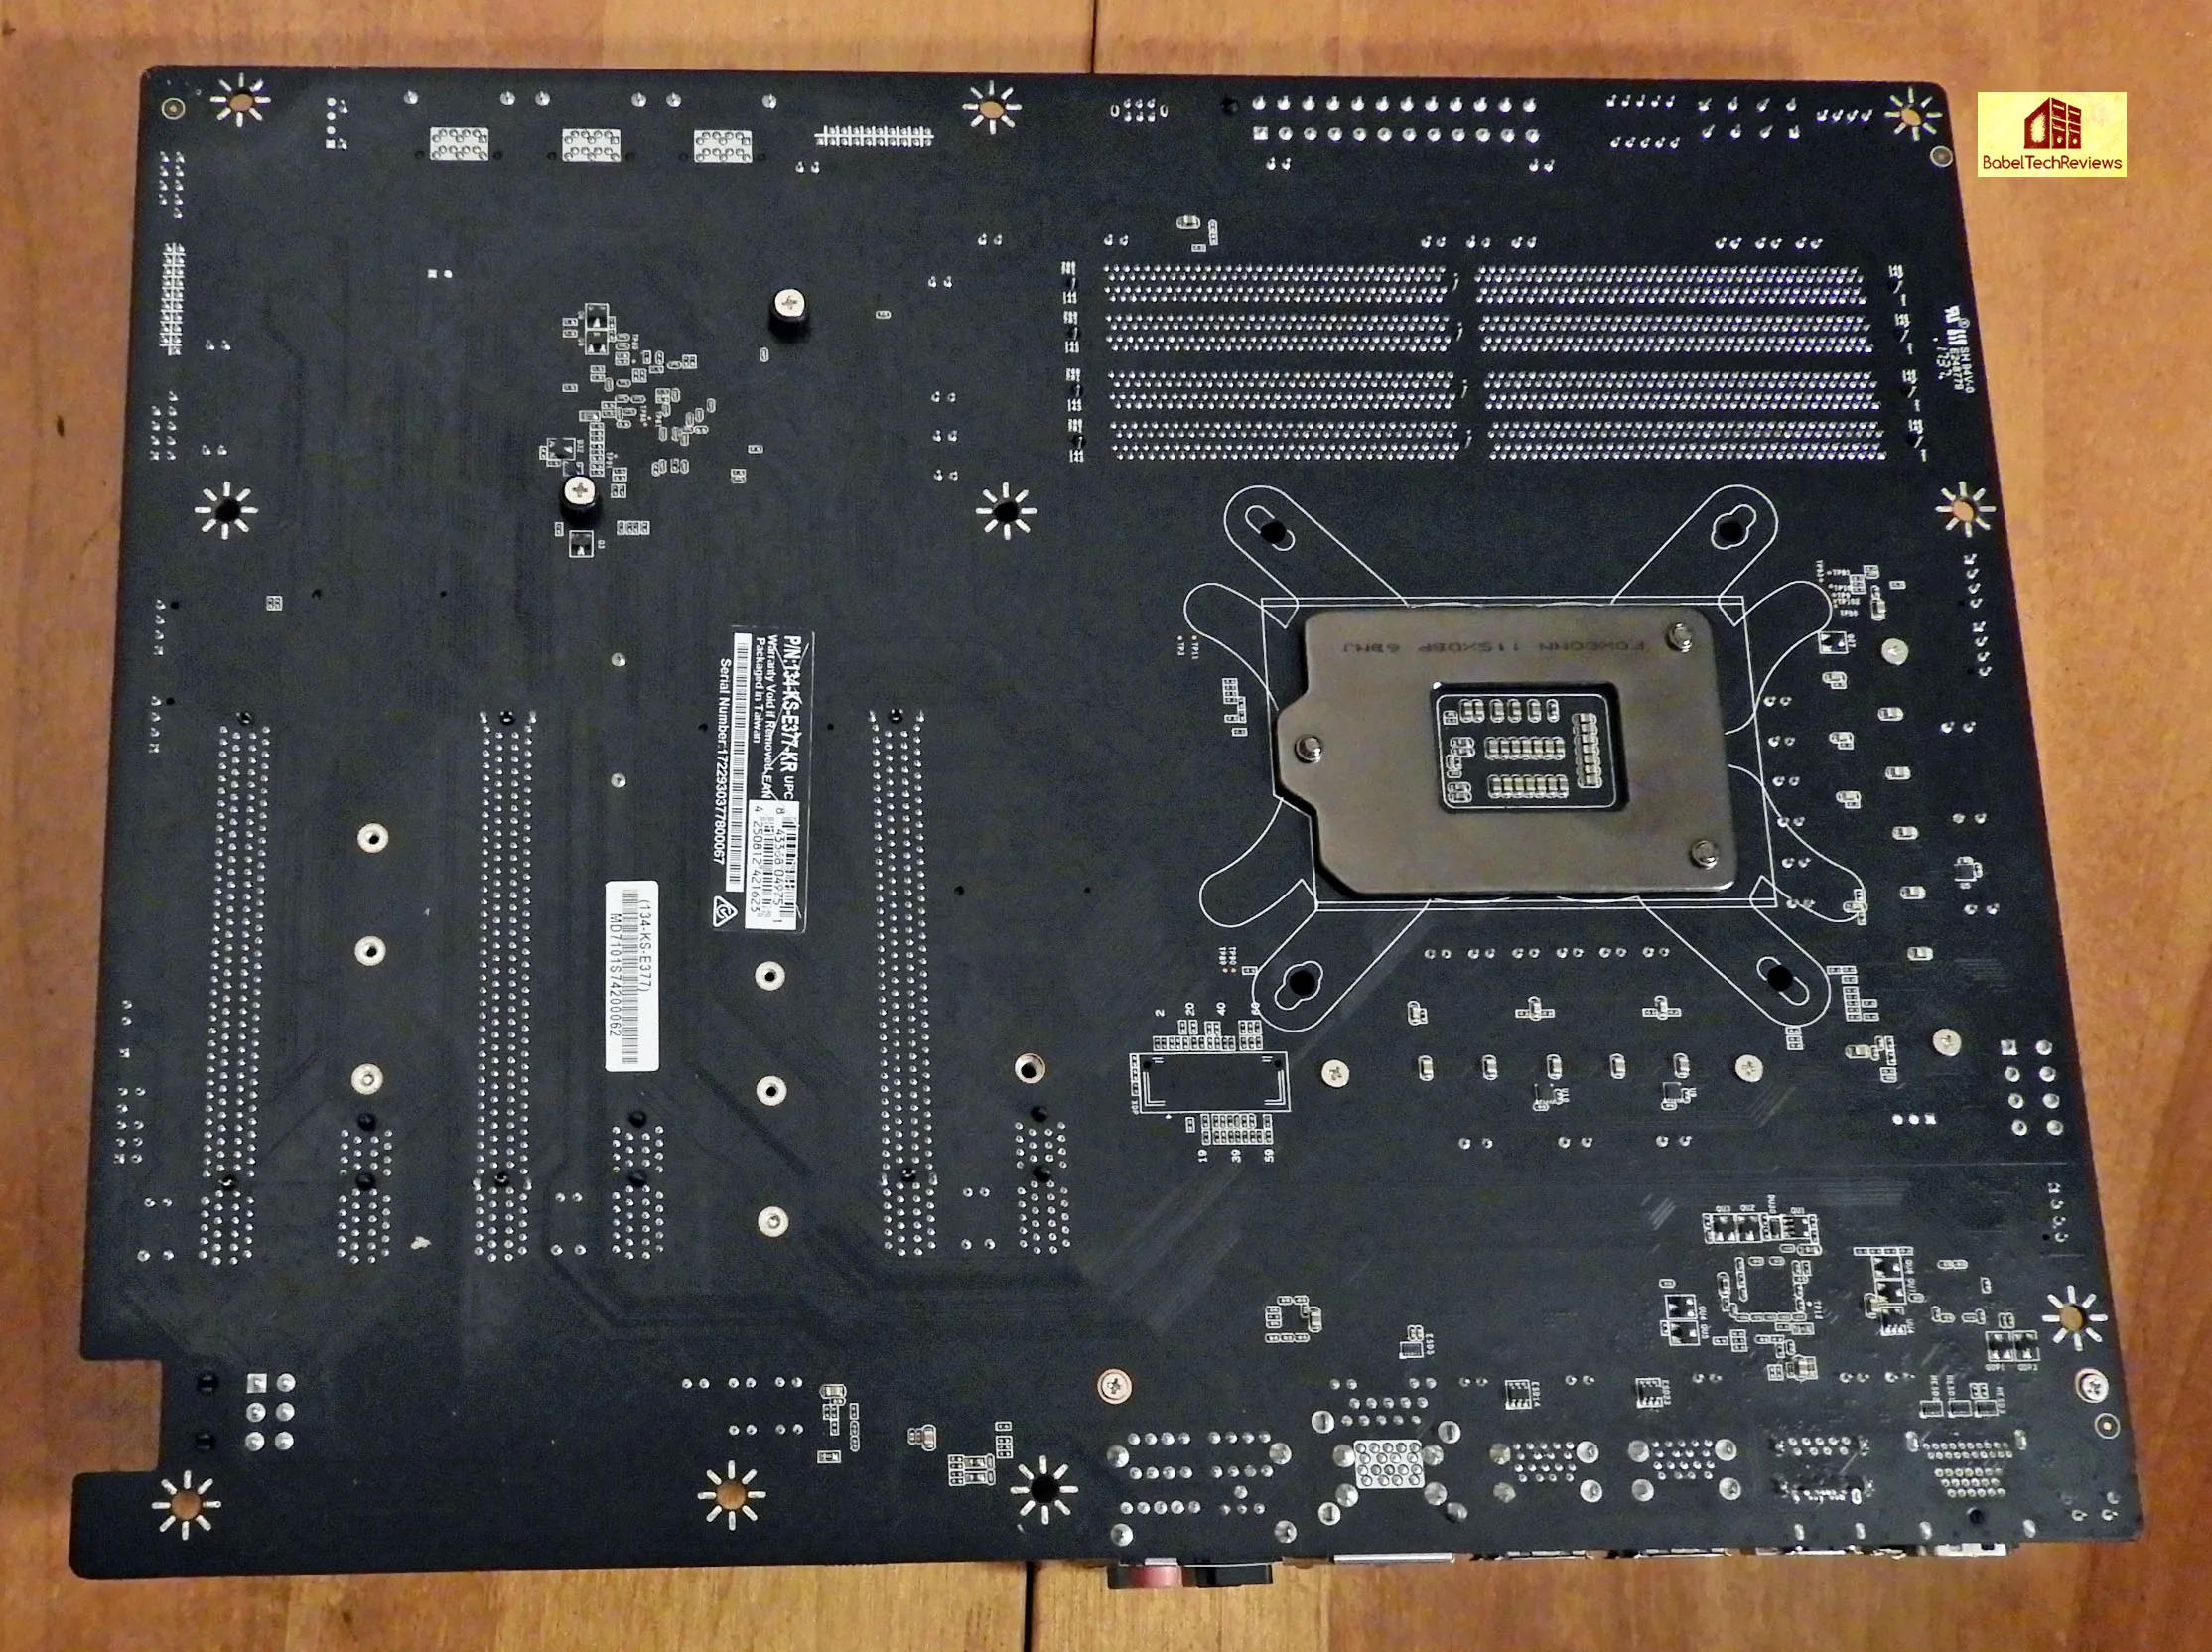
The manual is basic. There are several issues with accuracy (the SATA ports are mislabeled according to the BIOS) and the pictures don’t always match the motherboard exactly, but it is decent and it will get an experienced PC builder up and going quickly. The EVGA support forums contain a wealth of helpful tips from fellow enthusiasts, and the EVGA technical support is just a toll-free call away – 24/7. Our build turned out to be quite easy.
We started with a transplant from our ASRock Z370 Killer SLI/ac motherboard into the EVGA Z370 FTW motherboard.
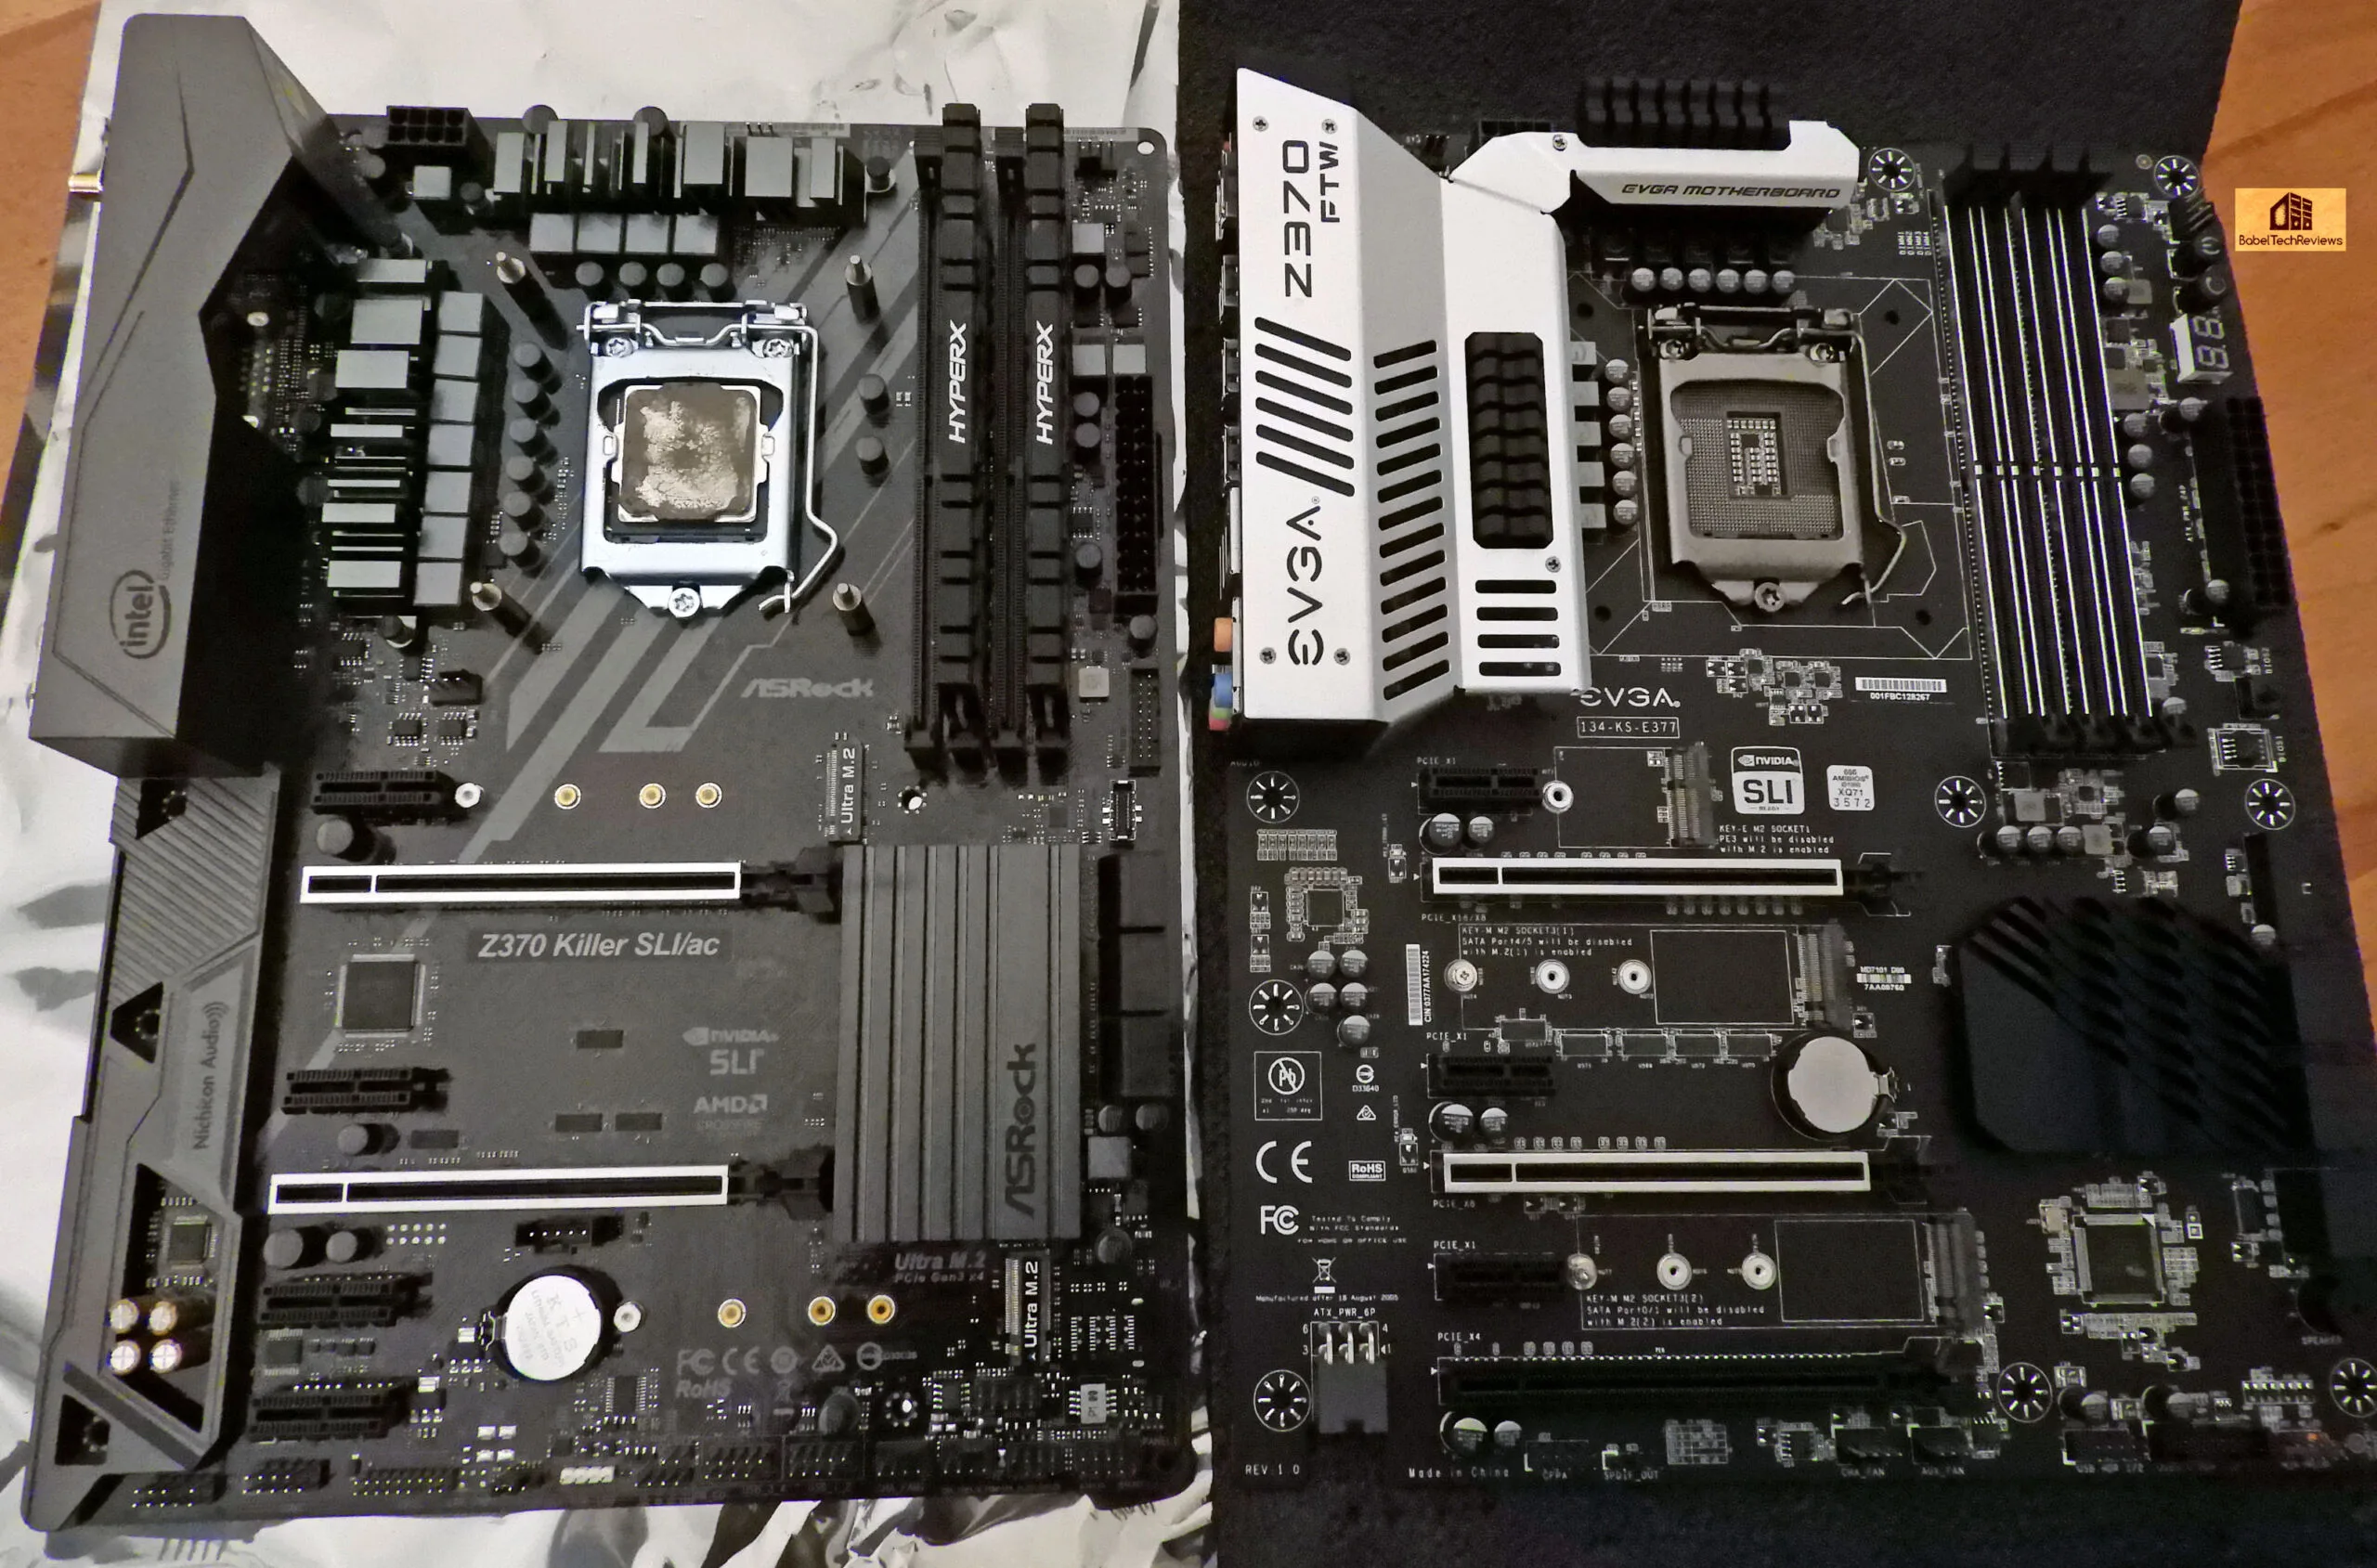
The ASRock motherboard may be a bit more fully featured with wireless AC, but we were unable to stabilize our i7-8700K at 4.8 GHz even with more than 1.4V. And we noted that leaving the voltage on automatic provided spikes in voltage that we deemed unacceptable. In contrast, we achieved 5.0 GHz with the EVGA FTW motherboard using 1.41V, but we also were able to leave it on automatic voltage where it did not spike over 1.45V. The only issue then became the high temperatures that resulted from the high voltage and overclock.
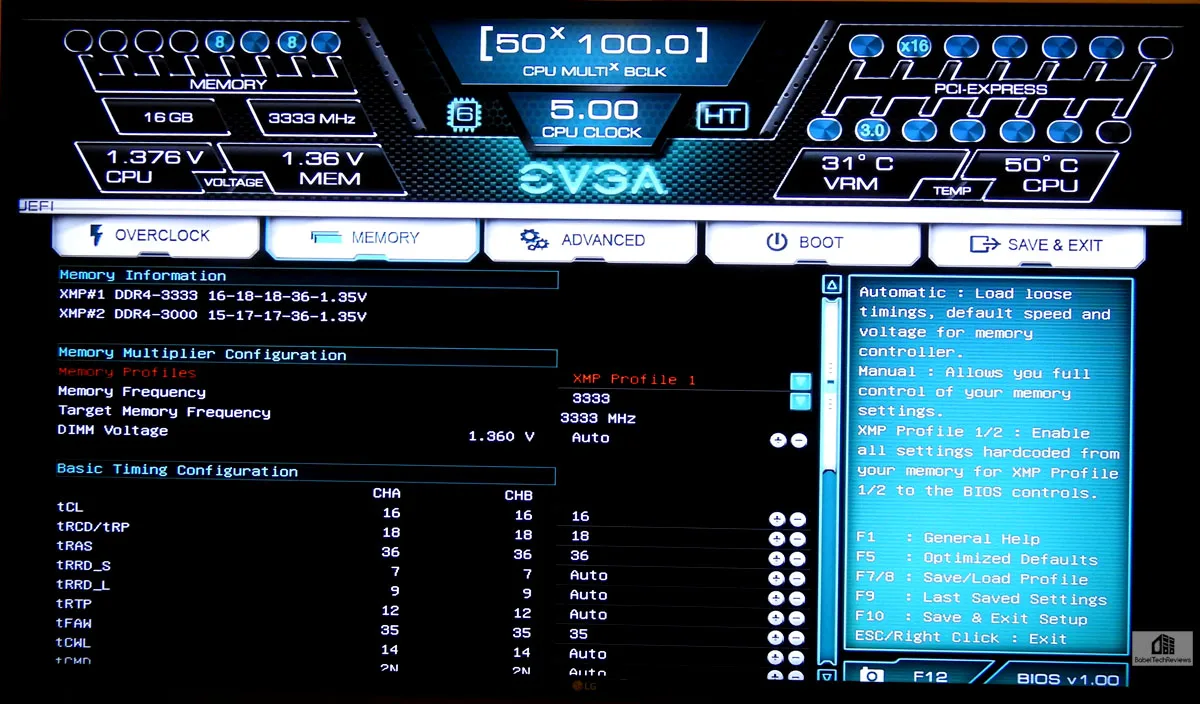
We pre-installed the memory and the CPU together with the backplate and CPU cooler standoffs and fastened them securely with the 9 screws to the standoffs in our full tower Thermaltake Chaser MK-II. We used 2x8GB of Kingston’s HyperX DDR4 at stock speeds of 3333 MHz using the automatic XMP profile 1 in the BIOS.
On the rear panel of the EVGA Z370 FTW, there is a Clear CMOS button, HDMI and DisplayPort video outputs, two USB 3.1 ports (red), the USB 3.1 ports (blue), the Intel network port, and the audio jacks.
We installed the CPU cooler using Arctic Silver 5 and attached all of the cables and wiring. 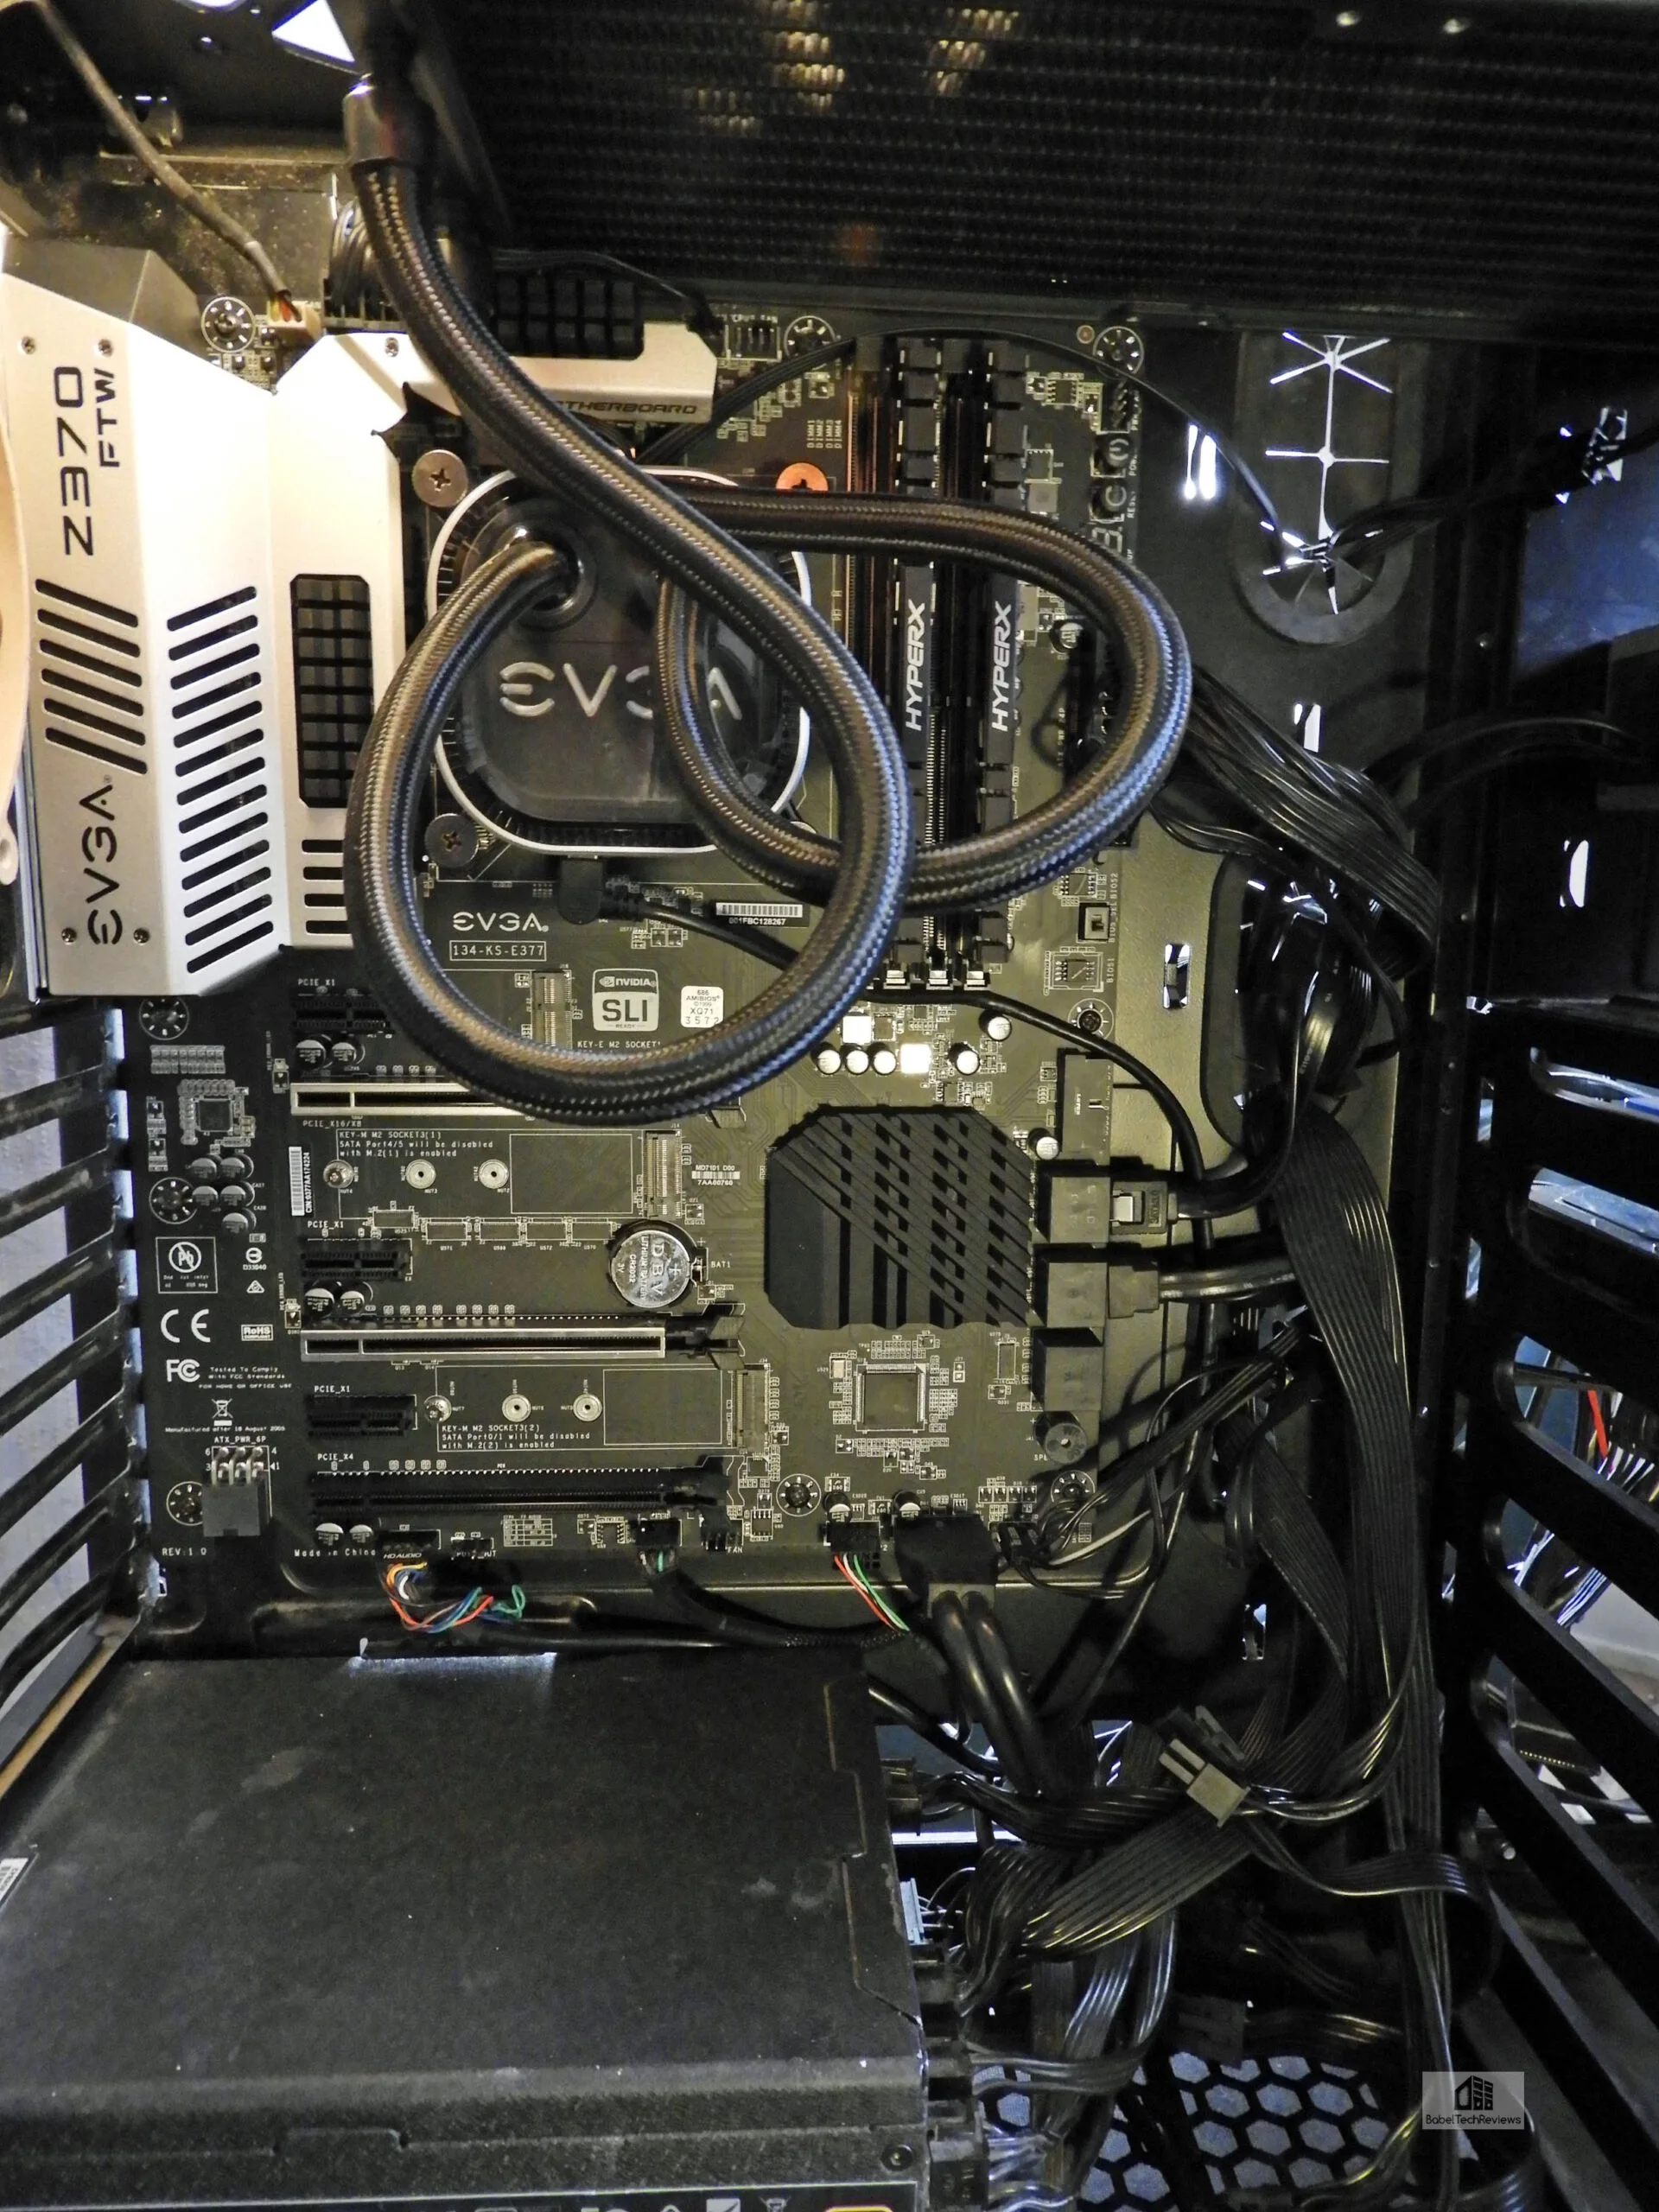 We did not like the direction of the cooler lines after we installed the CPU cooler pump contact plate and changed it later when we reseated our cooler and used Arctic Silver Ceramique for slightly cooler temperatures over using Arctic Silver 5.
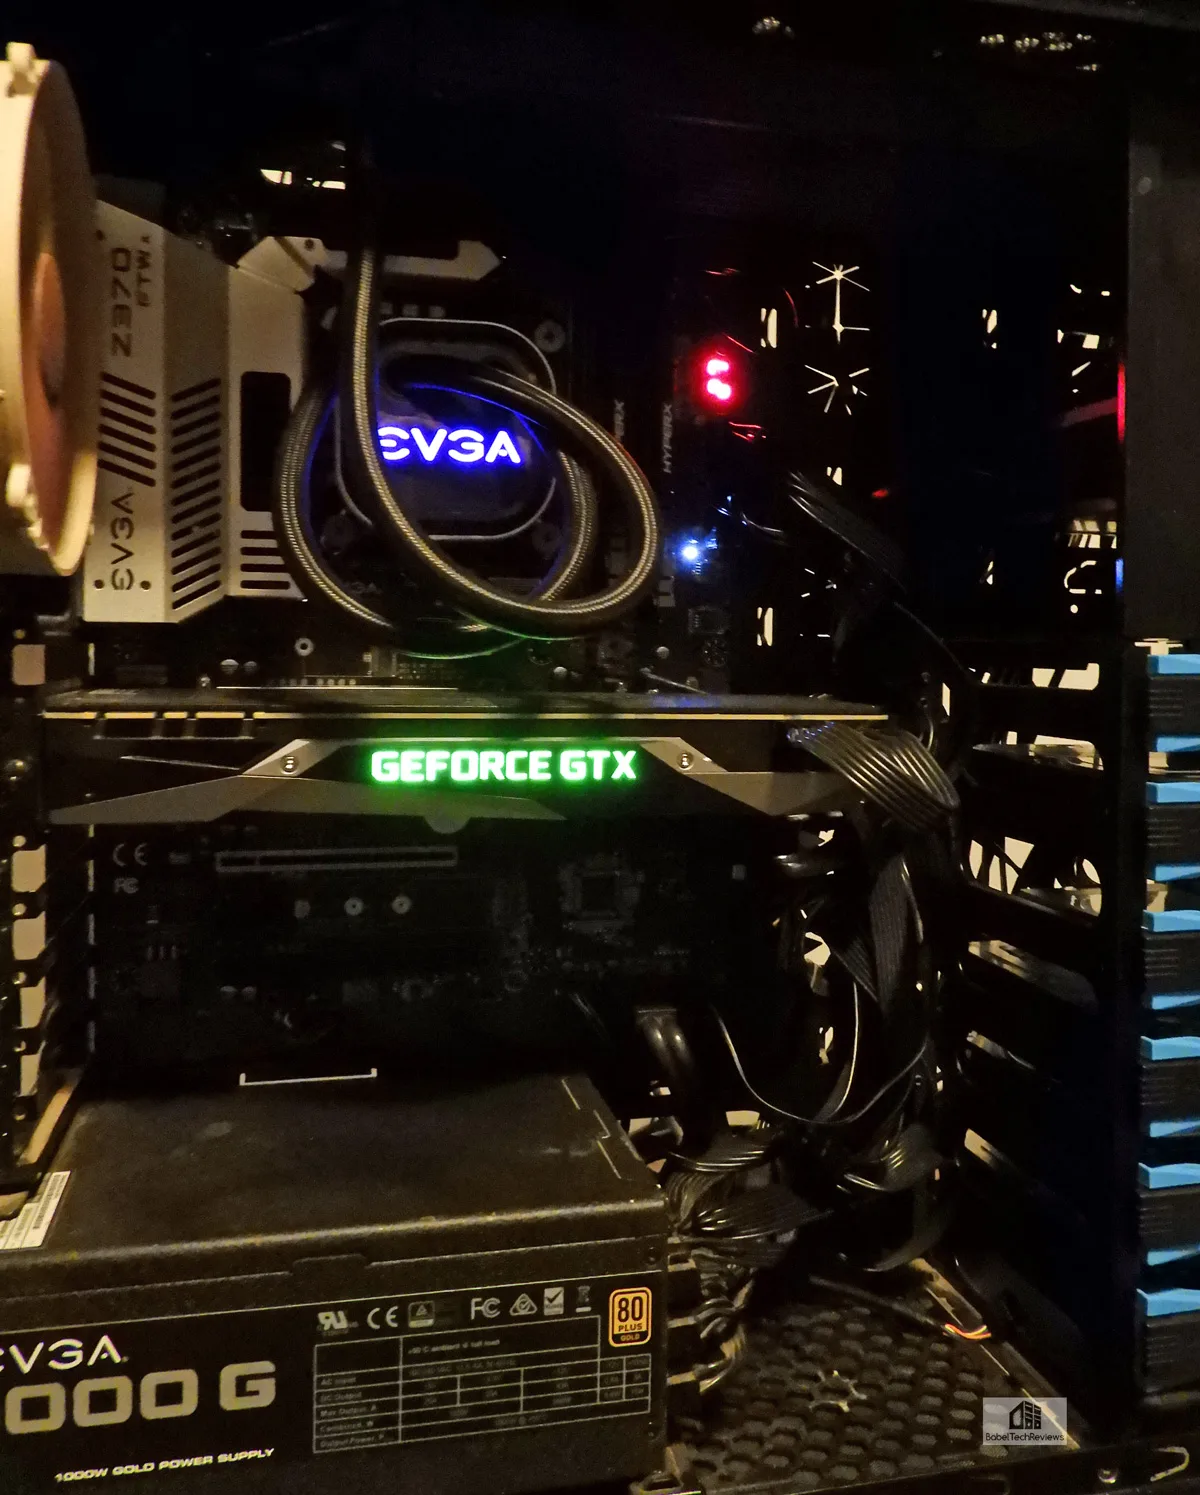
Well, it’s time to turn it on. And it started right up and went into the BIOS screen.
BIOS
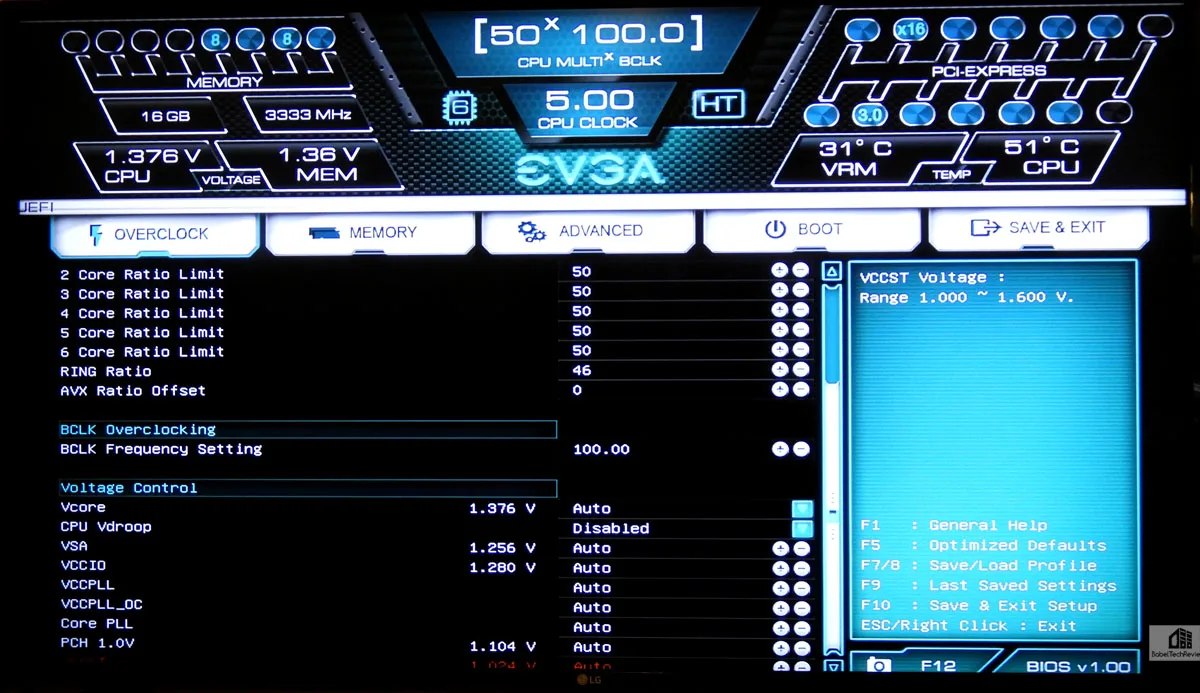
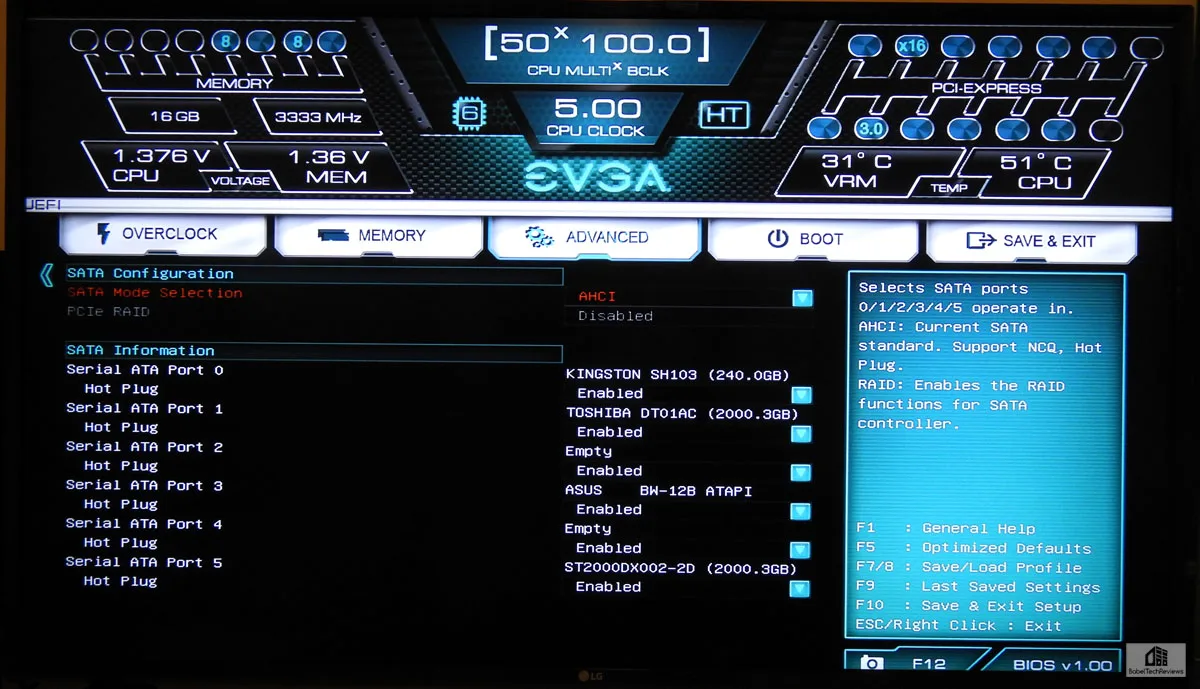
Upon reaching the BIOS with delete, you are presented immediately with a very overclocking friendly advanced screen. You can navigate the BIOS with keyboard or mouse, and although it is fully-featured, it is rather minimalist in our opinion which is an advantage as the options are easy to understand and they give full control to the user with setting the overclock.
Overclocking is simple. You switch from Automatic (3.7 GHz) to Manual and are presented with options to set the multiplier up or down from 47 (47×100 MHz=4.7 GHz). Setting the overall CPU Multiplier setting sets the individual cores to the same frequency or they may be adjusted individually. We picked a multiplier of 50 for 5.0 GHz. We also made sure the AVX Ratio offset was set to zero because we wanted all 6 cores to turbo to 5.0 GHz.
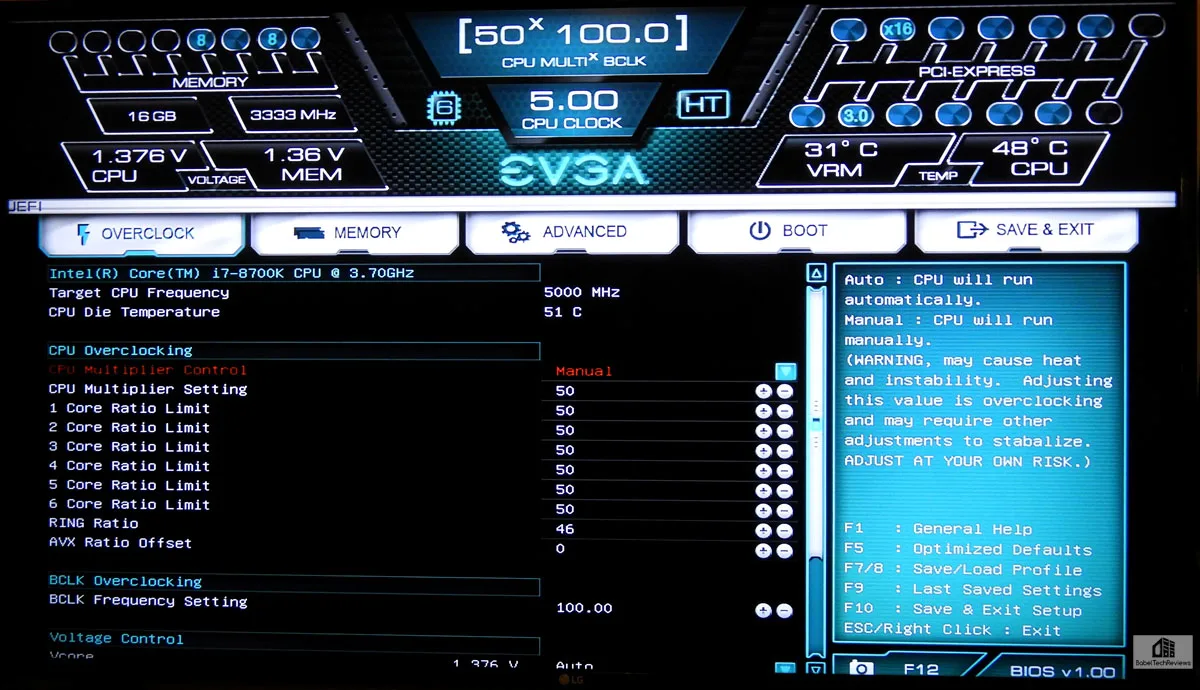 There are also options to set the BCLK Frequency but we only overclocked the core. Unlike with many motherboards that allow excessive voltage to flow to a highly overclocked CPU, the FTW is a rare board that did not allow excessive spikes (over 1.45V) even with the automatic setting at 5.0 GHz. However, we also found that setting the voltage manually to 1.41V in Vcore was enough to stabilize the CPU at 5.0 GHz although it still spiked to an observed 1.45V. We also disabled Vdroop.
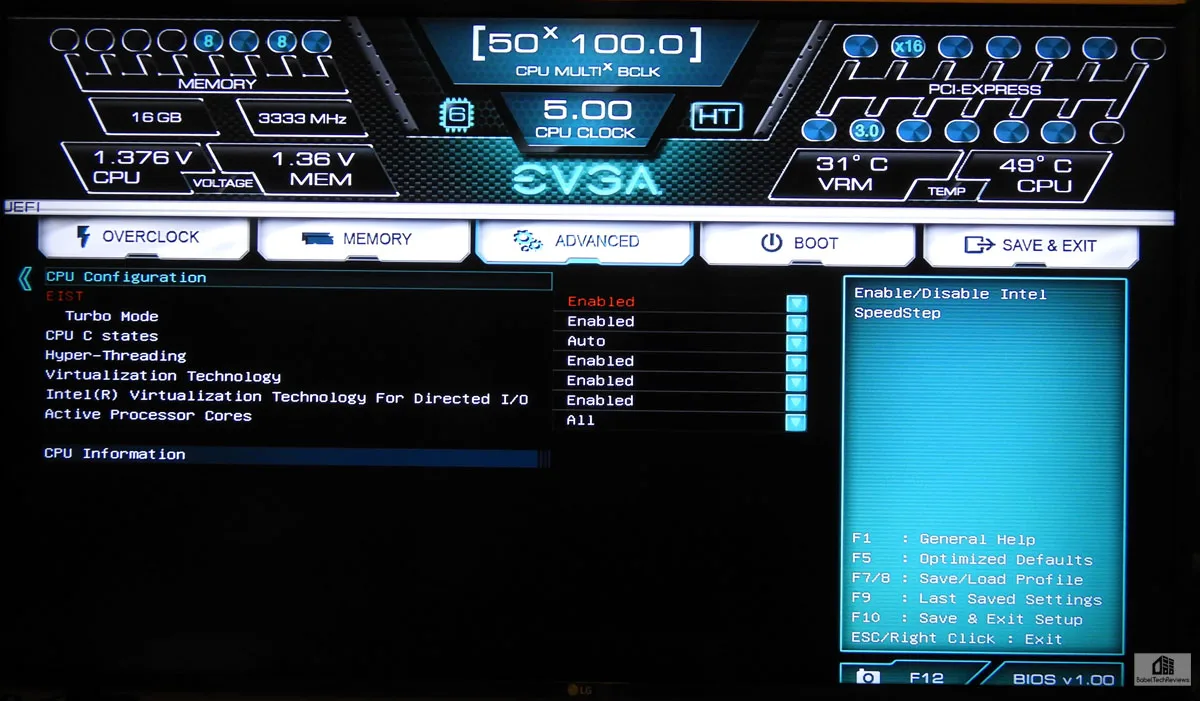
 In the Advanced options, the user is given many options including further fine-tuning of the CPU.
The user also has the ability to set individual fan settings. We used EVGA’s Flow Control under Windows to set our pump and fan speed, and for 5.0 GHz, they were on maximum.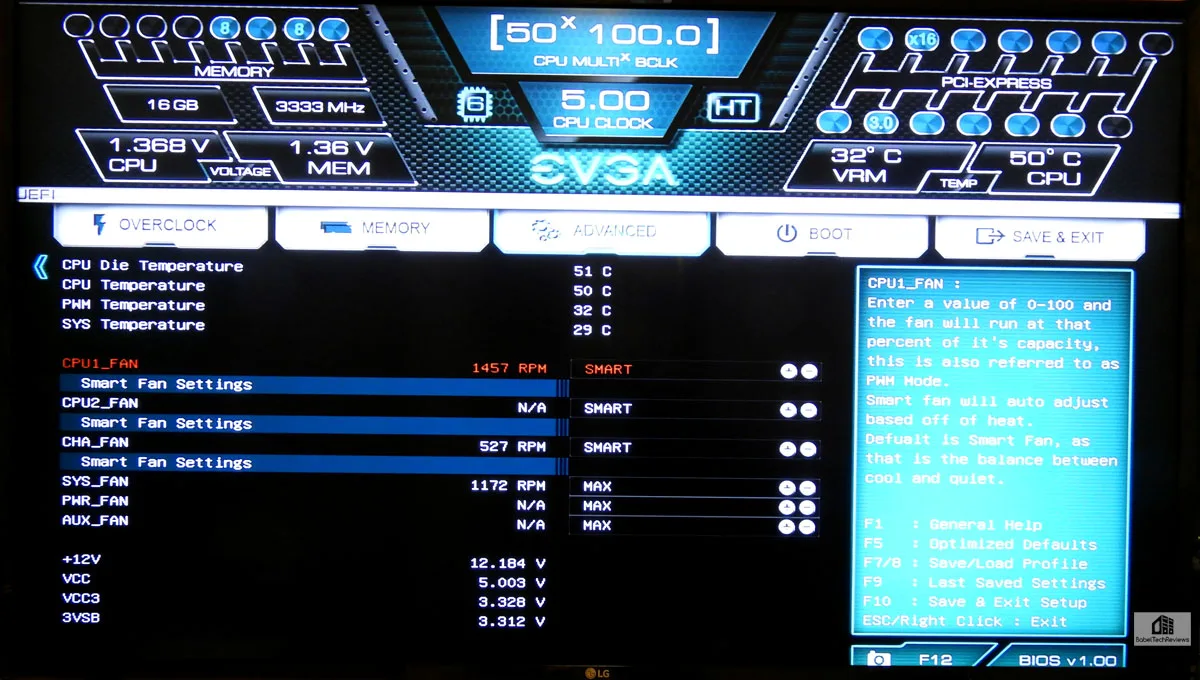 We are using HyperX DDR4 at 3333MHz rated speeds and the XMP Profile 1 identified it properly and set the settings accordingly. If we wished, we could overclock it and also set the individual timings to our liking.
 We are using a Kingston HyperX 240 GB SSD as our boot drive, a 2TB HDD (and now, a 2TB SSD) for general game storage, and another 2TB SSHD for our Windows Store and VR games and we were able to assign our ports as we wished.
  The only thing left to do is to Save Changes and Reset and we will be at 5.0 Ghz.
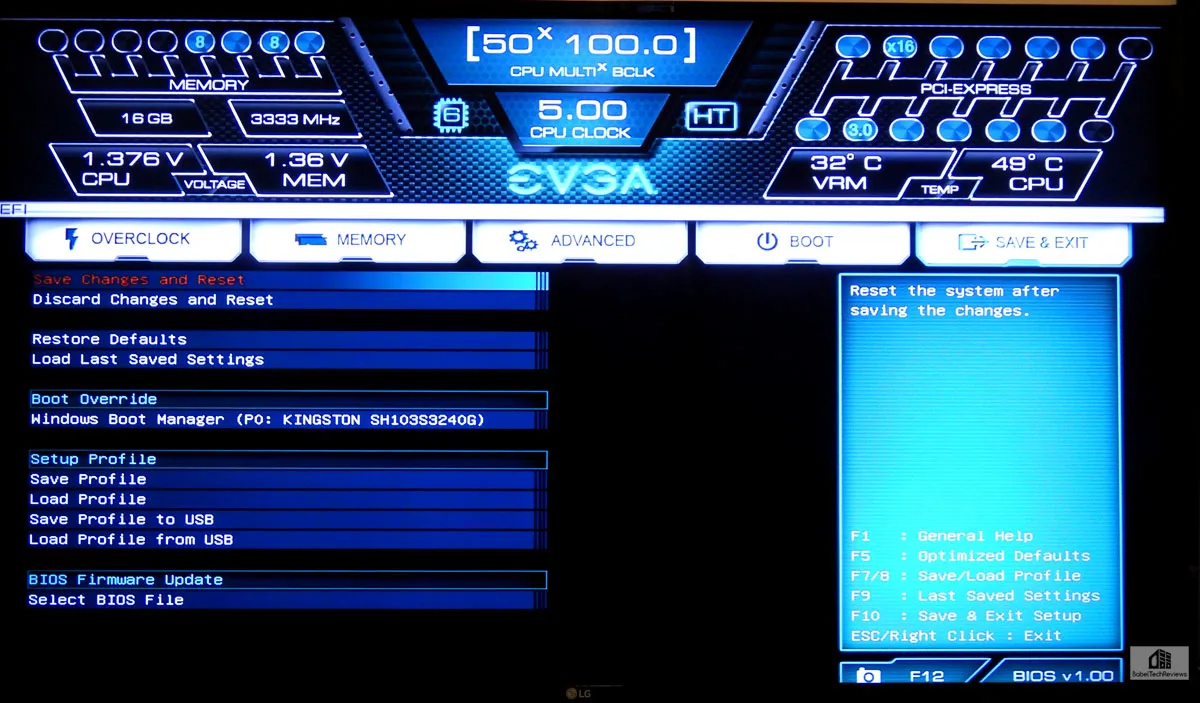 We really like this new BIOS especially compared with the Z77 (Ivy Bridge) FTW motherboard. This one is much easier to navigate, less complex, more intuitive – overall, most improved! We were also impressed that a CPU that wouldn’t reach 4.8 GHz completely stable in our ASRock Z370 motherboard, had no issues other than thermal in the FTW – definitely overclocking For The Win!
Overclocking, Voltage, and Temperatures
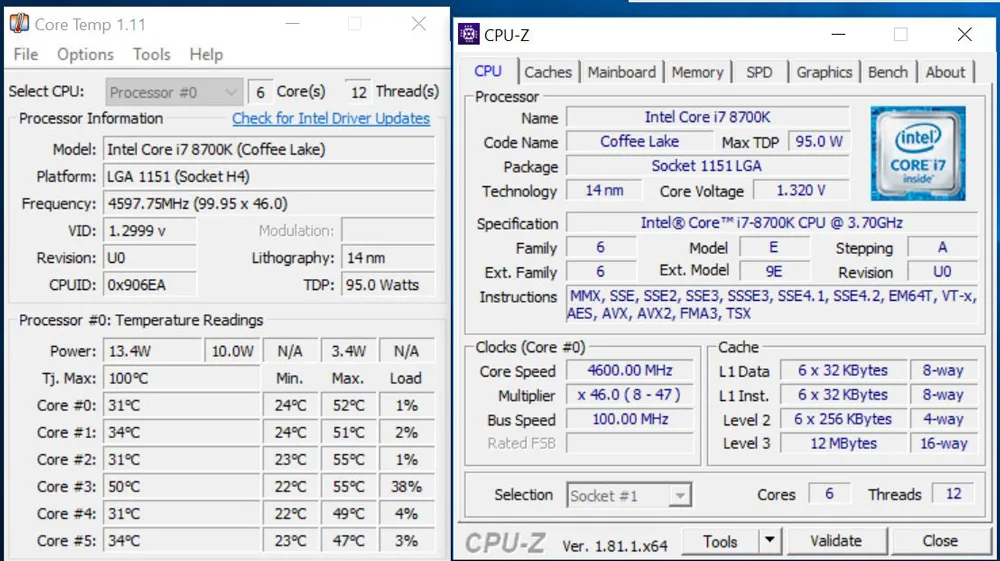
CPUz shows the i7-8700K overclocked to 4.6 GHz, and Core Temp shows the maximum temperatures after 24 hours of gaming and running game benchmarks. Temperatures are quite reasonable in the upper 40s C to mid-50s C and not much higher than at stock since very little extra added voltage is needed – we even leave it on automatic since there are no voltage spikes.
However, when we overclock further to 4.9 GHz, the voltage requirements exceed 1.4V and temperatures spike into the 80s C under gaming load and into the 90s C under synthetic benches full load such as using Linpack or OCCT. We are still able to use our EVGA 240mm CLC with a modified aggressive fan profile, but when we bump the frequencies to 5.0 GHz, we have to run our fan and pump at 100% and voltages are approaching 1.45V and temperatures are rather high for any long-term benching.
Driver Installation
The EVGA motherboard driver CD works automatically, quickly, and painlessly to install the needed drivers. The latest drivers can always be found on EVGA’s web site, but at the time of writing, the CD has the very latest.
Let’s look next at our test configuration before we do any benching
Test Configuration
Test Configuration – Hardware
- Intel Core i7-8700K (HyperThreading and Turbo boost is on – first at stock settings; to 4.6 GHz; to 4.9 GHz; and to 5.0 GHz for all six cores. Coffee Lake DX11 CPU graphics.
- EVGA Z370 FTW motherboard (Intel Z370 chipset, latest BIOS, PCIe 3.0/3.1 specification, CrossFire/SLI 8x+8x), supplied by EVGA
- ASRock Z370 Killer SLI/AC motherboard (Intel Z370 chipset, latest BIOS, PCIe 3.0/3.1 specification, CrossFire/SLI 8x+8x)
- HyperX 16GB DDR4 (2x8GB, dual channel at 3333MHz), supplied by HyperX/Kingston
- TITAN Xp 12GB, Star Wars Collector’s Edition, stock clocks, supplied by NVIDIA
- GTX 1080 Ti Founders Edition 8GB, stock clocks, supplied by NVIDIA
- 240GB HyperX SSD, supplied by Kingston, for the OS
- 2TB Toshiba 7200 rpm HDD for storage
- 2TB Seagate 7200 rpm SSHD for storage
- 2TB Micron Enterprise SSD for storage
- EVGA 1000G 1000W power supply unit
- EVGA CLC 280mm CPU water cooler, supplied by EVGA
- Onboard Realtek Audio
- Genius SP-D150 speakers, supplied by Genius
- Thermaltake Overseer RX-1, full tower case supplied by Thermaltake
- ASUS 12X Blu-ray writer
- Monoprice Crystal Pro 4K
Test Configuration – Software
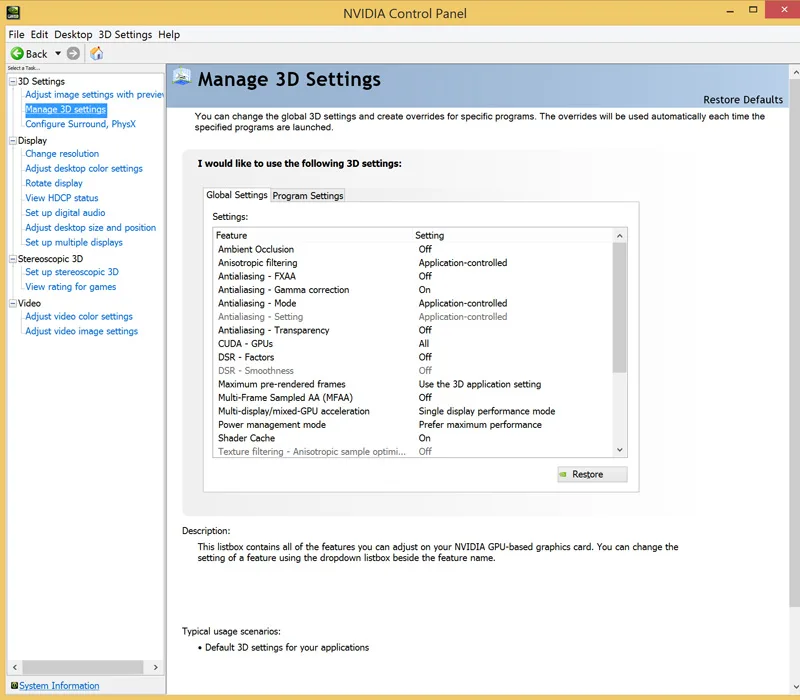
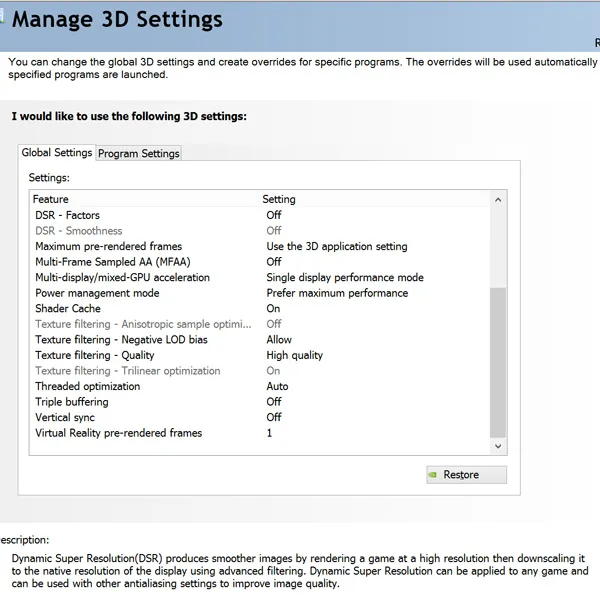
- Nvidia’s GeForce 388.31 WHQL drivers were used. High Quality, prefer maximum performance, single display.
- VSync is off in the control panel.
- AA enabled as noted in games; all in-game settings are specified with 16xAF always applied
- All results show average frame rates including minimum frame rates shown in italics on the chart next to the averages in smaller font.
- Highest quality sound (stereo) used in all games.
- Windows 10 64-bit Home edition. All DX11 titles were run under DX11 render paths, DX12 titles are run under the DX12 render path, and two Games use the Vulkan API (and 1 game also uses the OpenGL path)
- Latest DirectX
- All games are patched to their latest versions at time of publication.
- MSI’s Afterburner, latest version.
- OCAT, latest version
- Core Temp, latest version 1.11
- CPUz, latest version 1.81.1 x64
- Fraps, latest version
35 PC Game benchmark suite & 4 synthetic tests
Synthetic
- Firestrike – Basic & Extreme
- Time Spy DX12
- VRMark Orange Room
- VRMark Cyan Room
- VRMark Blue Room
DX11 Games
- Crysis 3
- Metro: Last Light Redux (2014)
- Grand Theft Auto V
- The Witcher 3
- Fallout 4
- Assassin’s Creed Syndicate
- Just Cause 3
- Rainbow Six Siege
- DiRT Rally
- Far Cry Primal
- Call of Duty Infinite Warfare
- Battlefield 1
- Watch Dogs 2
- Resident Evil 7
- For Honor
- Ghost Recon Wildlands
- Mass Effect: Andromeda
- Prey
- DiRT 4
- Project CARS 2
- Middle Earth: Shadow of War
- Assassin’s Creed Origins
- Destiny 2
- Star Wars: Battlefront II
DX12 Games
- Tom Clancy’s The Division
- Ashes of the Singularity
- Ashes of the Singularity: Escalation
- Hitman
- Rise of the Tomb Raider
- Deus Ex Mankind Divided
- Civilization VI
- Sniper Elite 4
- Total War: Warhammer II
Vulkan Games
- DOOM
- Wolfenstein: The New Order
Synthetic Benching Suites
- SiSoft Sandra 2017
- PC Mark 10
Other benching SW
- AS SSD
- WPrime
- Super Pi
- Crystal Disk Mark
- HWBot x265
- Cinebench
Nvidia Control Panel settings:
We used MSI’s Afterburner to set the power and temp limits to their maximums.
We used MSI’s Afterburner to set the GeForce cards’ Power and Temperature targets to their maximum.
Let’s head to our performance charts.
Synthetic Benching Suites
SiSoft Sandra 2017
Before we get to gaming, we want to see exactly where the the stock i7-8700K and the overclocked results differ, and there is no better tool than SiSoft’s Sandra 2017. SiSoftware Sandra (the System ANalyser, Diagnostic and Reporting Assistant) is an complete information & diagnostic utility in one complete package. It is able to provide all the information about your hardware, software and other devices for diagnosis and for benchmarking. In addition, Sandra is derived from a Greek name that means “defender” or “helper” – a Wonder Woman of benching indeed.
There are several versions of Sandra 2017, including a free version of Sandra Lite that anyone can download and use. It is highly recommended! SiSoft’s Sandra 2017 is the very latest version and we are using the full engineer suite courtesy of SiSoft, with quite a few improvements over Sandra 2016.
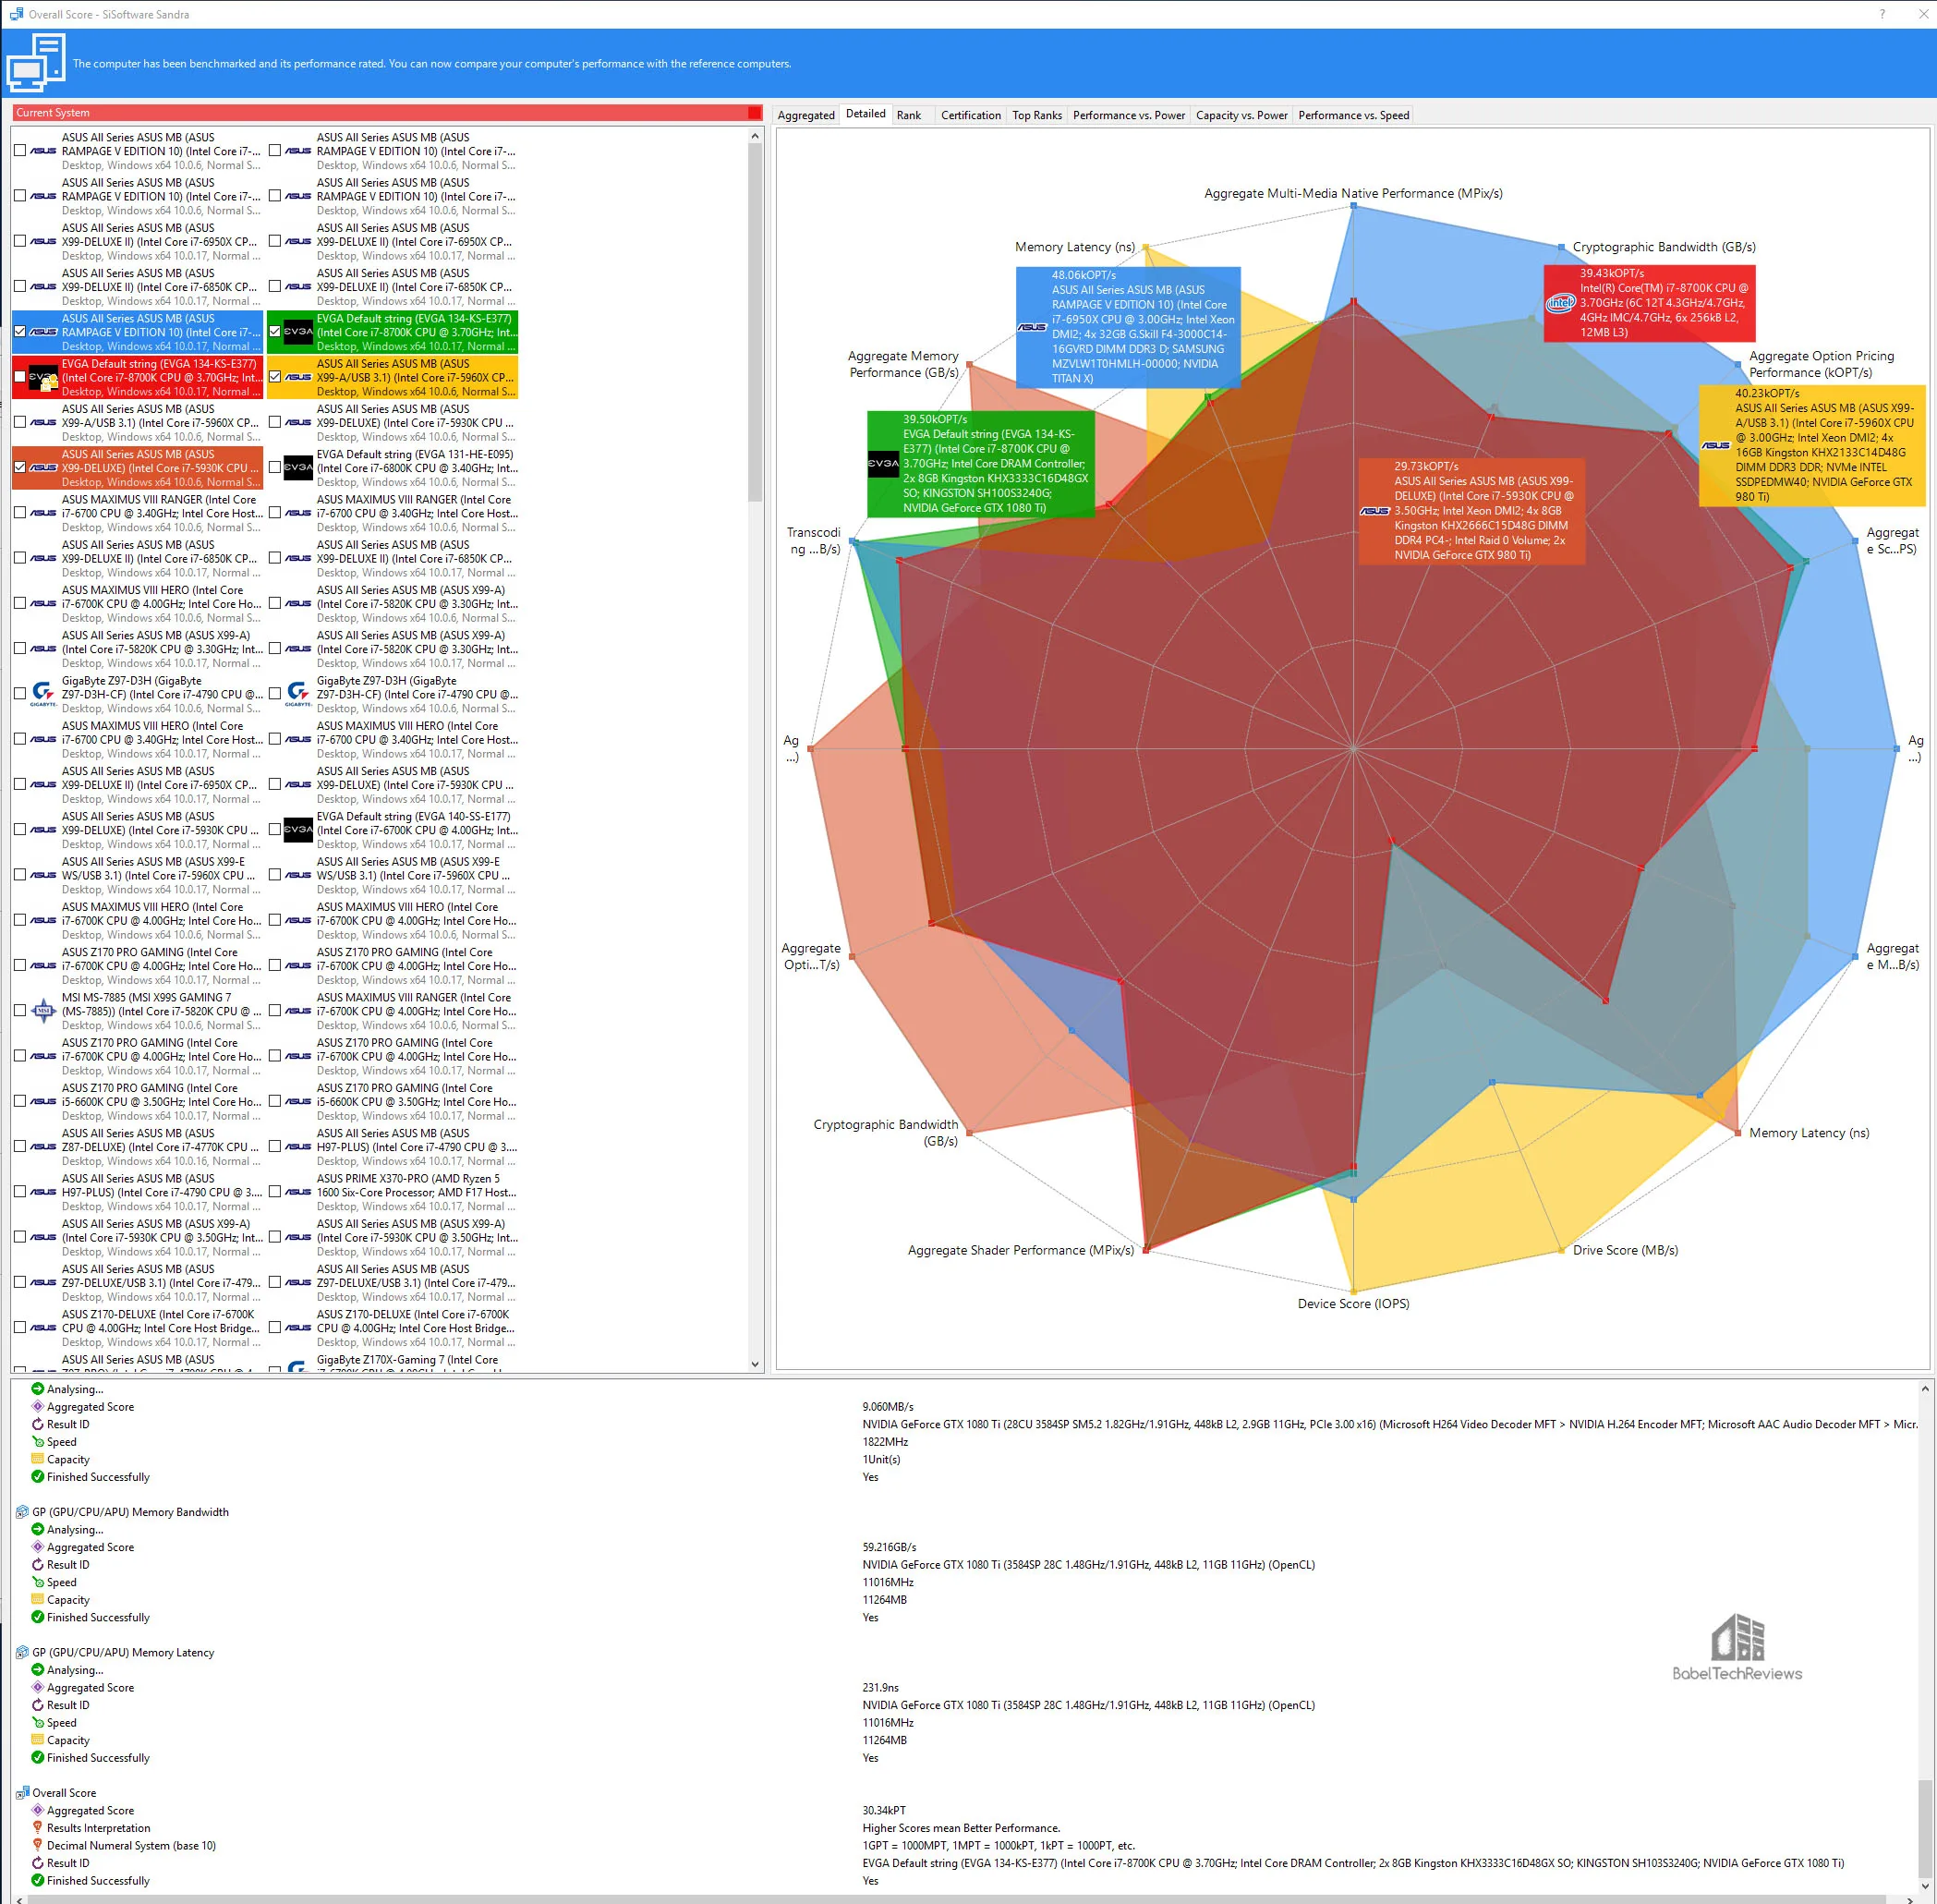
First we run the very latest full Sandra benchmark suite with the EVGA FTW Z370 motherboard and Core i7-8770K at stock settings.
The EVGA Z370 motherboard ranks rather highly overall. Now here are the same benches at 4.6 GHz.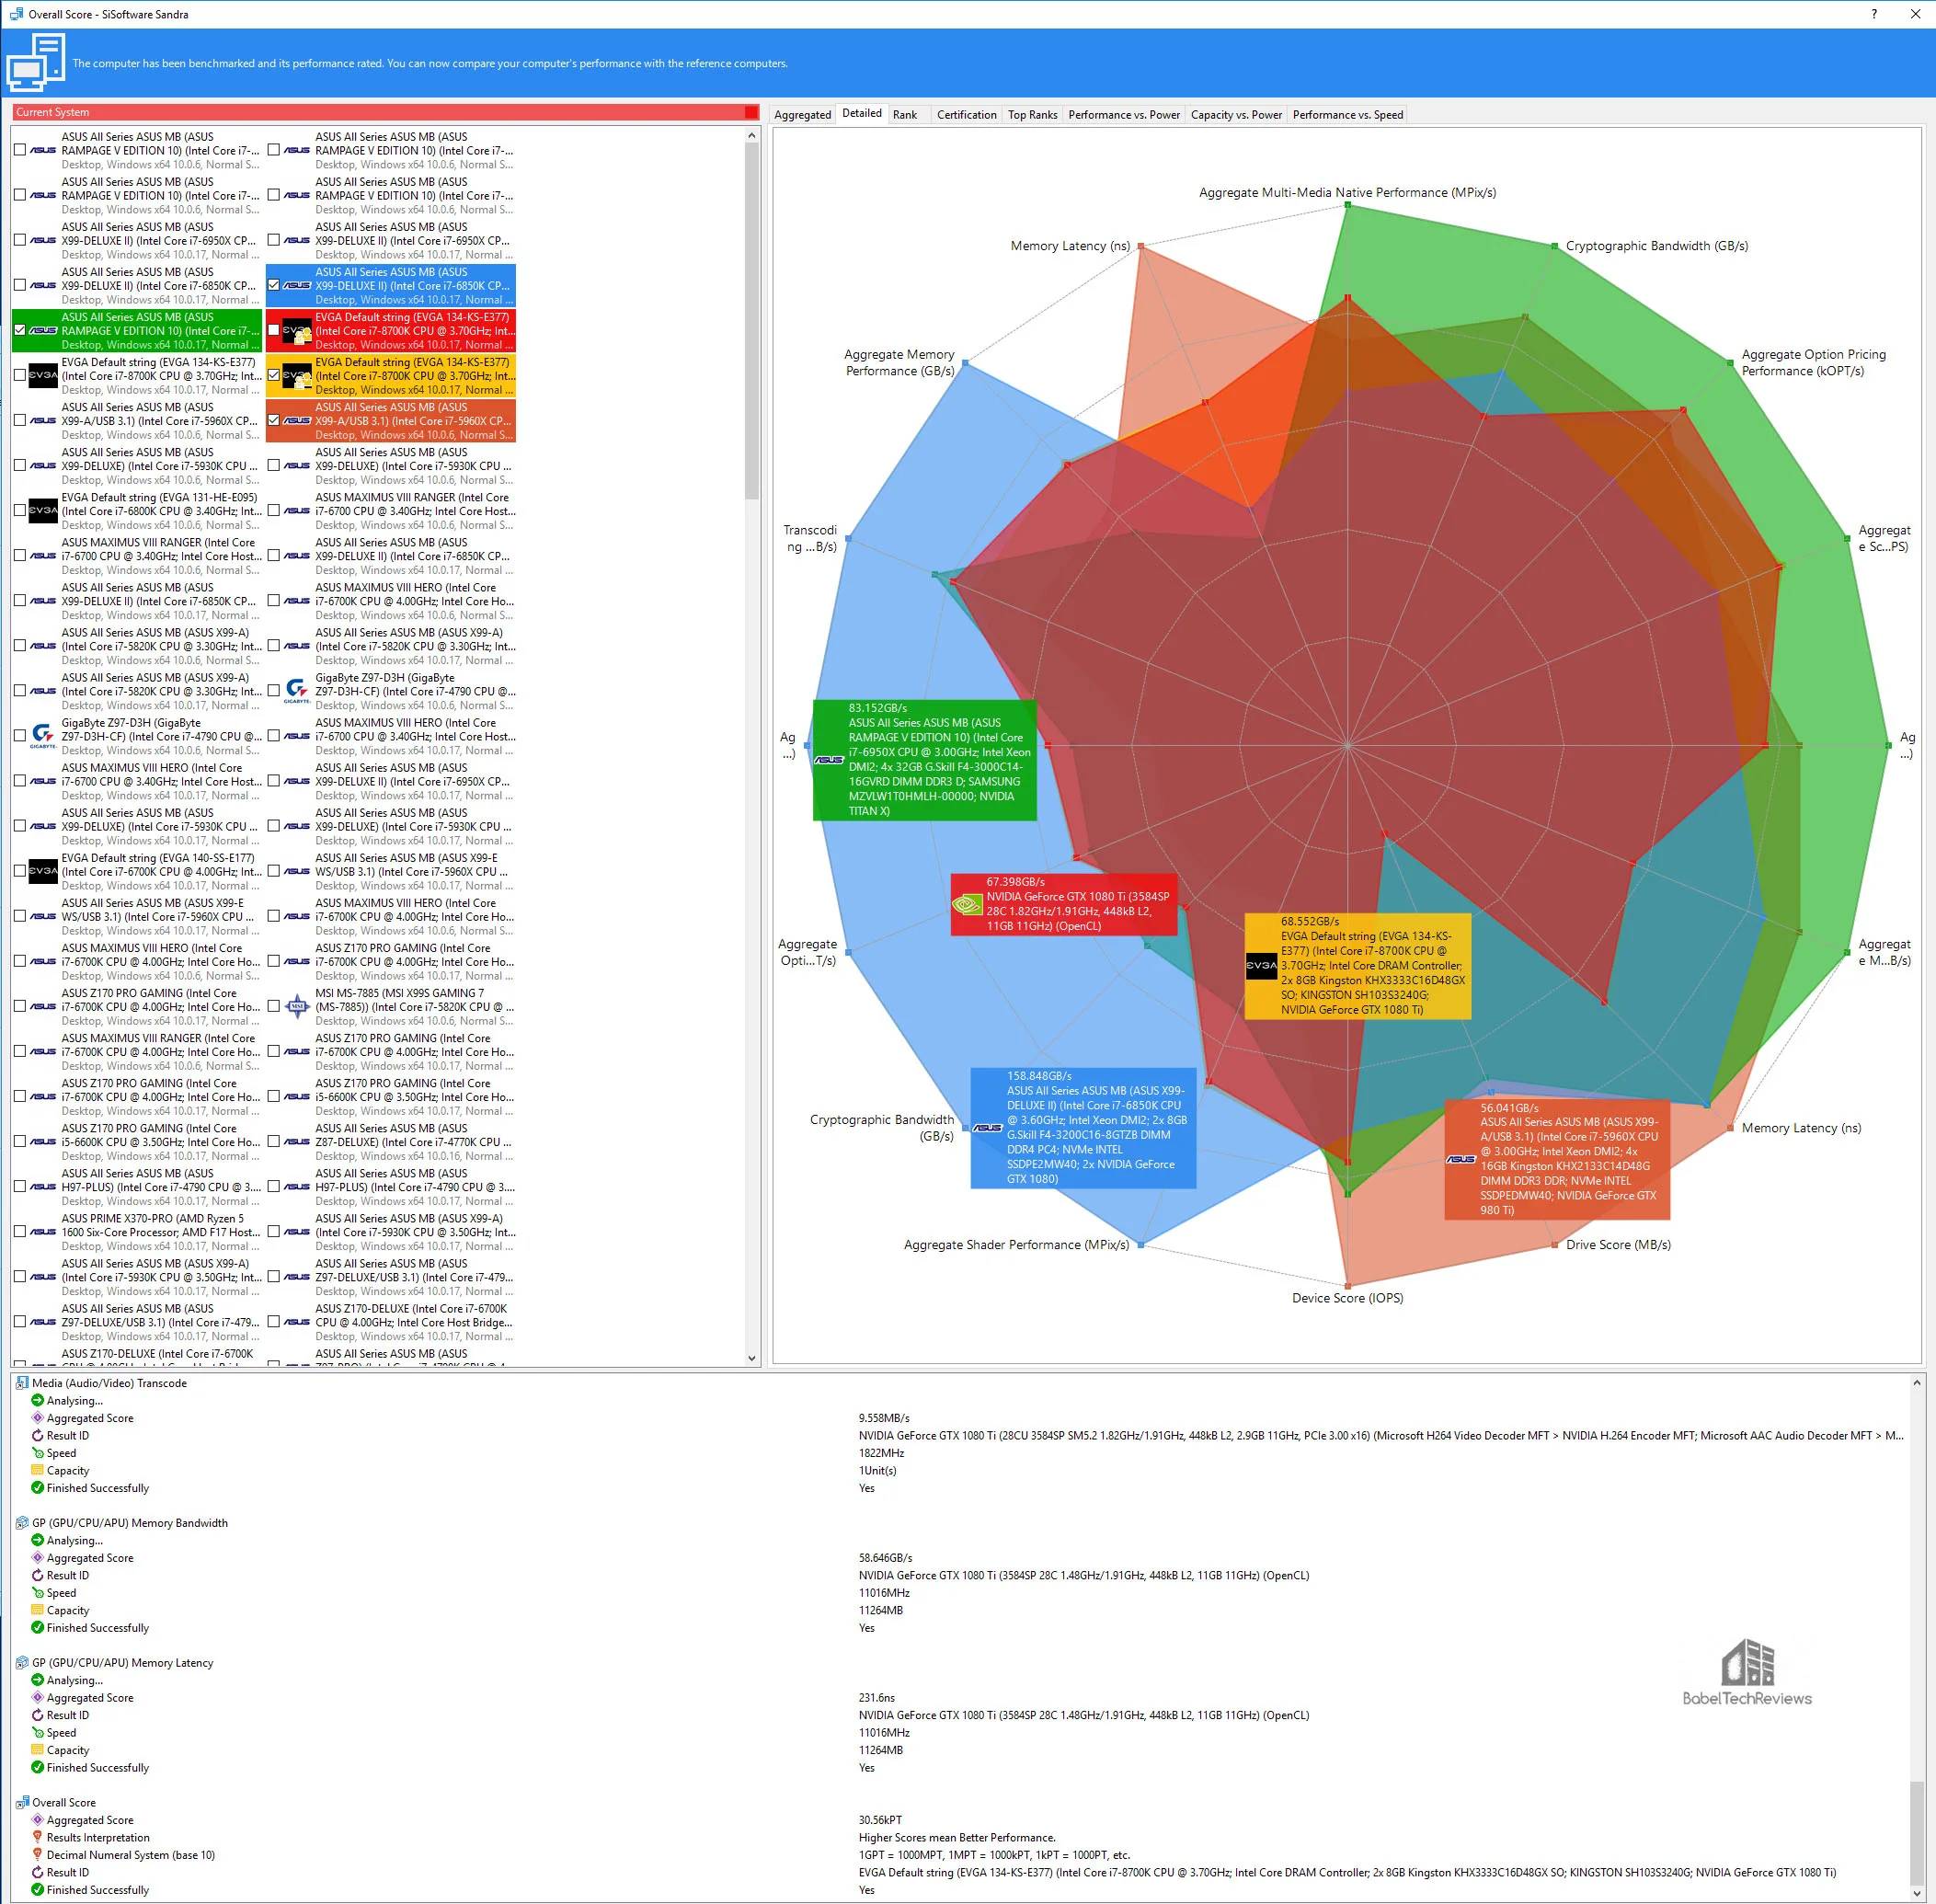


Let’s compare the benchmark results from stock 3.7 GHz (4.3 GHz effective) to 4.6 GHz overclocked.
SiSoftware Sandra – Stock (4.3 GHz) vs Overclocked (4.6 GHz)
- Processor Multi-Media – Stock 657.04MPix/s – Overclocked 661.14MPix/s
- Processor Cryptography – Stock: 12.090GB/s – Overclocked 12.071GB/s
- Processor Financial Analysis – Stock 39.43kOPT/s – 42.22kOPT/s Overclocked
- Processor Scientific Analysis – Stock 39.33GFLOPS – 38.99GFLOPS Overclocked
- .NET Arithmetic – Stock 58.09GOPS – Overclocked 60.82GOPS
- Memory Bandwidth – Stock 31.953GB/s – Overclocked 31.886GB/s
- Cache & Memory Latency – Stock 18.8ns – Overclocked 18.4ns (lower is better)
- File System Bandwidth – Stock 401.742MB/s – Overclocked 392.081MB/s
- File System I/O – Stock 25517.6IOPS – Overclocked 25555.3IOPS
- GP (GPU/CPU/APU) Processing – Stock 3394.29MPix/s – Overclocked 3345.35MPix/s
- GP (GPU/CPU/APU) Cryptography – Stock 68.552GB/s – Overclocked 67.398GB/s
- GP (GPU/CPU/APU) Financial Analysis – Stock 3796.98kOPT/s – Overclocked 3778.94kOPT/s
- GP (GPU/CPU/APU) Scientific Analysis – Stock 1169.86GFLOPS – Overclocked 1166.34GFLOPS
- Media (Audio/Video) Transcode – Stock 9.060MB/s – Overclocked 9.558MB/s
- GP (GPU/CPU/APU) Memory Bandwidth – Stock 59.216GB/s – Overclocked 58.646GB/s
- GP (GPU/CPU/APU) Memory Latency – Stock 231.9ns – Overclocked 231.6ns
- Overall Score – Stock 30.34kPT – Overclocked 30.56kPT
Higher scores mean better performance and in almost every case, the faster CPU has better results when it plays a part in the calculations. When the tests are GPU/APU oriented, the graphics card is doing most of the work.
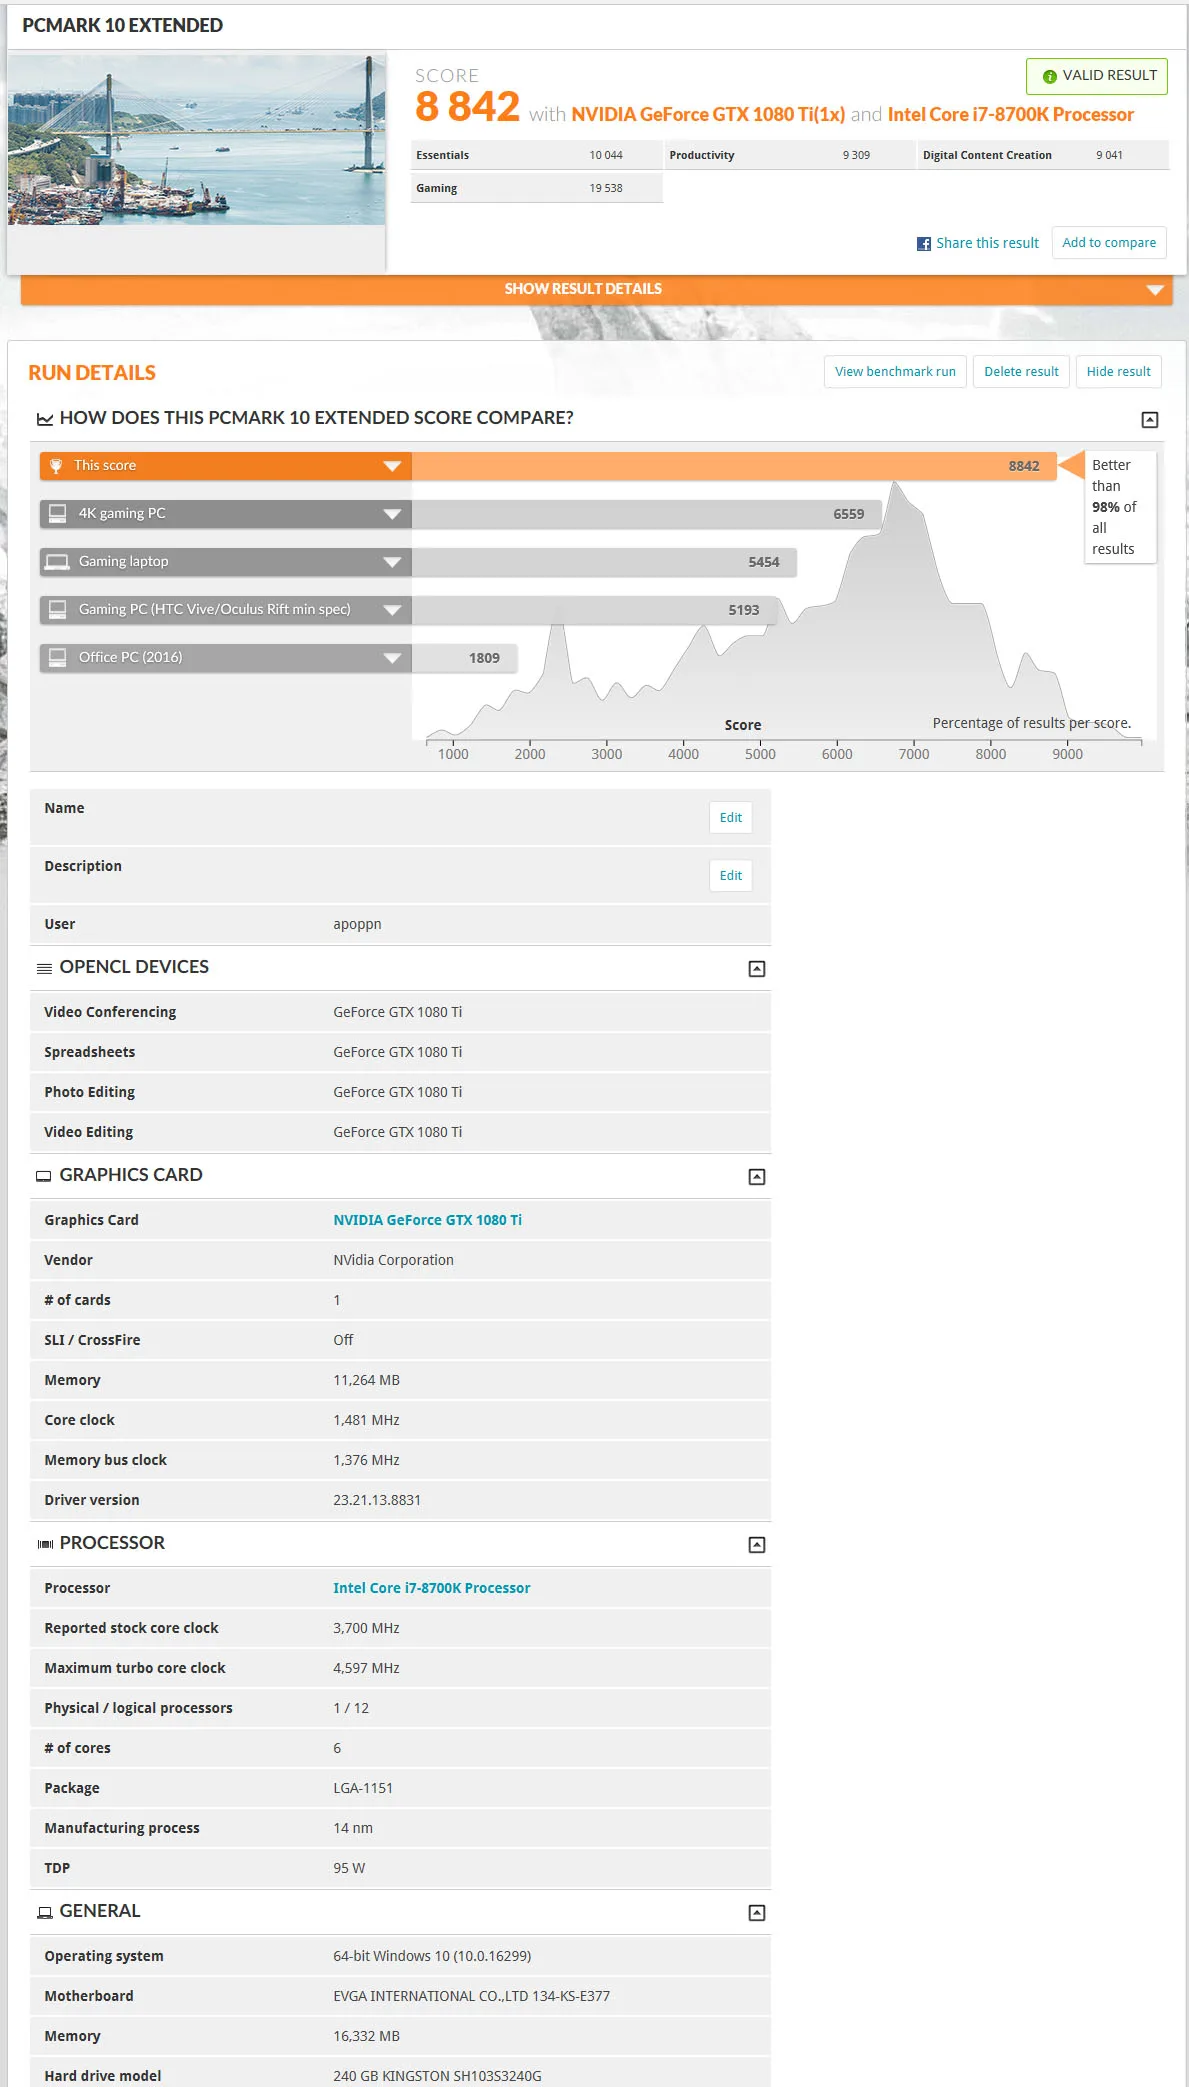
PCMark 10
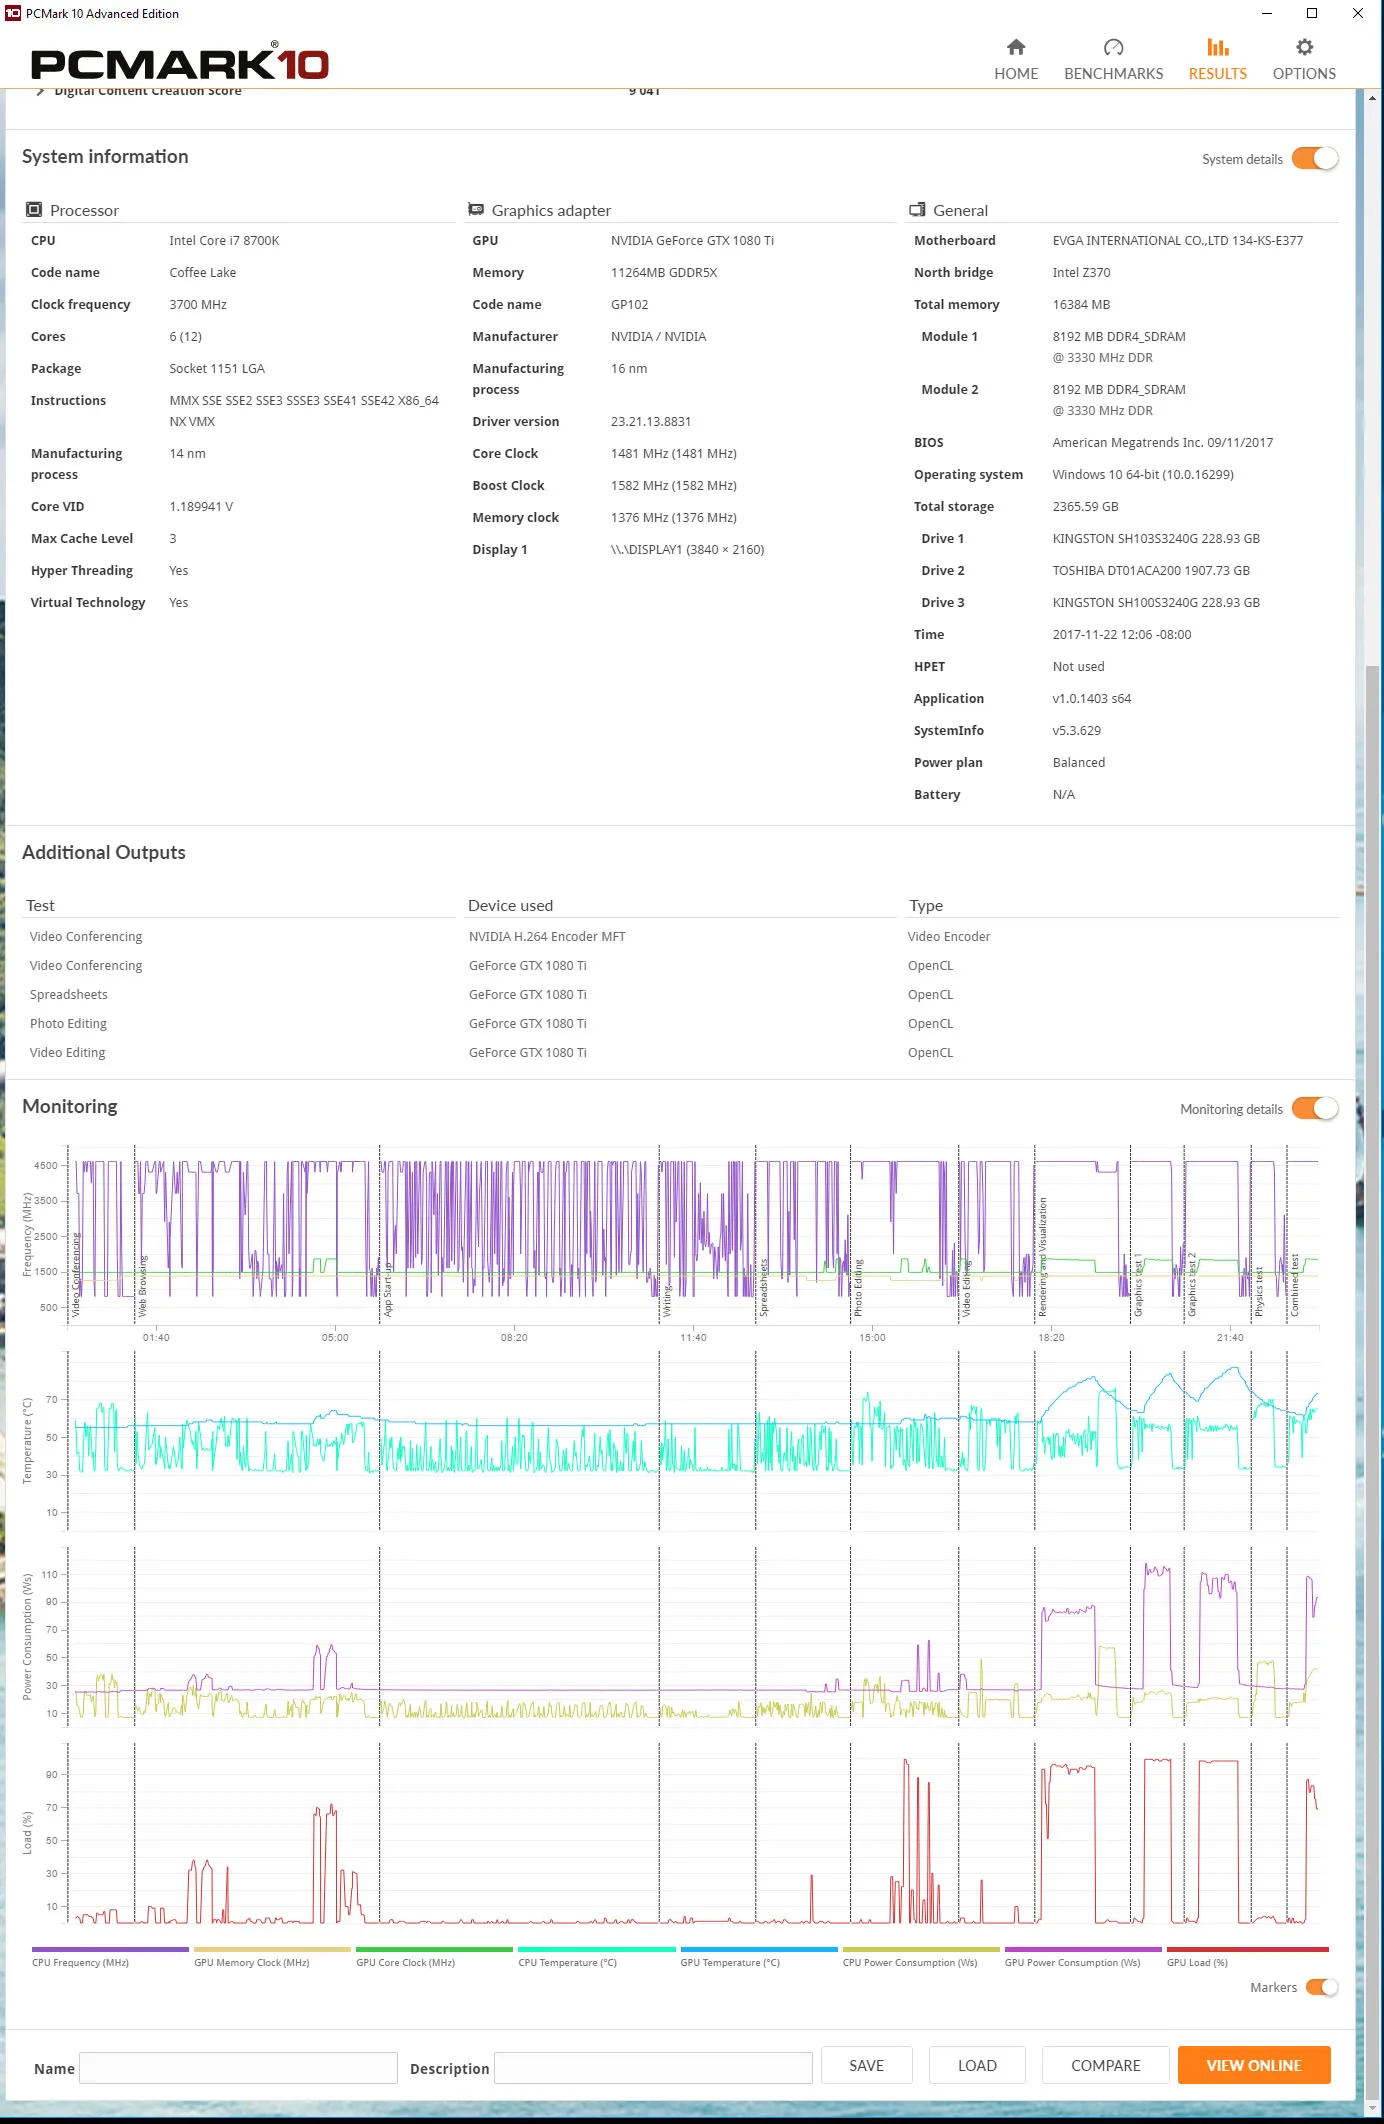
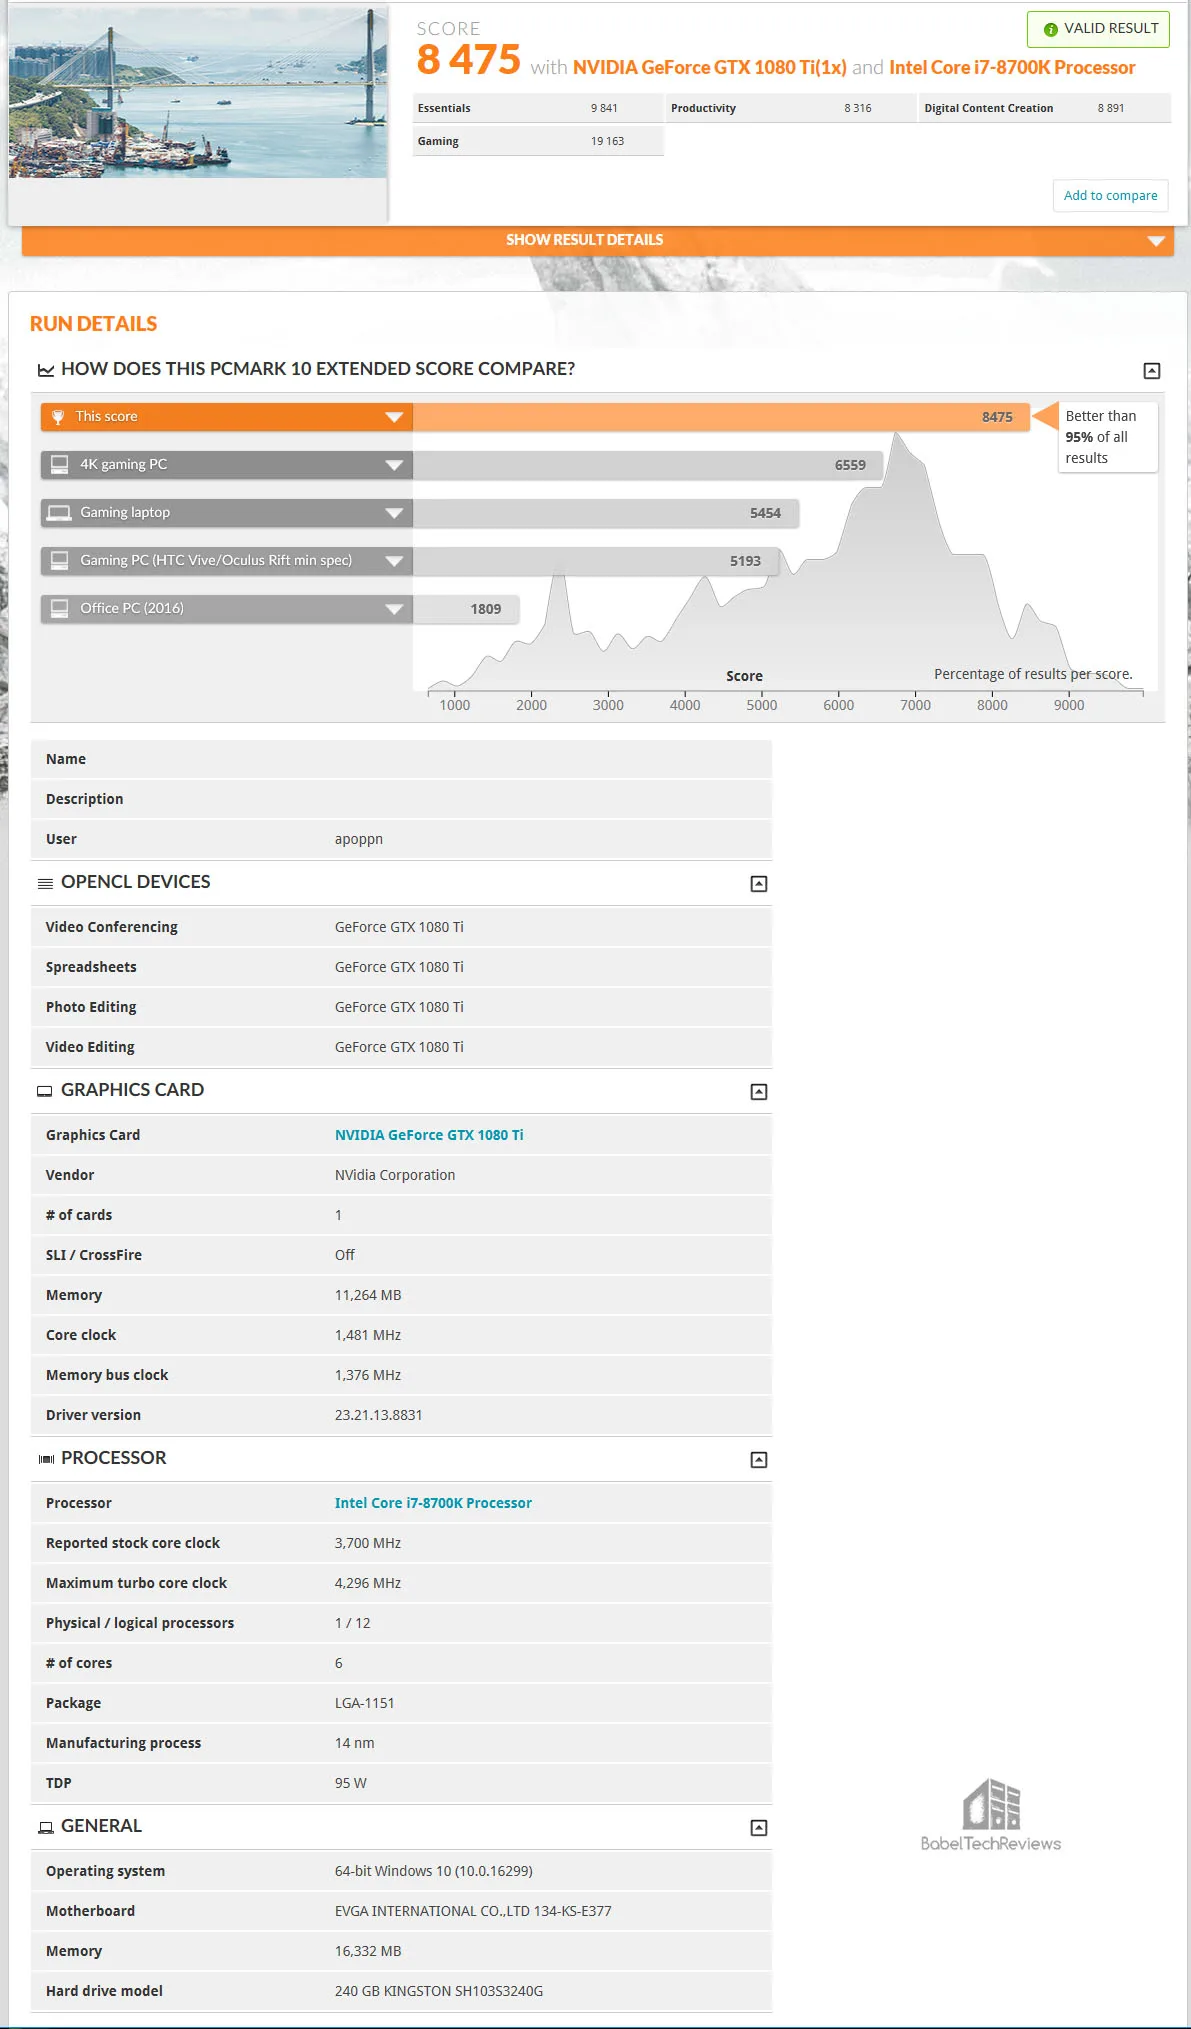
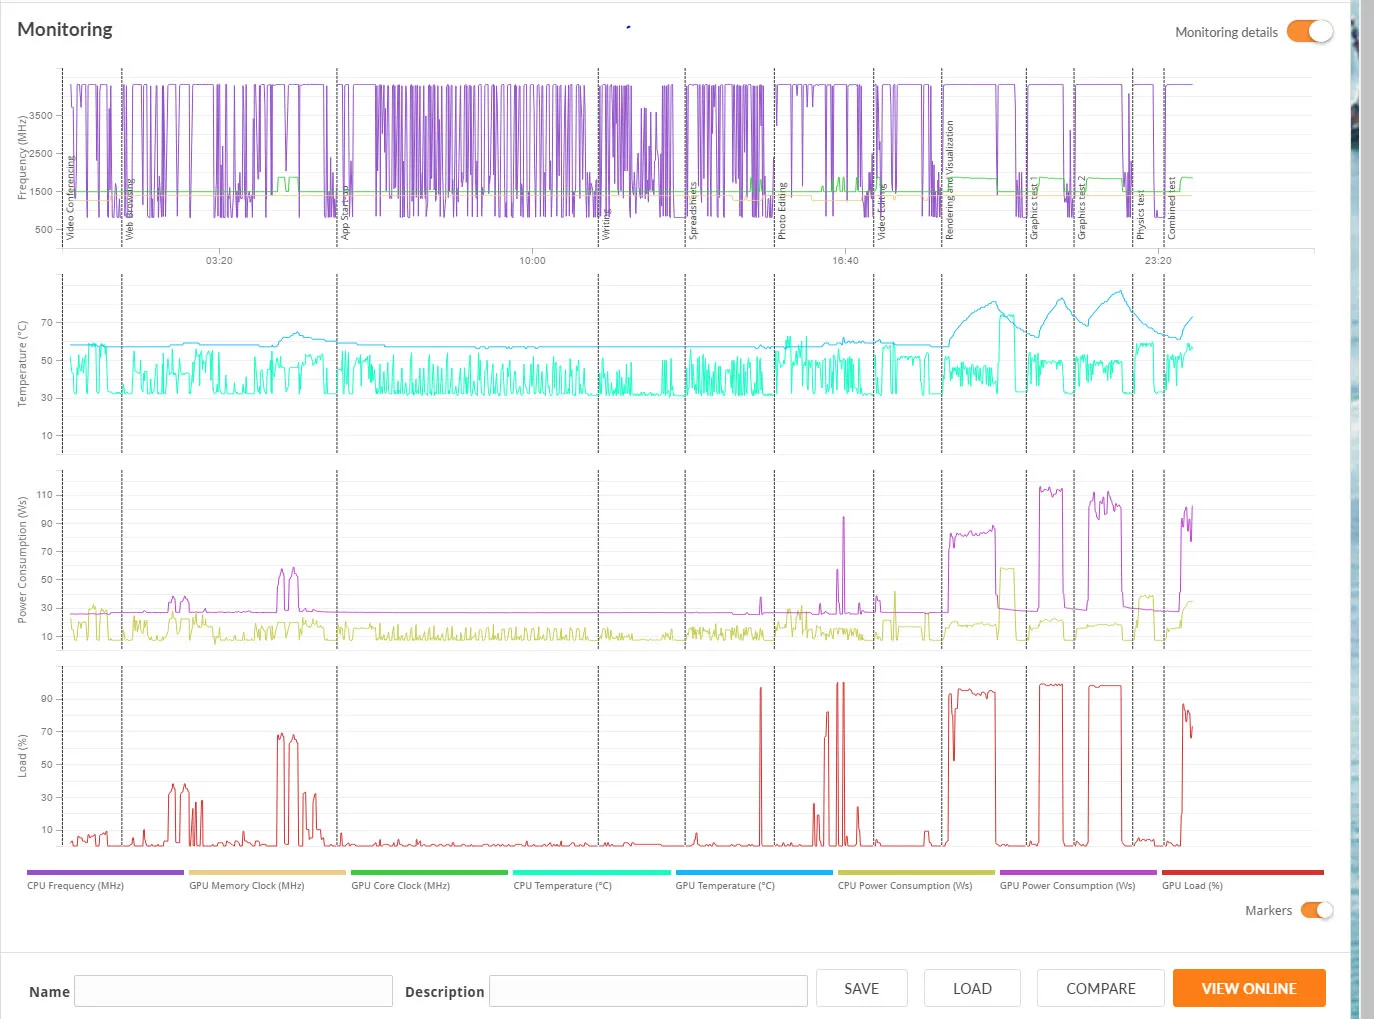
Futuremark is well-respected as a developer and publisher of PC benchmark applications for nearly two decades. Although they are synthetic tests, they provide a good measure of system performance. PCMark 10 is Futuremark’s seventh major update to the PCMark series. PCMark 10 is developed for Windows 10 and it builds upon the PCMark 8 platform for a complete package of vendor-neutral and easy-to-use benchmarks for home or office environments. We are testing using the Extended settings..
First up is the i7-8770K at stock.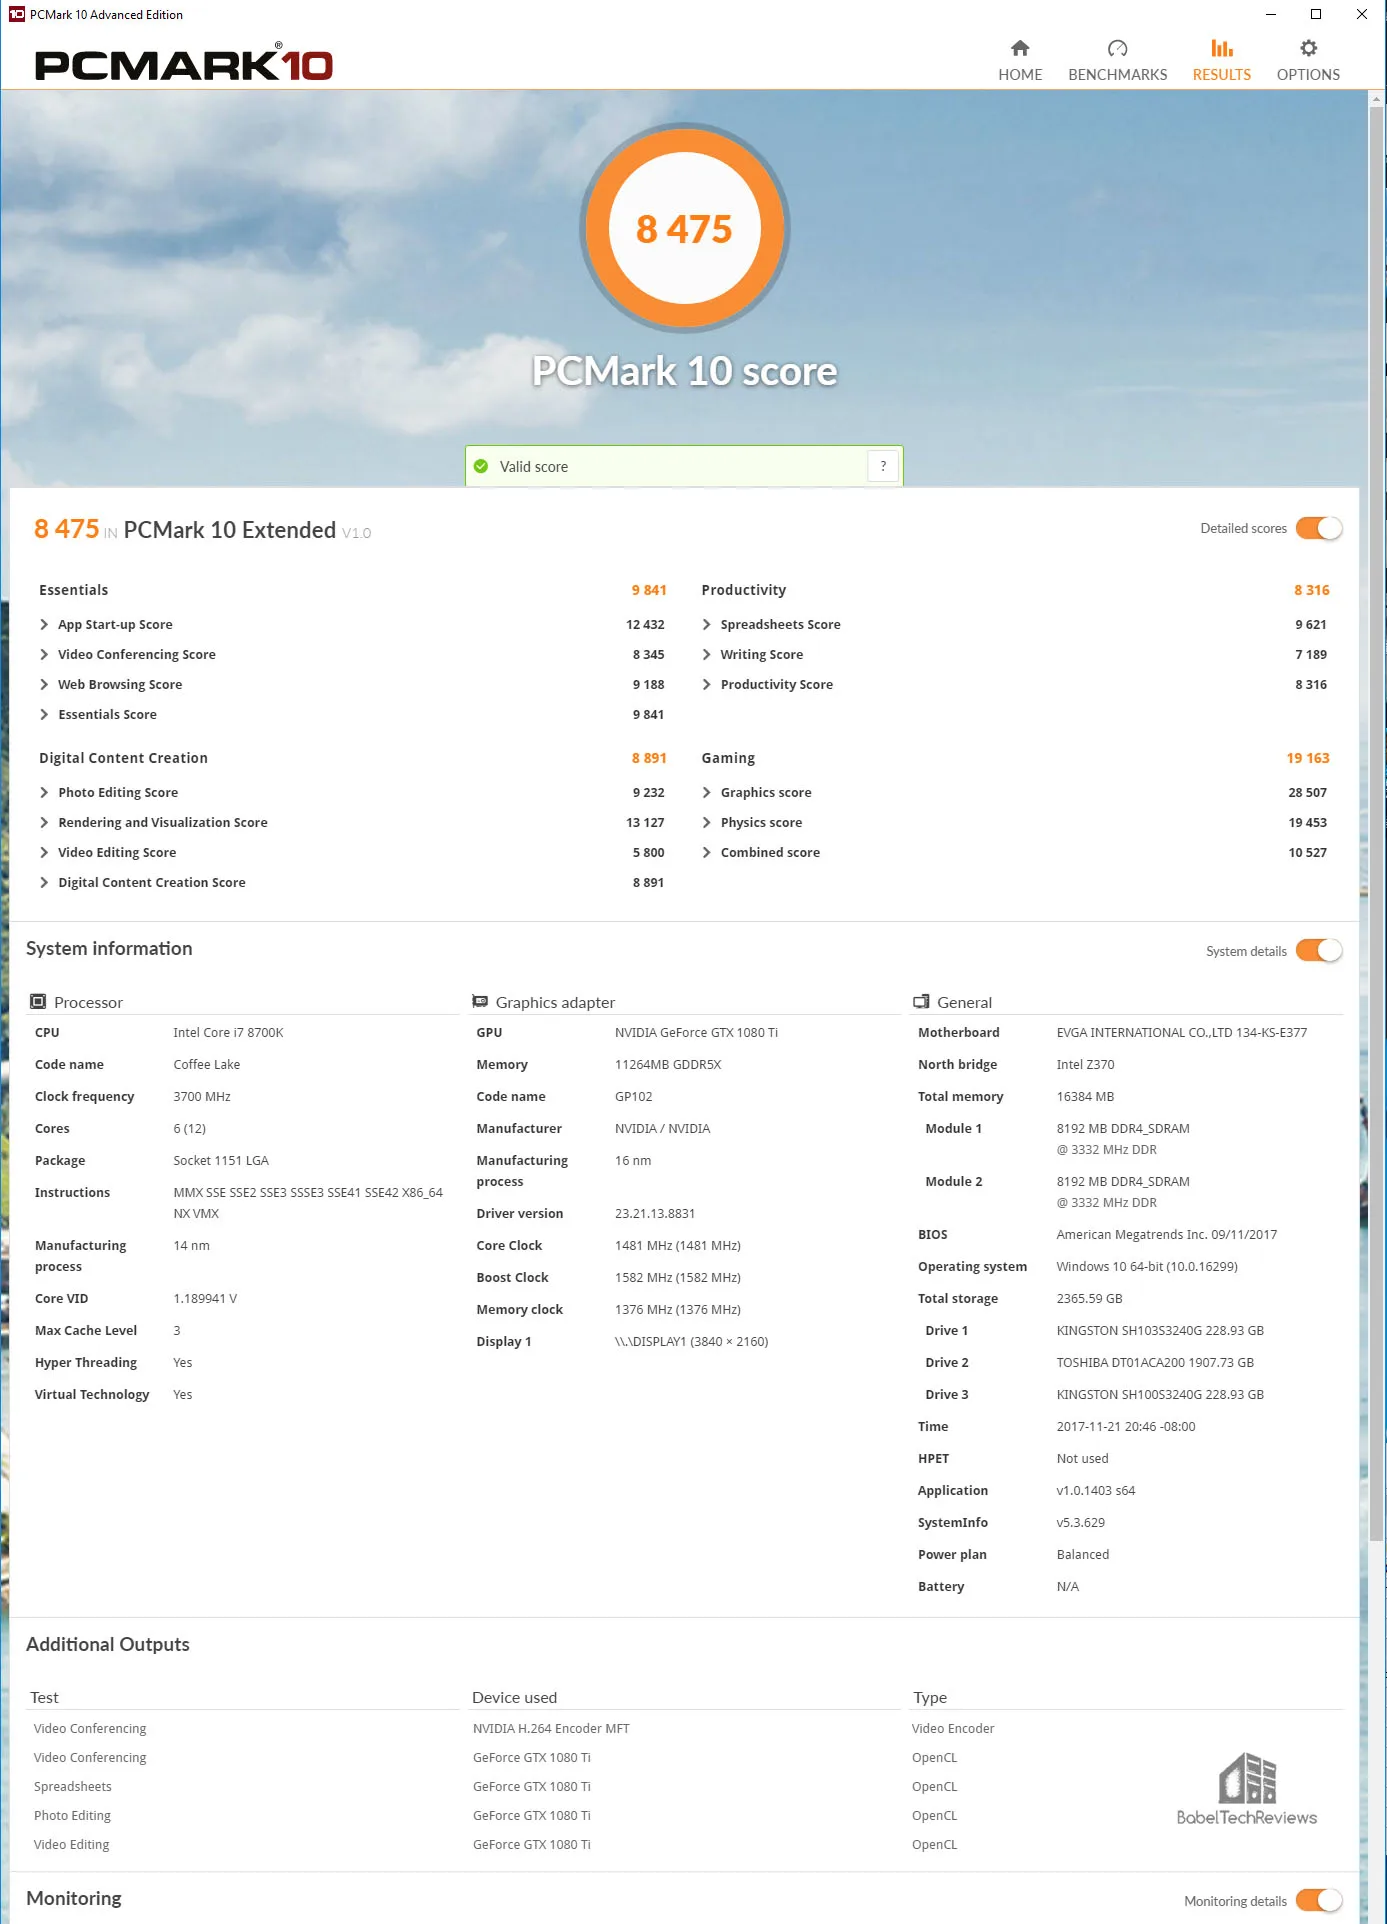
And now we run PCMark 10 at 4.6GHz.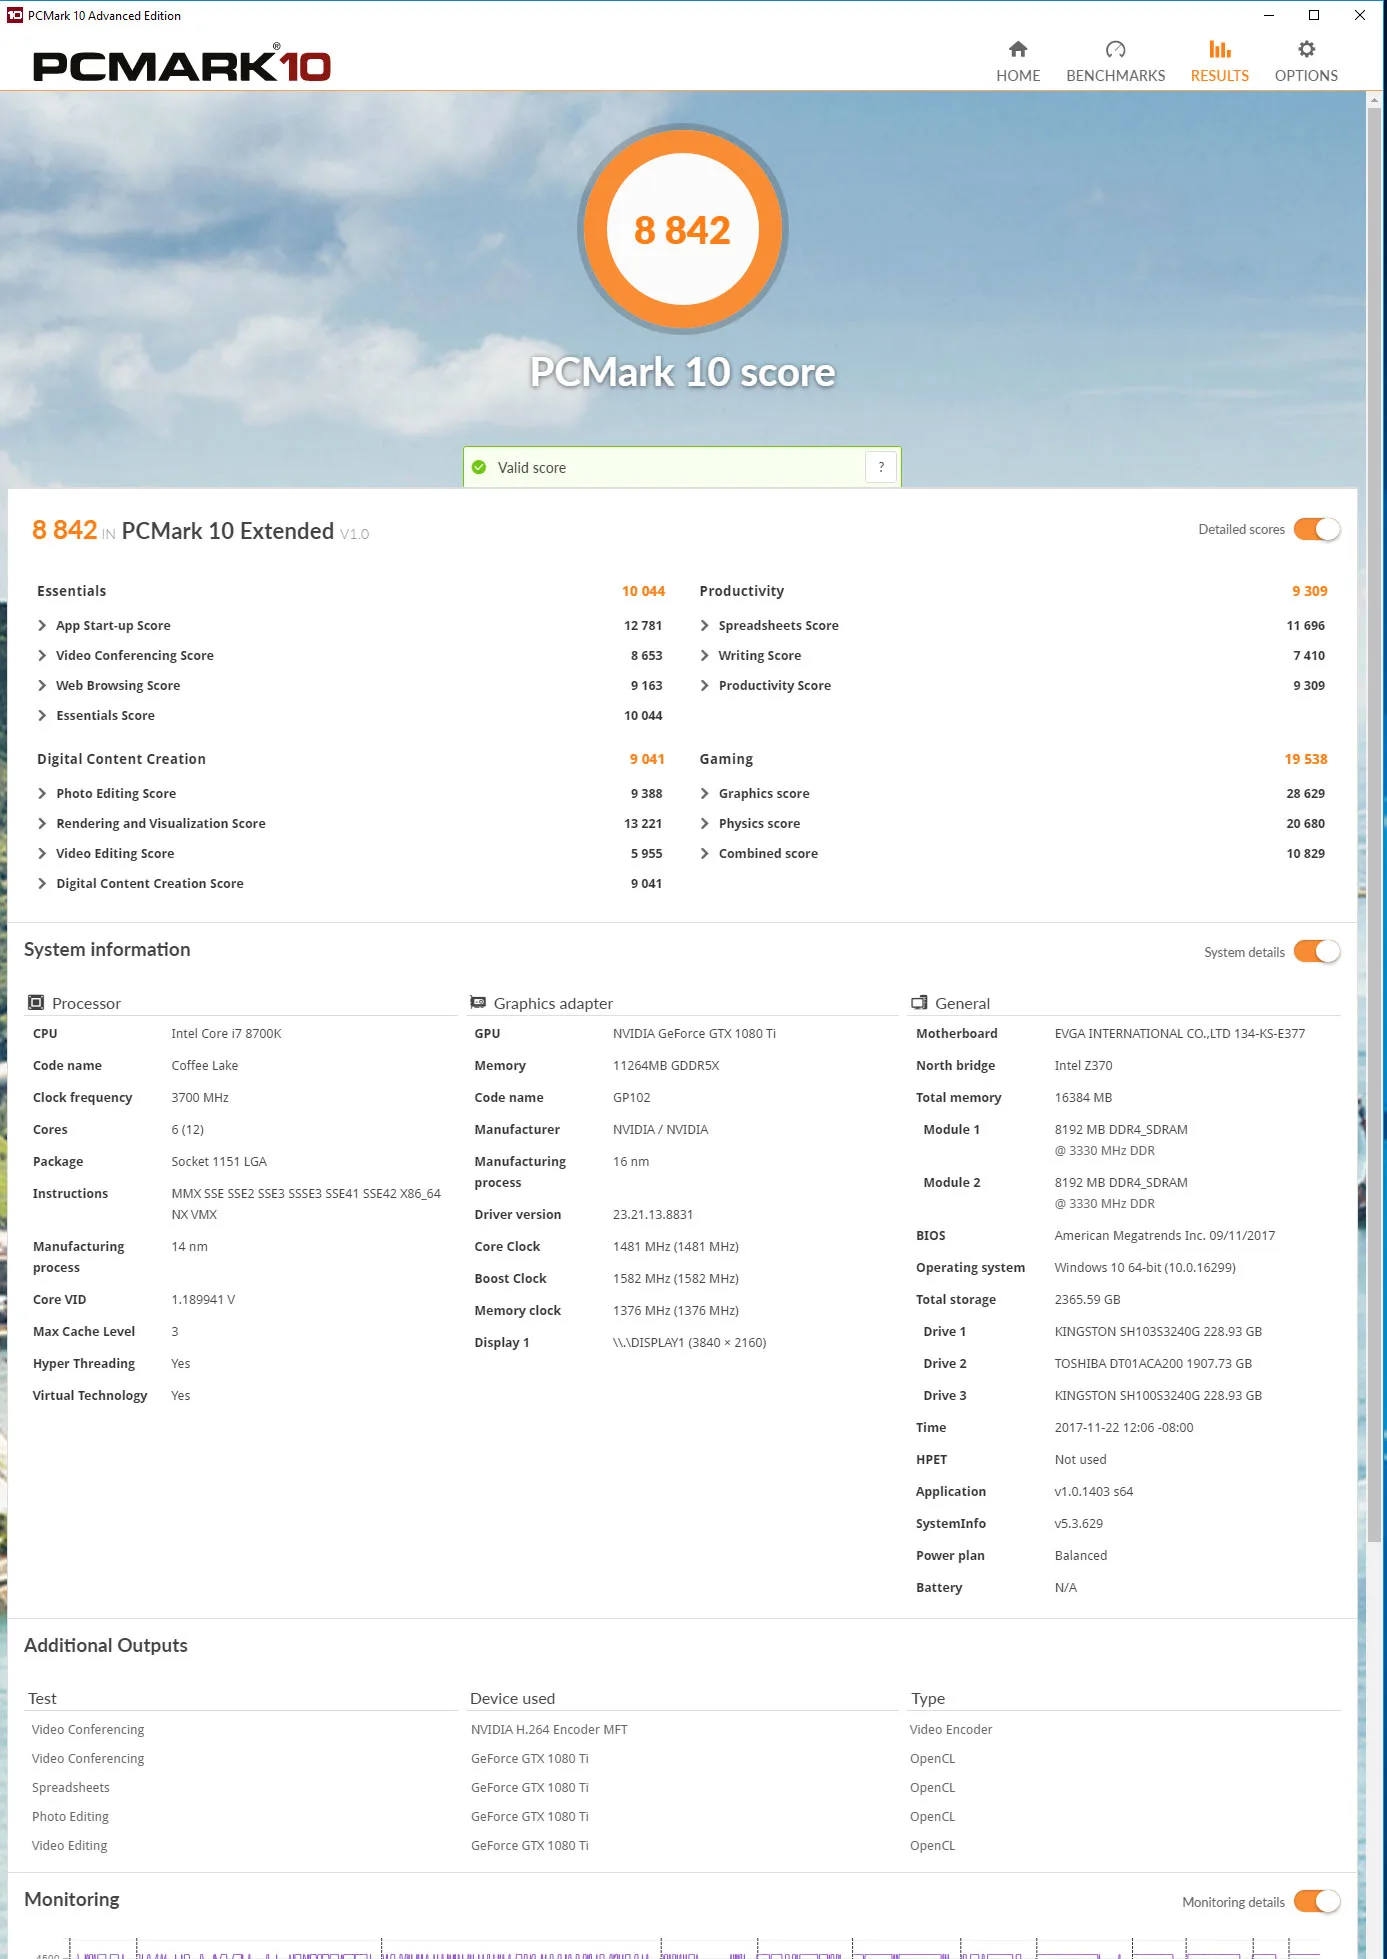
Clearly, overclocking the CPU from stock to 4.6 GHz makes a practical difference. Before, at stock, this PC ranked in the top 5% of all PCs taking this benchmark – now, overclocked, it is in the top 2%.
Before we look at gaming differences, we need to look at more benchmarks including real world applications that many of us use daily, including calculation, SSD testing, encoding video, multi-tasking, image editing and gaming.
More Tests
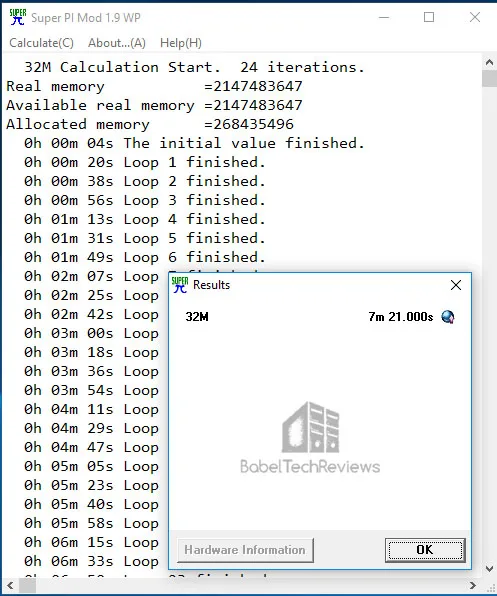
Super Pi
Super Pis is a single-threaded benchmark which can show the differences in IPC between CPU platforms or frequencies. Here are the test results, and we choose 32 million digits of Pi to calculate.
First up is Super Pi on the Core i7-8770K at 3.7GHz. 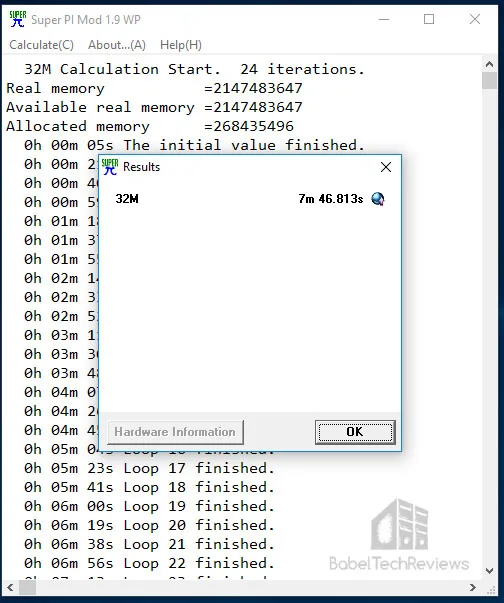
Here are overclocked i7-8700K results at the same settings:
Overclocked, the i7-8700K can calculate faster than at stock frequencies. And this is a single-threaded application.
WPrime
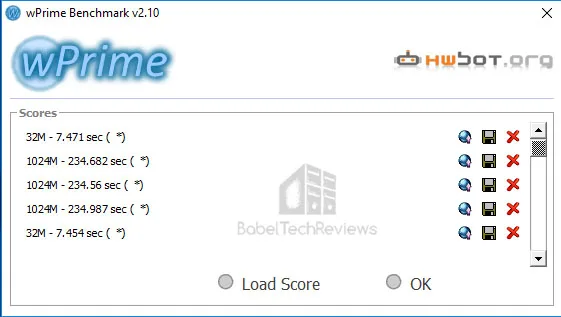
WPrime is a multi-threaded benchmark which can show the differences in IPC between CPUs. Here are the tests, and we choose to calculate 1024 million digits and 32 million digits.
First up is Super Pi on the Core i7-8770K at 3.7 GHz. 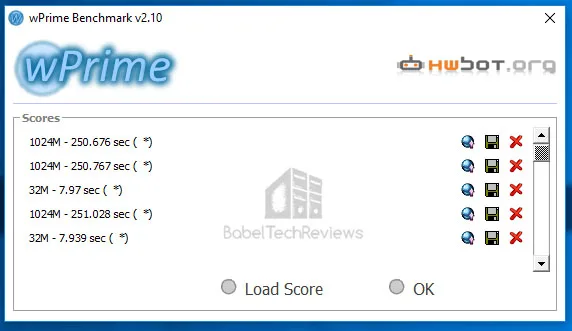
Now here are overclocked results at the same settings:
Again, the overclocked CPU calculates faster than the stock CPU and in all cases of calculation, it is faster than at stock frequencies.
CINEBENCH
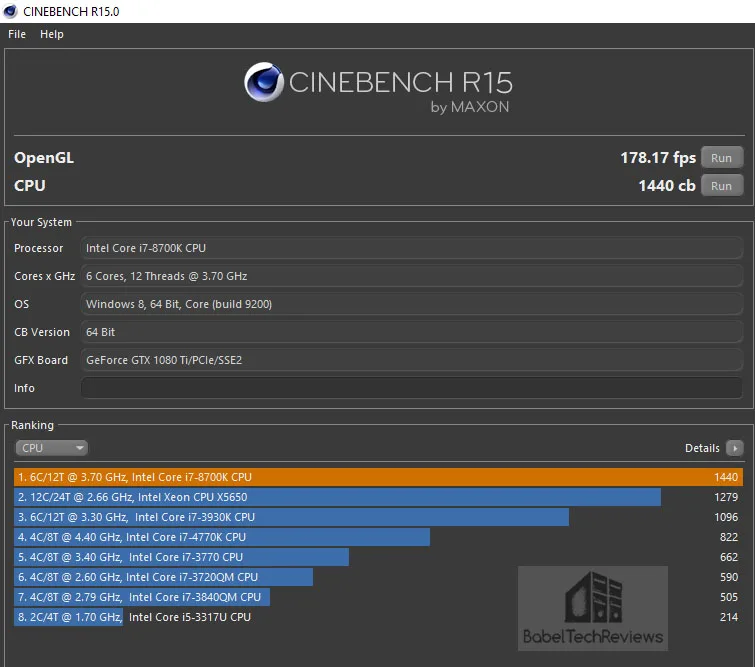
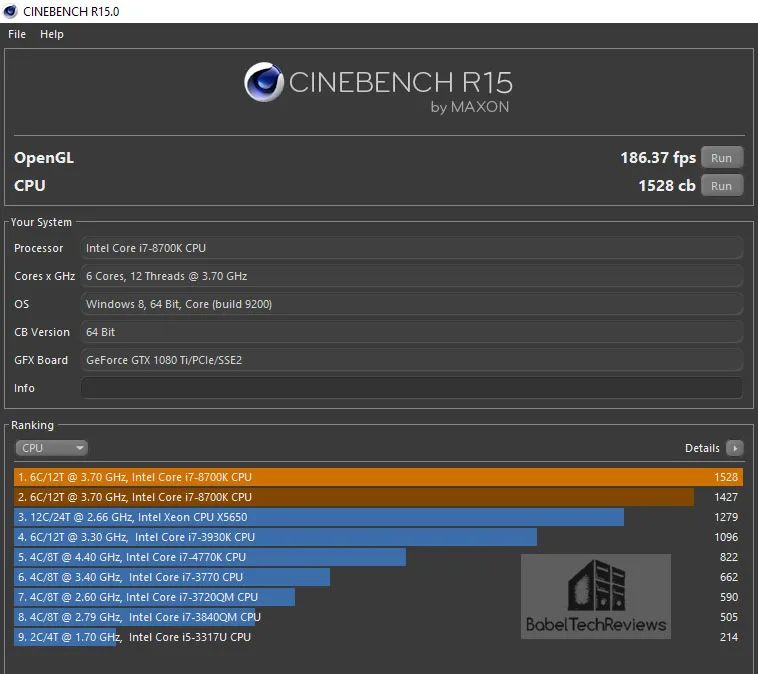
CINEBENCH is based on MAXON’s professional 3D content creation suite, CINEMA 4D. This latest R15.038 version of CINEBENCH can test up to 64 processor threads accurately and automatically. It is an excellent tool to compare both CPU and graphics OGL performance. Below is graphics (OpenGl).
First up, we present the i7-8770K results at 3.7 GHz with the GTX 1080 Ti at reference clocks.
Now at 4.6 GHz with the same settings and hardware.
In all cases, the faster-clocked CPU renders faster over its stock frequencies.
X265
x265 is a library for encoding video into the High Efficiency Video Coding (HEVC/
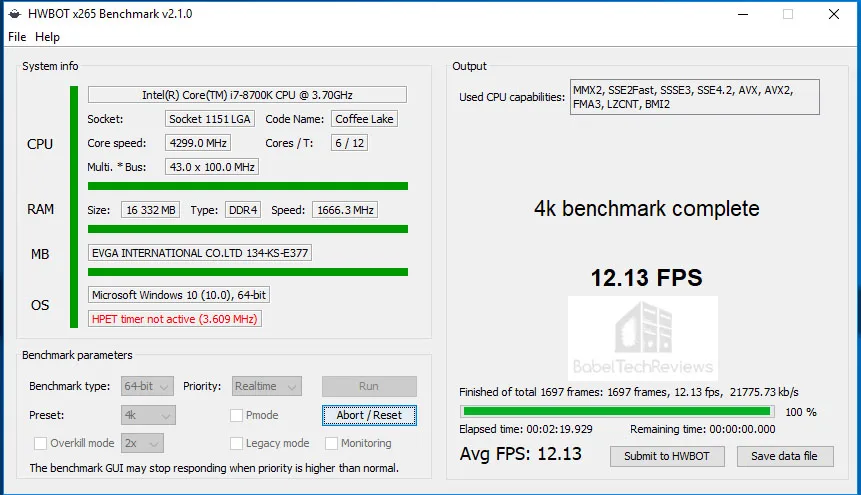
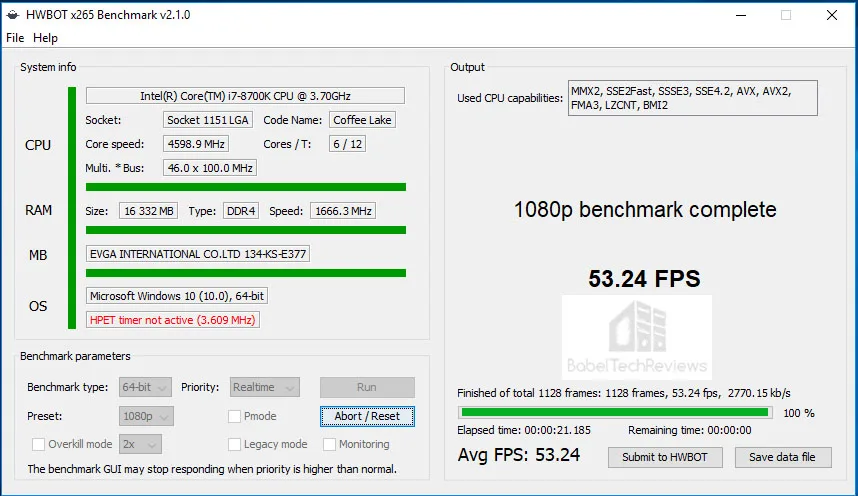
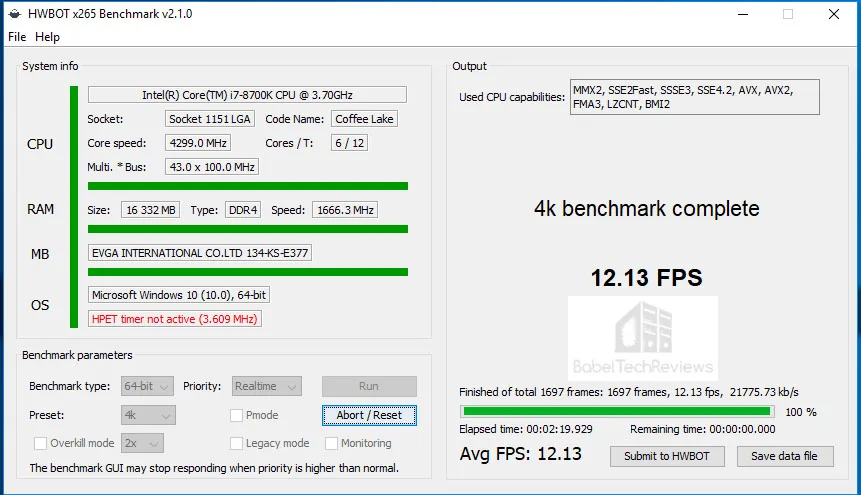
We are using the latest version, v2.1.0. The first benchmark is of the stock i7-8700K at 1920×1080 followed by 4K results. The HPET timer no longer needs to be activated under Windows 10 to give a valid result.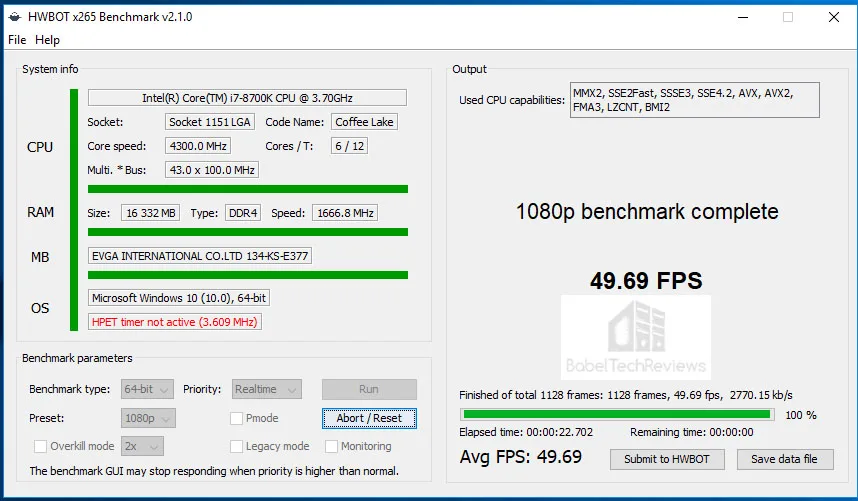
Now 4K at stock.
Below, the first benchmark is of the overclocked i7-8700K at 1920×1080 followed by 4K results.
Now 4.6GHz at 4K.
If you are encoding video, it will save time if you overclock your CPU.
The next series of tests are going to focus on the SSD to see which CPU is faster or if there are any performance differences.
Crystal Disk Mark
CrystalDiskMark is a HDD benchmark utility for your hard drive that enables you to measure sequential and random read/write speeds. Here are some key features:
- Measure sequential reads/writes speed
- Measure random 512KB, 4KB, 4KB (Queue Depth=32) reads/writes speed
First up is the stock i7-8770K using our HyperX 240GB drive.
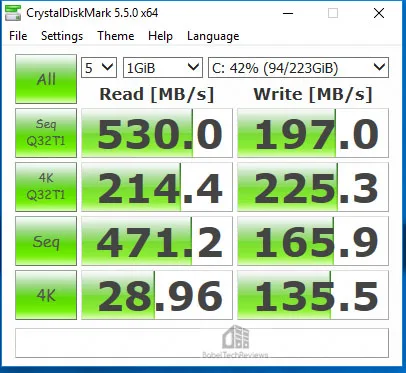
Now we overclock our CPU to 4.6 GHz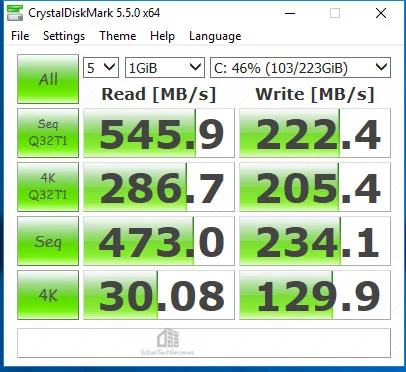 The results are somewhat variable as this is a SSD test.
AS SSD
AS SSD is especially designed for Solid State Drives (SSD). The tool contains synthetic and practice tests. The synthetic tests determine the sequential and random read and write performance of the SSD without use of the operating system caches. In Seq-test the program measures how long it takes to read and write a 1 GB file. In the 4K test, read and write performance for random 4K blocks are determined. The 4K-64-thrd test are similar to the 4K procedure except that the read and write operations on 64 threads are distributed as in the usual start of a program.
In the copying test, two large ISO file folders are created, programs with many small files, and a games folder with small and large files. These three folders are copied by the OS copy command with the cache turned on. The practice tests show performance with simultaneous read and write operations
AS SSD gives an overall “score” after it runs the benchmarks. These scores and comparisons are summed up in the performance summary charts.
First up, the i7-8770K at stock.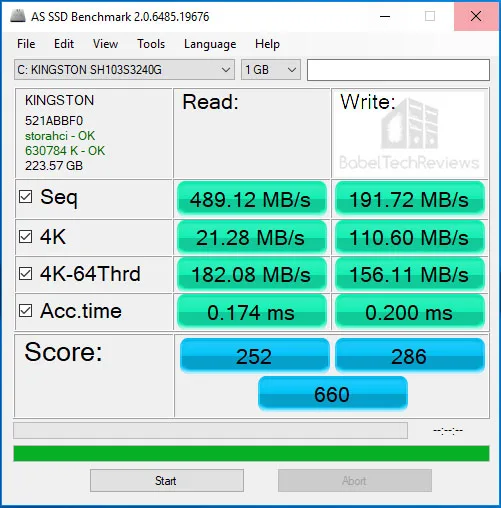
Now we overclock our CPU and run the benchmark again.
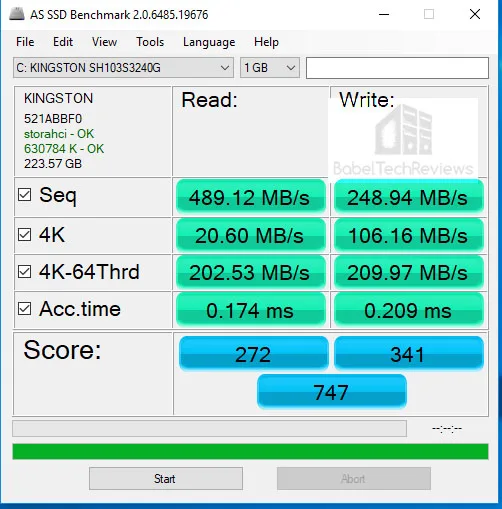
The overclocked platform scores higher.
Next, we move on to game-related benchmarks and games.
Game-related benchmarks
The 35 Game Benchmarks with the TITAN Xp and the GTX 1080 Ti
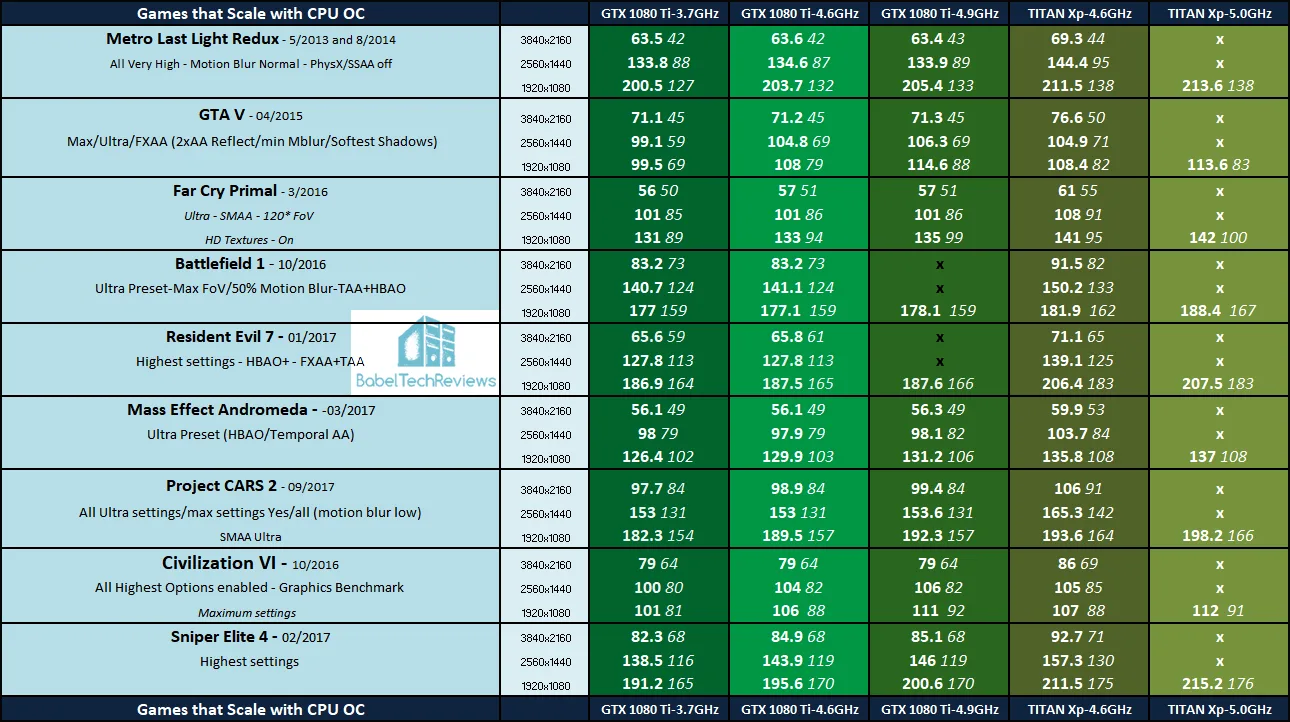
Here are the summary charts of 35 games and 3 synthetic tests. The highest settings are always chosen, and DX12 is usually picked above DX11, and the settings are ultra or maxed. Specific settings are listed on the performance charts. The benches were run at 1920×1080, 2560×1440 and at 3840×2160 with the i7-8700K at either stock frequencies or overclocked to 4.6GHz. Our promised full TITAN Xp results at 4.6GHz are in the third column.
All results, except for FireStrike, Time Spy, and VRMark, show average framerates and higher is always better. Minimum frame rates are shown next to the averages in italics and in a slightly smaller font. In-game settings are fully maxed out and they are identically high or ultra across all platforms. The first column shows the GTX 1080 Ti results at stock CPU settings, the second is for the GTX 1080 Ti at 4.6 GHz, and the TITAN Xp results are in the third column. We will identify the games that scale with CPU overclocking, and then we will focus on those games with a further CPU overclock to 4.9 GHz or to 5.0 GHz.

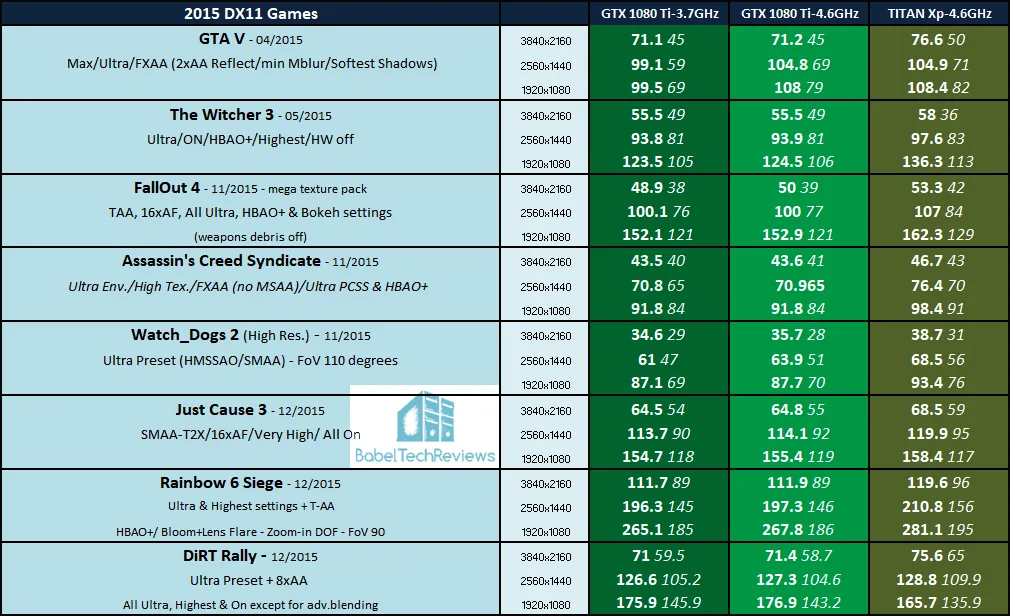

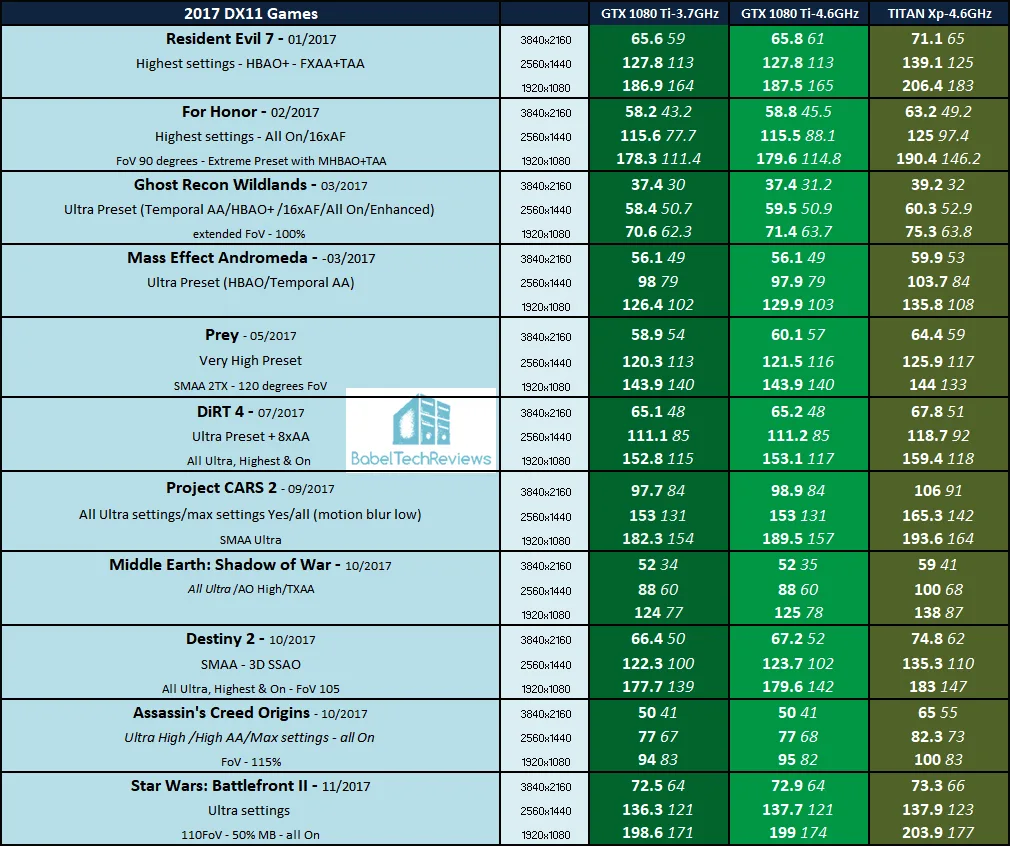
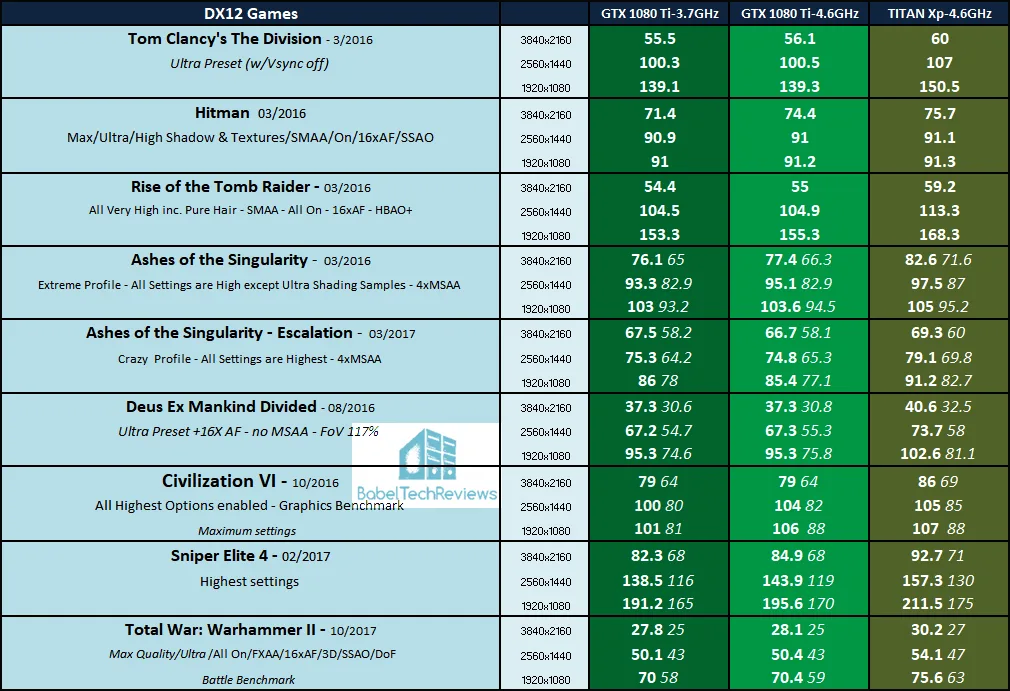

Out of our 35 game benching suite, we identified 9 games that appear to scale with a CPU overclock above the benchmarking margin of error. So we overclock the GTX 1080 Ti further to 4.9 GHz in the third column and show Titan Xp 5.0 GHz results for 1920×1080 only in the last column.
There appears to be a small percentage of scaling that occurs for a few games at only 1920×1080 in the 2-6% range when our CPU is overclocked from its stock frequencies of 3.7 GHz/4.3 GHz Turbo to 4.9 GHz or to 5.0 GHz using the two top performing video cards in the world.
Finally, here is Firestrike Extreme with a stock TITAN Xp and the i7-8700K at 5.0 GHz achieving a result that is in the top 5% in the world. Of course, overclocking the TITAN Xp would raise the score much higher.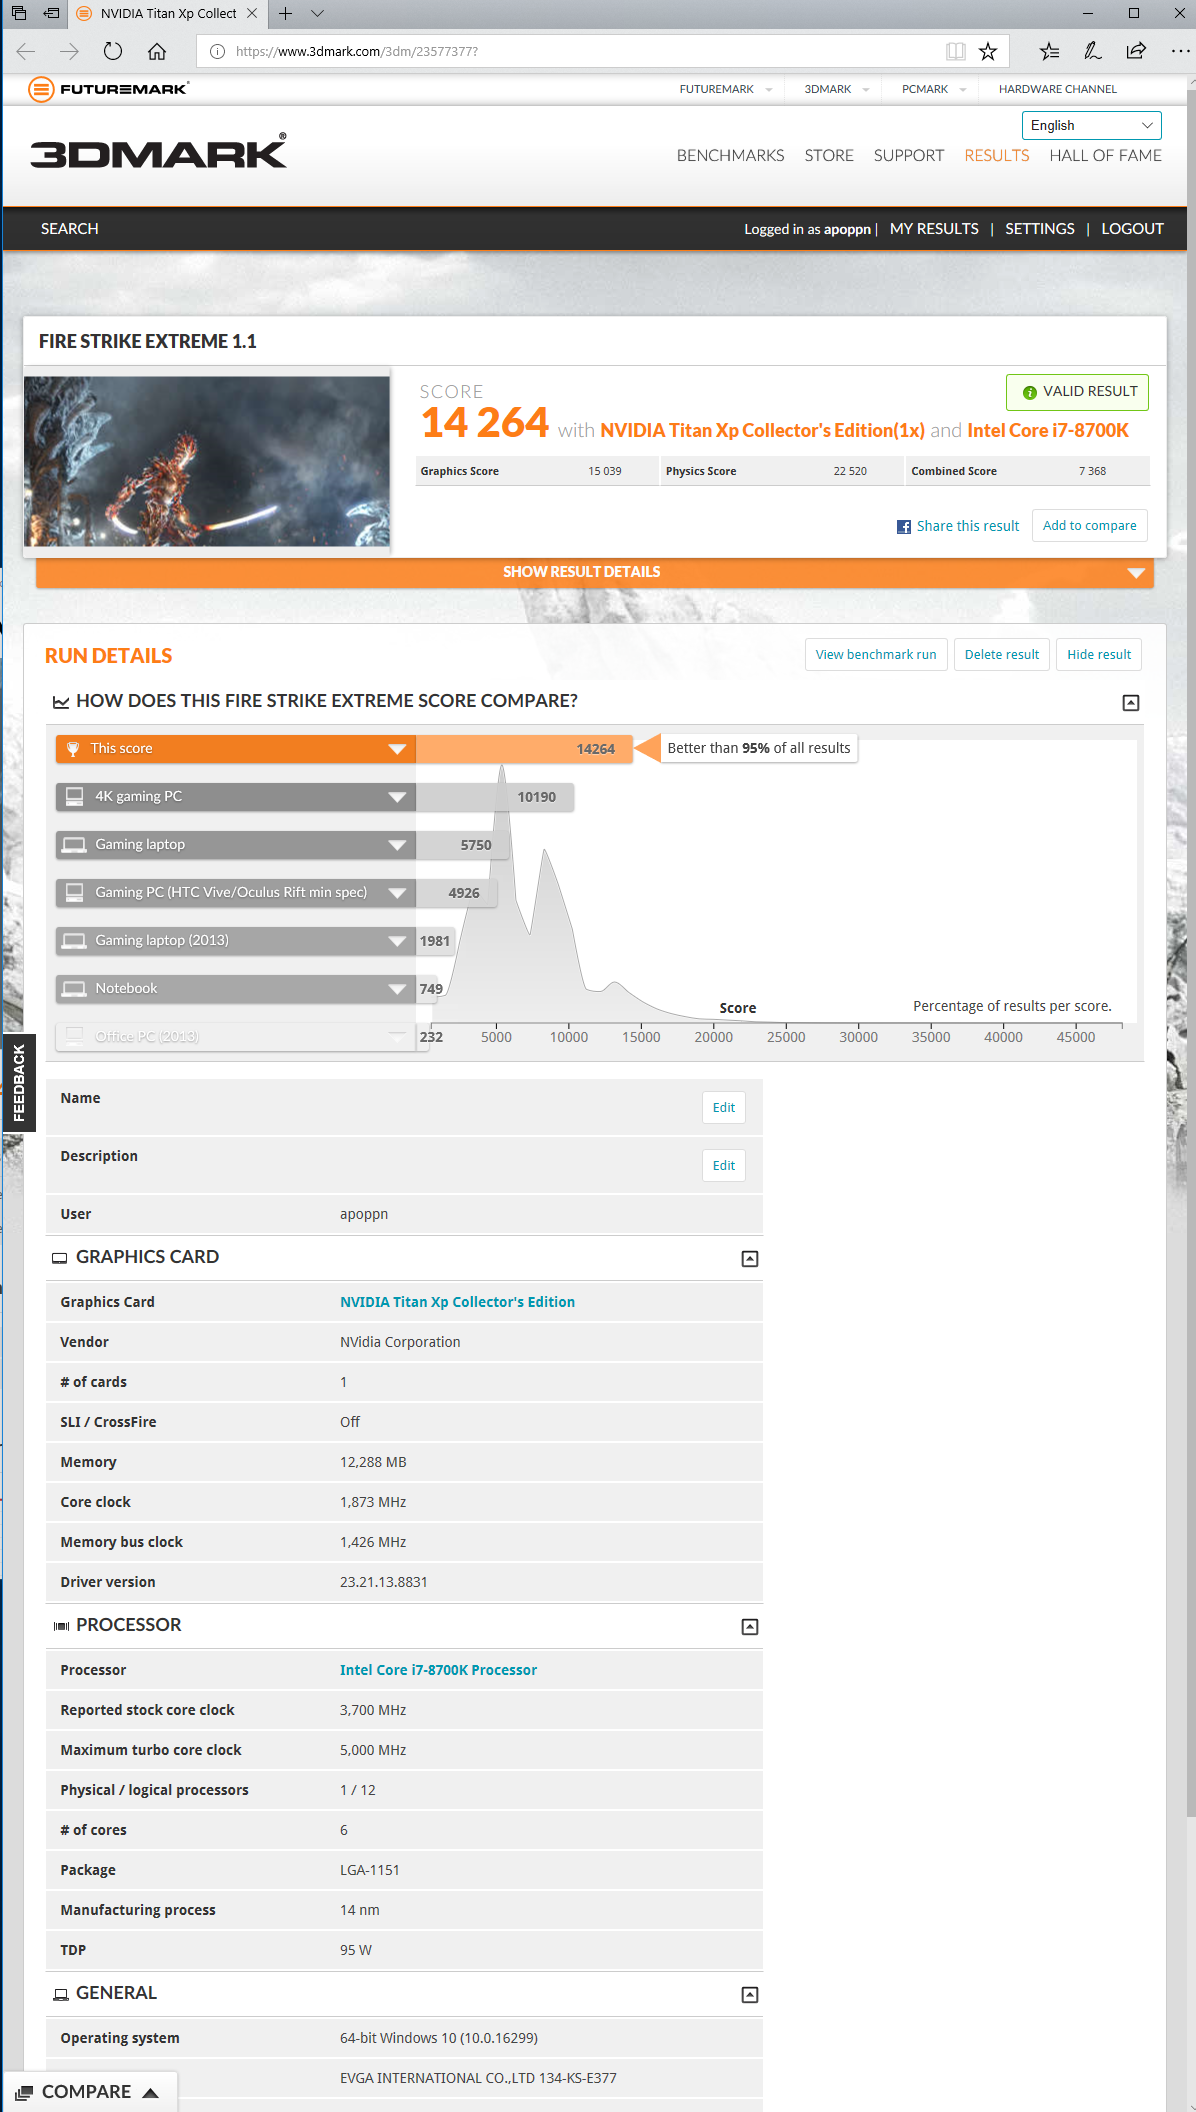
If you are a primarily a gamer, you will get much higher framerates from overclocking your video card than from overclocking your CPU. If you game at 2560×1440, 3440×1440, or especially at 4K, you won’t notice any framerate increase from CPU scaling. However, for other tasks that primarily involve the CPU, overclocking may provide more dramatic results.
Let’s head for our conclusion.
Conclusion
There is absolutely no doubt that overclocking an i7-8700K from its stock frequencies of 3.7 GHz (4.3 GHz Turbo) to 4.6GHz and then to 4.9 GHz or even to 5.0 GHz provides more peformance. We are very impressed that the EVGA Z370 FTW motherboard was able to take our i7-8700K to 5.0 GHz with complete stability after we failed to stabilize our CPU at 4.8 GHz with our ASRock motherboard.
As gamers, we see that CPU scaling is only evident for a small percentage of games in our benchmark suite that are not GPU-bound, and we only see about 2-6% framerate increase for those games when we increase our CPU clocks from stock to 4.9 GHz or to 5.0 GHz. And there are the issues of running a CPU at high frequency and high temperatures which will shorten its life that each overclocker needs to balance against increased performance. An extreme overclocker who wants every last bit of performance from his CPU will no doubt consider delidding their CPU to maintain a 5.0 GHz overclock at decent temperatures for 24/7 use. Others may choose to moderate the overclock, and for us, 4.6 GHz to 4.8 GHz provides a good balance for our general benchmarking tests and for 24/7 use.
If you are upgrading to a hex-core i7-8700K, the EVGA Z370 FTW is an excellent choice for a fully-featured motherboard that will provide very clean power and great features for overclockers.
EVGA Z370 FTW – Pros and Cons
Pros
- The EVGA Z370 FTW is a good-looking motherboard with a really nice industrial design at a competitive price.
- The EVGA Z370 FTW is a fully-featured Z370 motherboard with premium components, and it has proved itself to be superb in providing stability for our i7-8700K at 5.0 GHz!
- EVGA gives great 24/7 telephone support and 3 years of warranty service if you need help with your motherboard or if you need to RMA
- In multi-tasking, encoding and almost every other task that we tested including gaming, an overclocked Core i7-8770K is faster than at stock
- Plenty of fan headers are available and cable management is easy using the provided FTW cutouts.
- Dual BIOSes are incredibly useful and a CMOS reset are very helpful for testing extreme overclocks.
- The FTW BIOS is most improved over years past, and it has become less complex, easier to navigate, and more intuitive. Every overclocking tool is right there in the BIOS.

Cons
- We would have liked an extra USB 2.0 header since the EVGA Flow Control uses the only header available to the exclusion of the USB 2.0 front panel connector.
We feel that EVGA has delivered another great overclocking motherboard in the form of the Z370 FTW. If you are an overclocker, you can choose this board with confidence – For the Win! The EVGA Z370 FTW motherboard has become BTR’s flagship motherboard and we feel that it deserves BTR’s Editor’s Choice Award.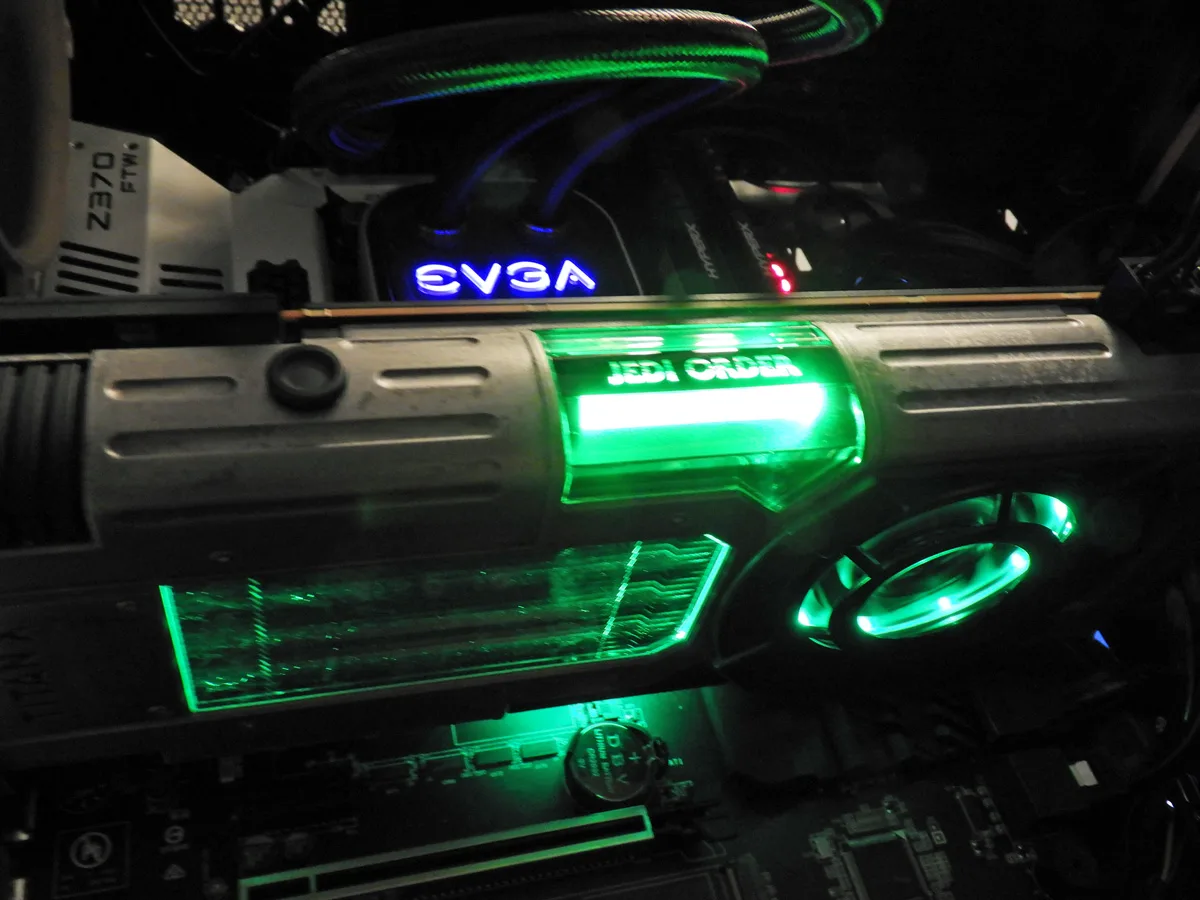
In our opinion, the EVGA Z370 FTW motherboard and the TITAN Xp look so good that our case is starting to look outdated. We asked for and received an EVGA DG-77 flagship mid-tower case that features a vertical video card placement, and we are building it now to show off our TITAN Xp Star Wars Collector’s Edition. It’s our next review and it will be posted this week.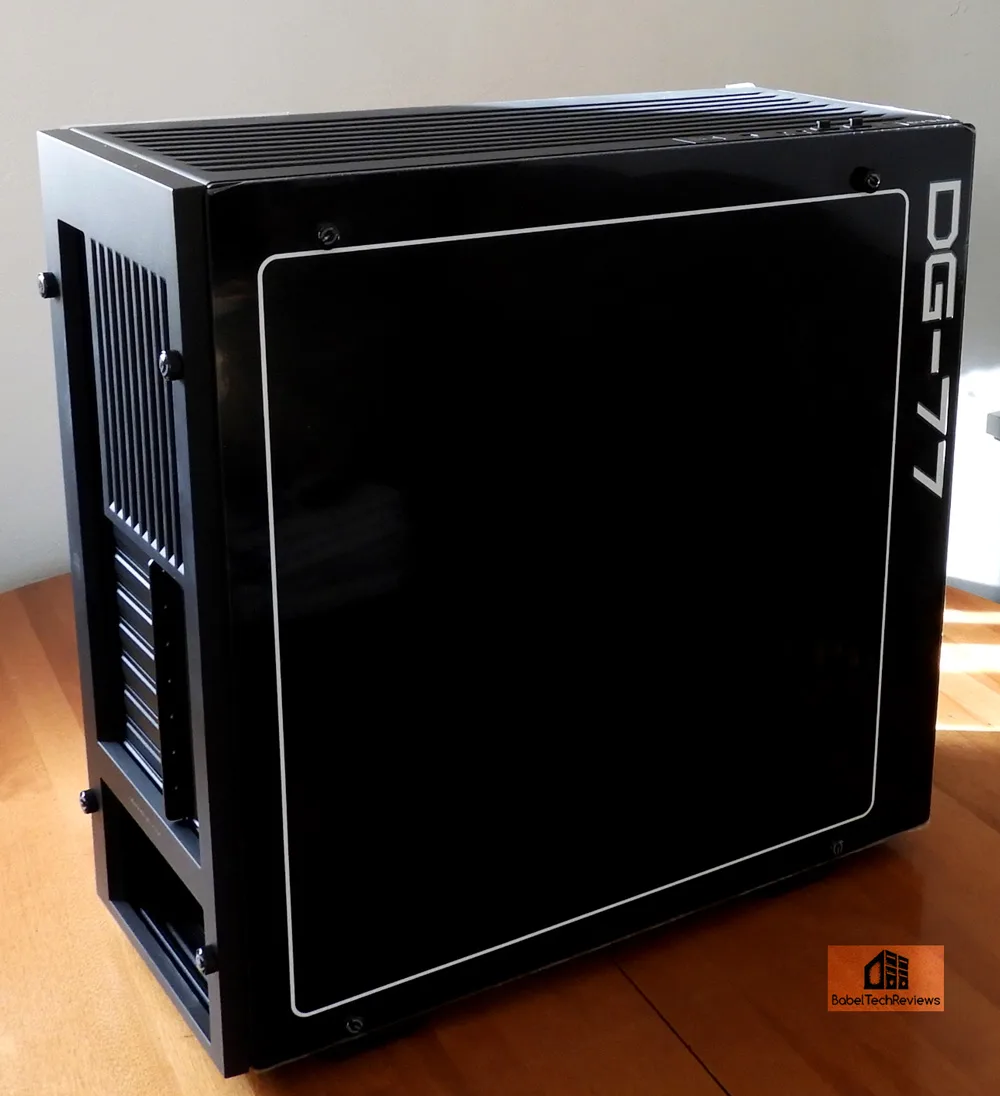
Besides building our EVGA DG-77 mid-tower case for the evaluation which will feature the TITAN Xp and the EVGA Z370 FTW motherboard, we also expect to be benching a brand new video card shortly and we are also working on an article featuring 4K HDR TV gaming. Stay tuned!
Happy Gaming!
