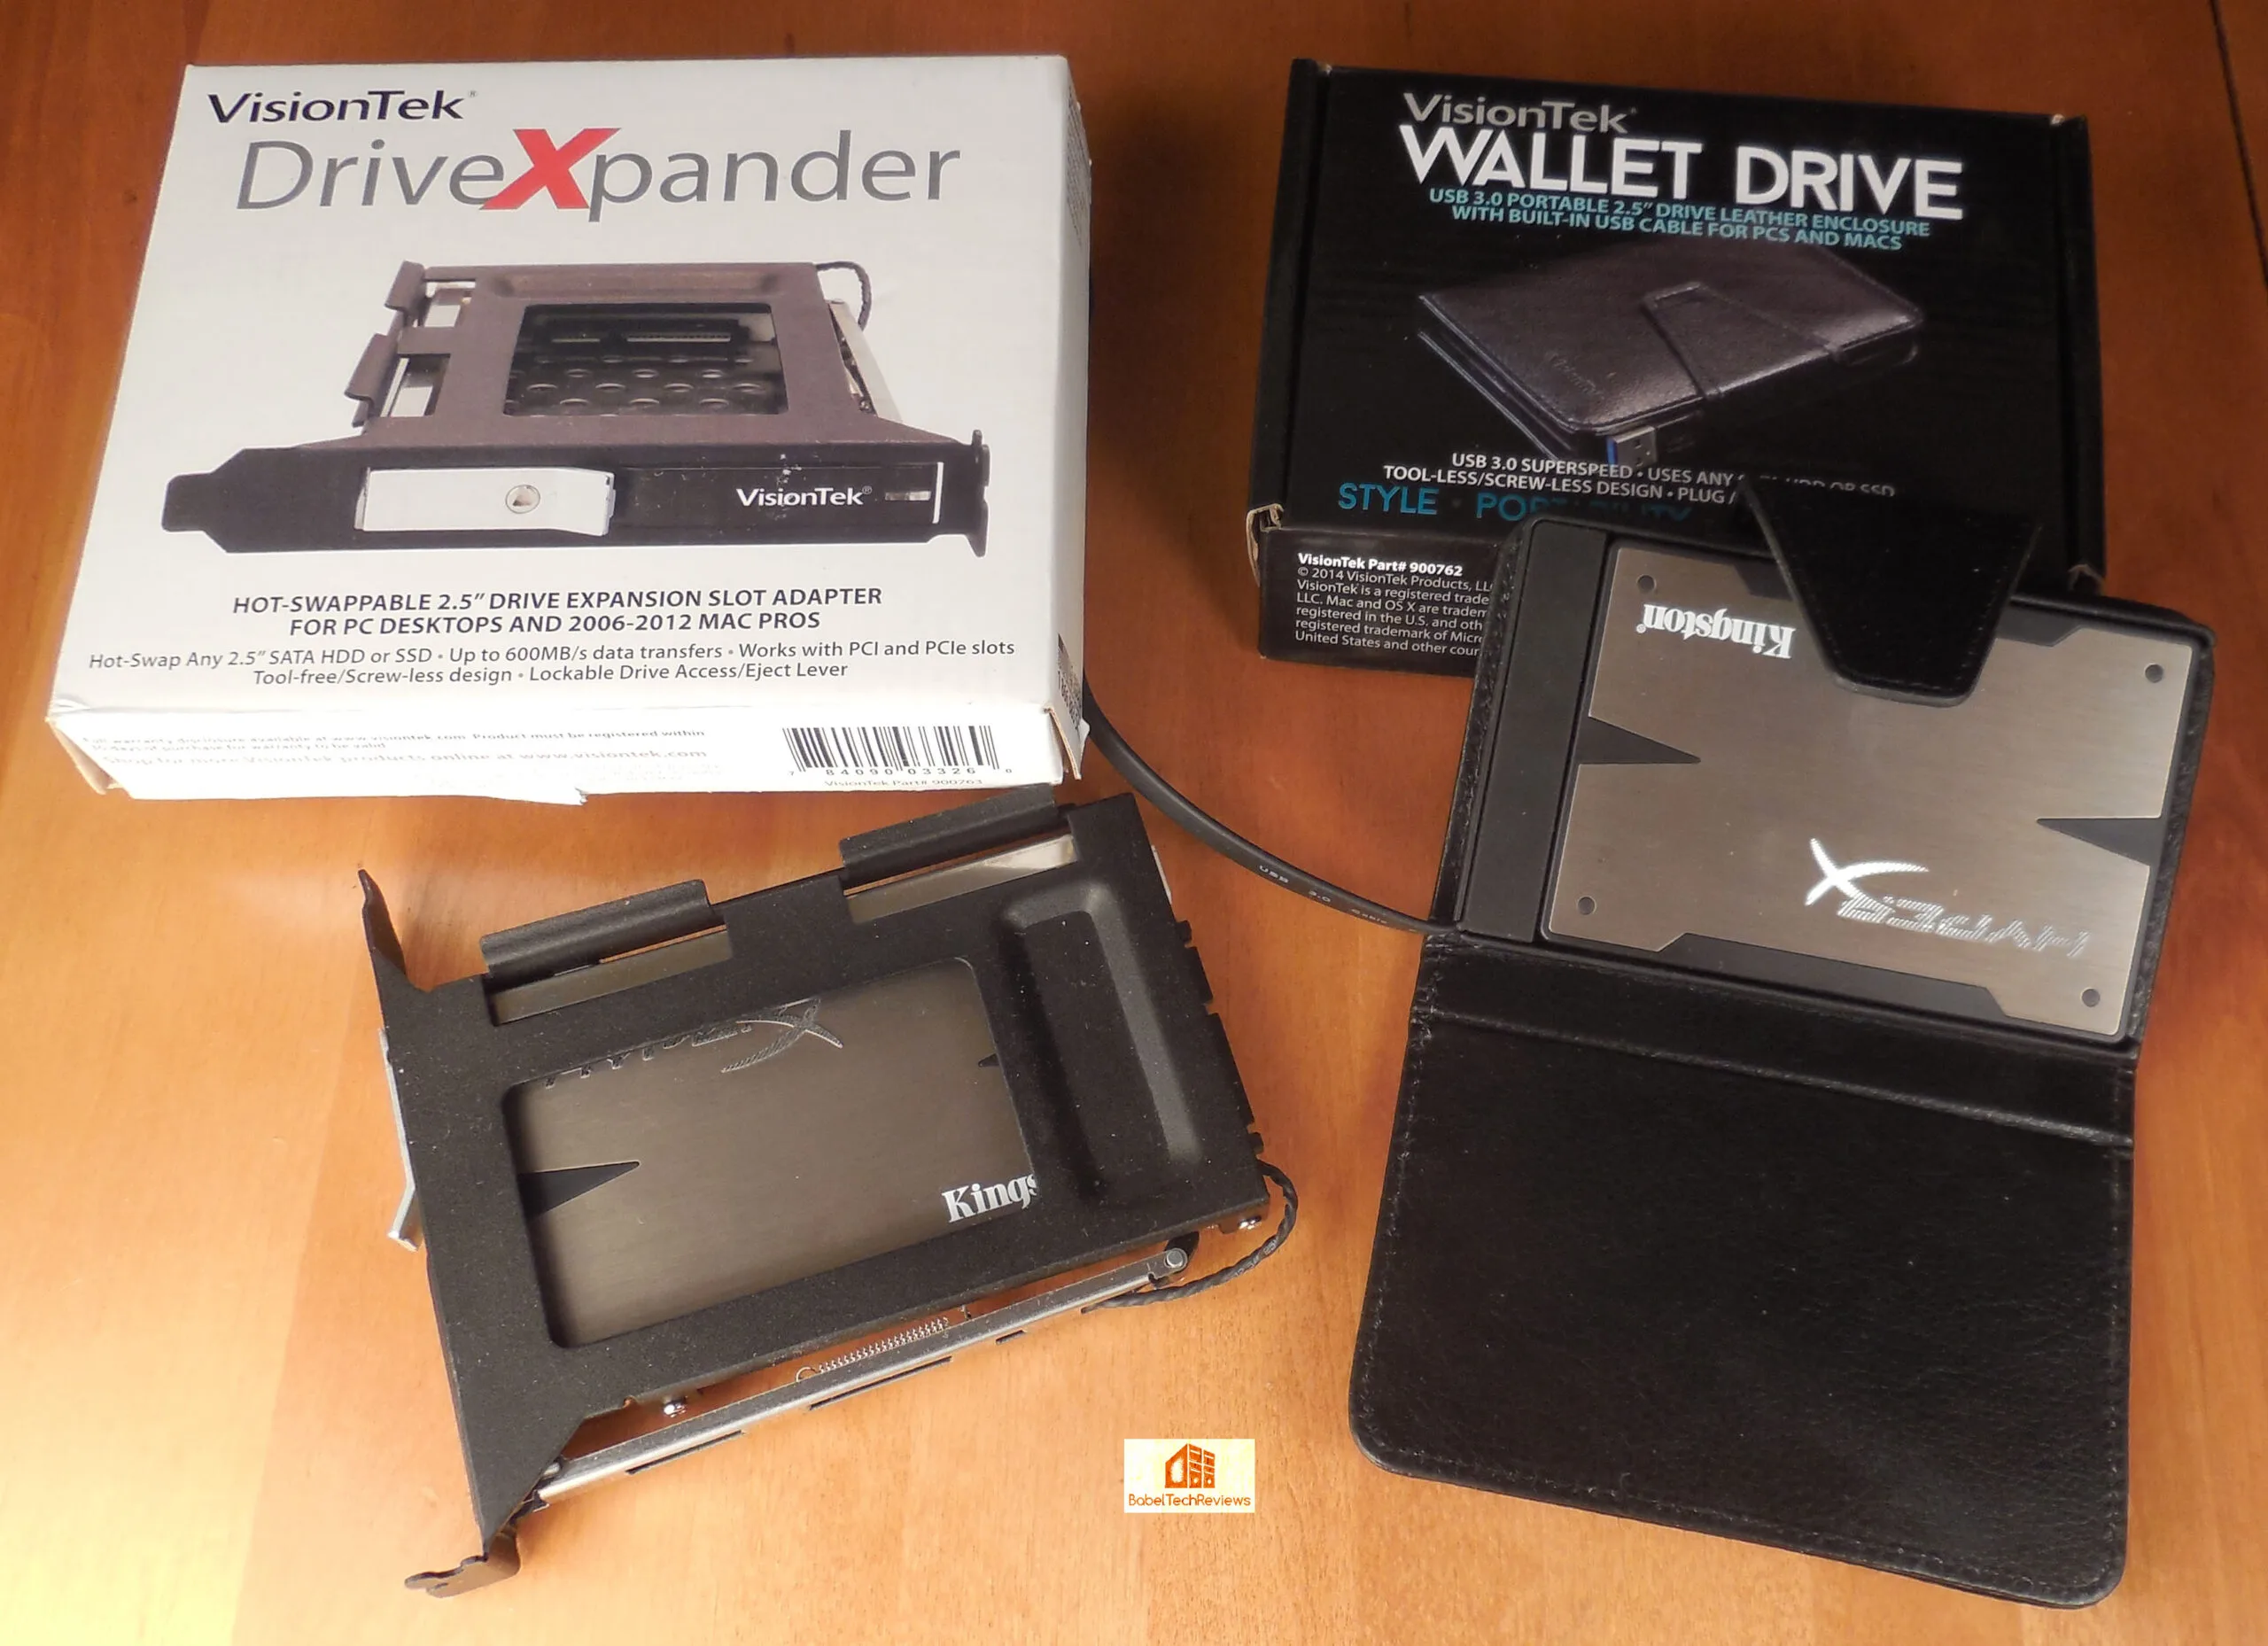
 VisionTek announced the VisionTek DriveXpander and Wallet Drive back in late February, and we are going to evaluate these two drive accessories that can make ones life a little easier.
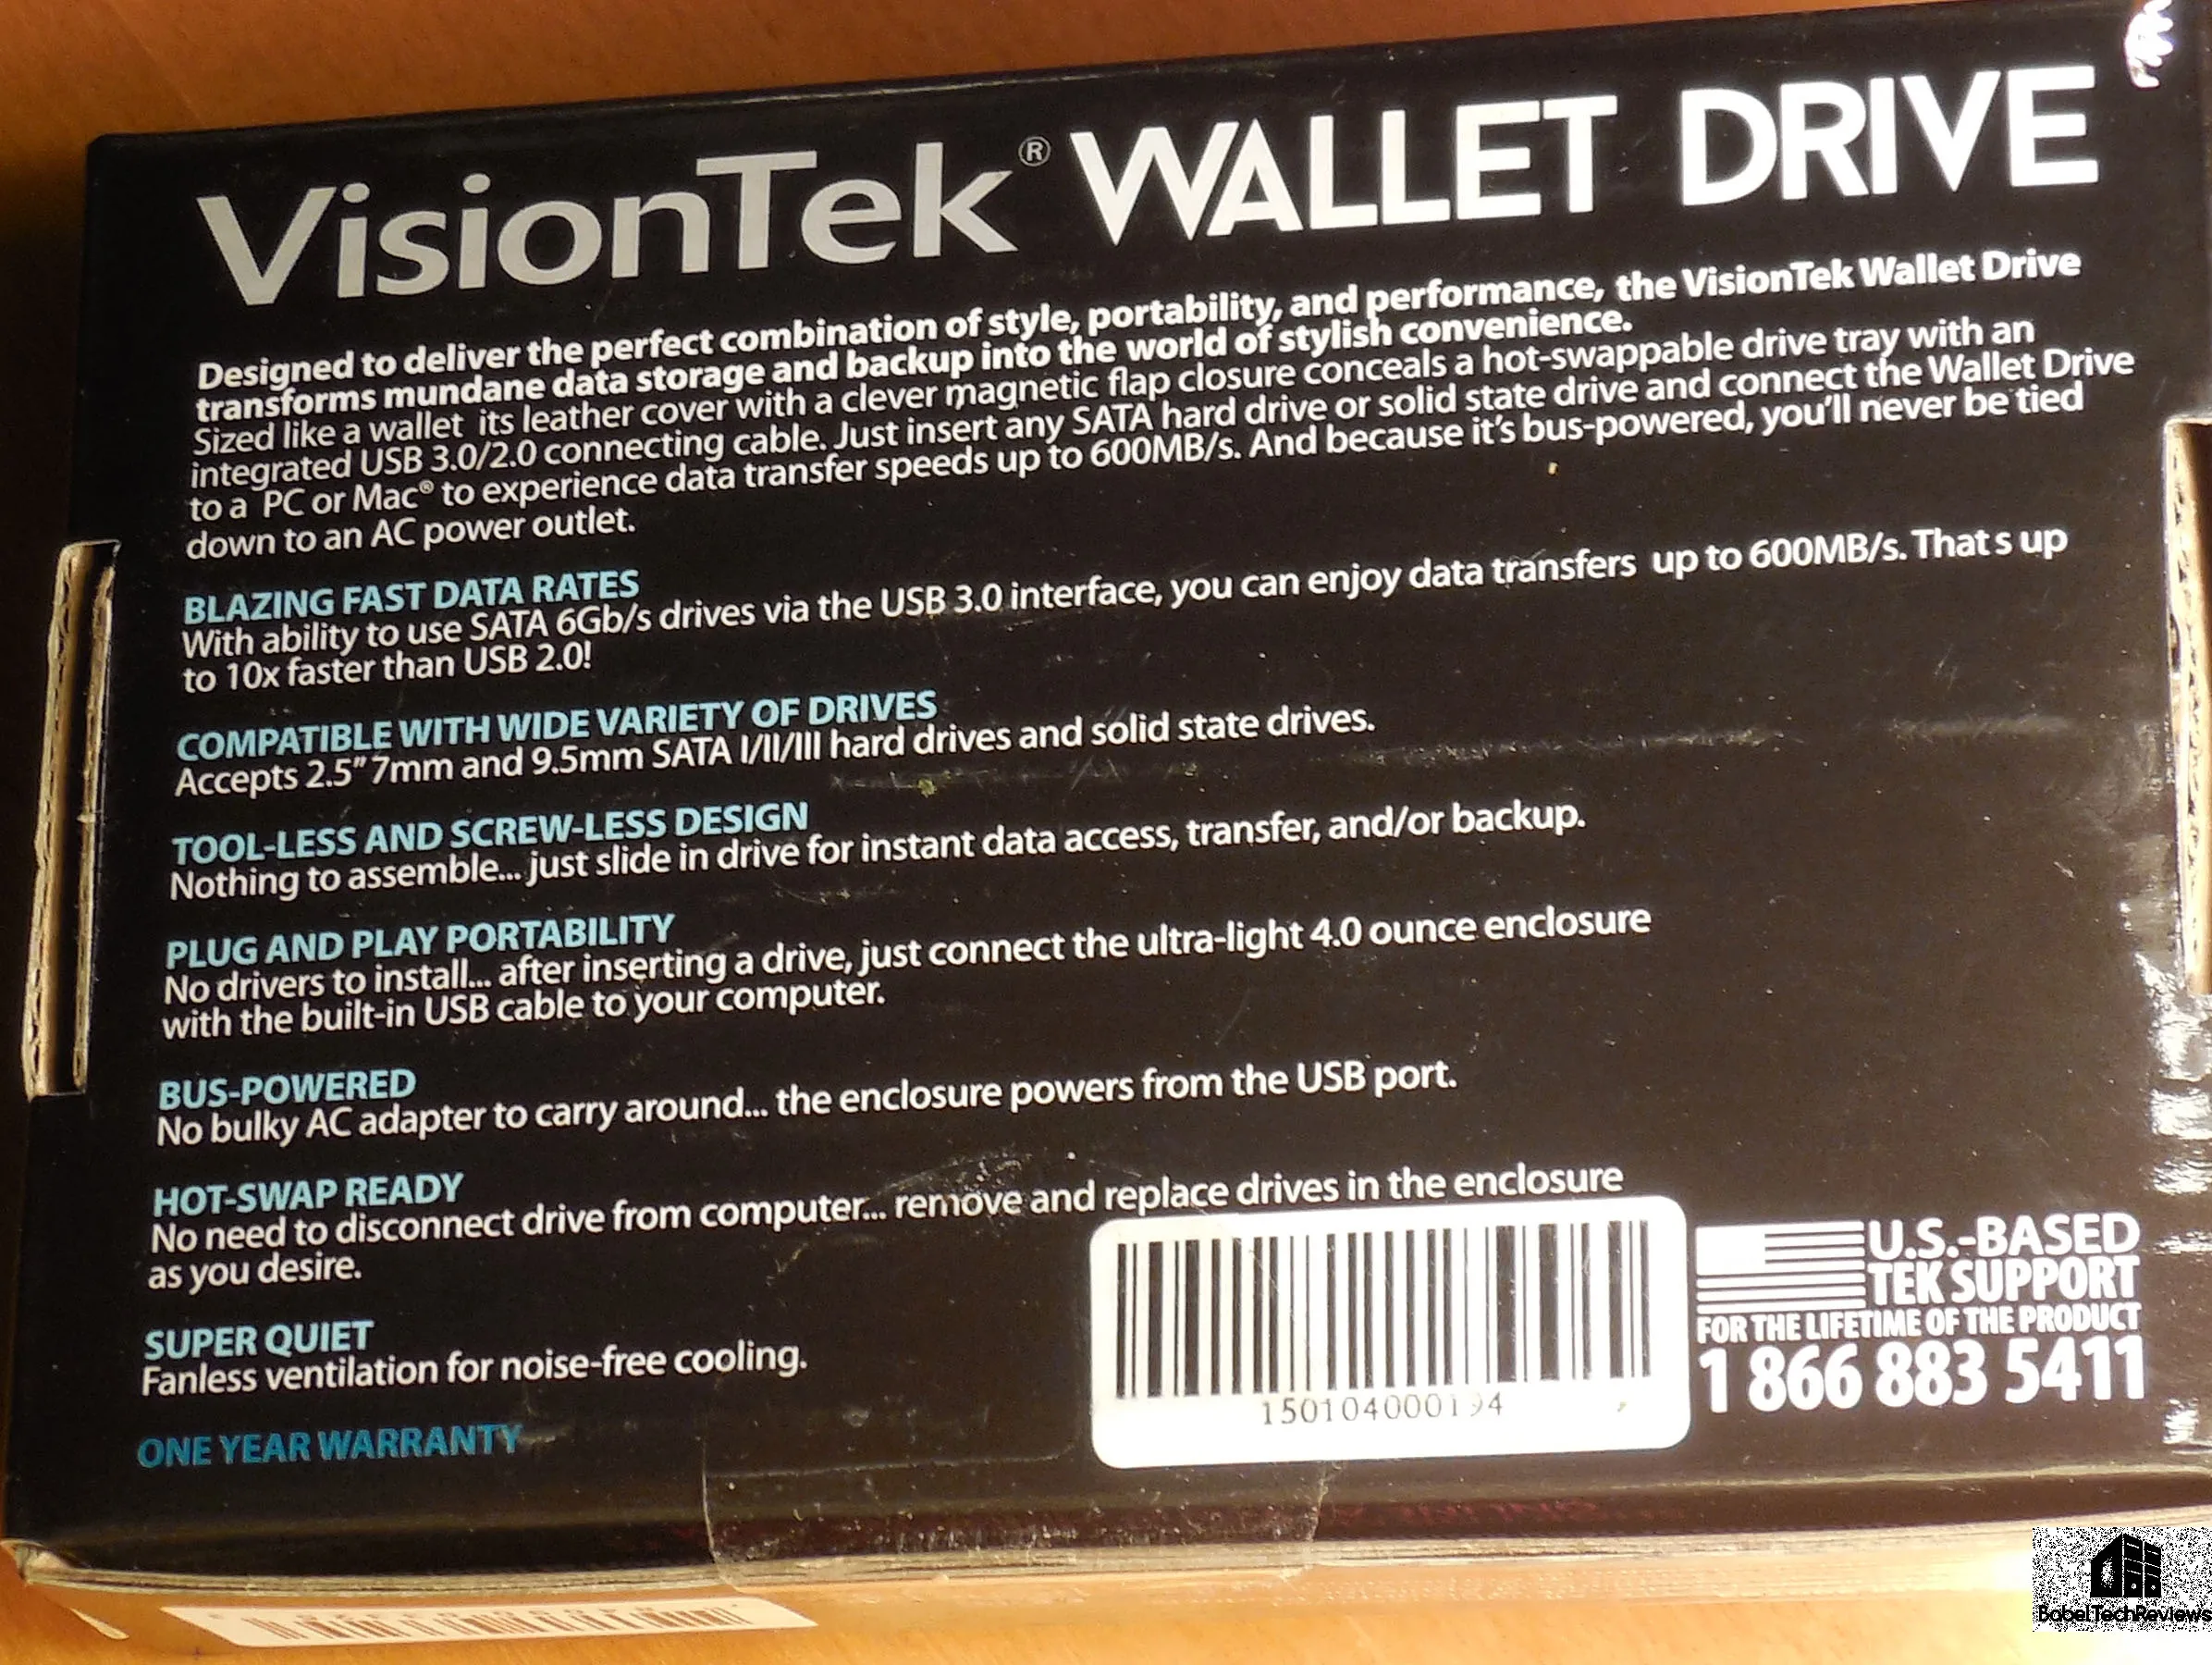
The VisionTek Wallet Drive is a portable USB 3.0 hot swappable 2.5″ drive enclosure that allows you to put 1TB or more of SSD storage into your shirt pocket for about $17.99 from Dell.com. We will test its performance in this review, including timing the transferring of 50GB game files.
The DriveXpander is designed to fit a PCI or PCIe expansion slot and it allows one to almost instantly change out SSDs or 2.5″ HDDs by accessing the back of the PC without opening the case.
Each of these drive accessories cost just under $20 and could be very useful in giving an old drive new life, or in making a SSD accessible and swappable instantly from the back of your PC. We will first take a look at the DriveXpander which can be found at Dell.com for $18.95.
The VisionTek DriveXpander
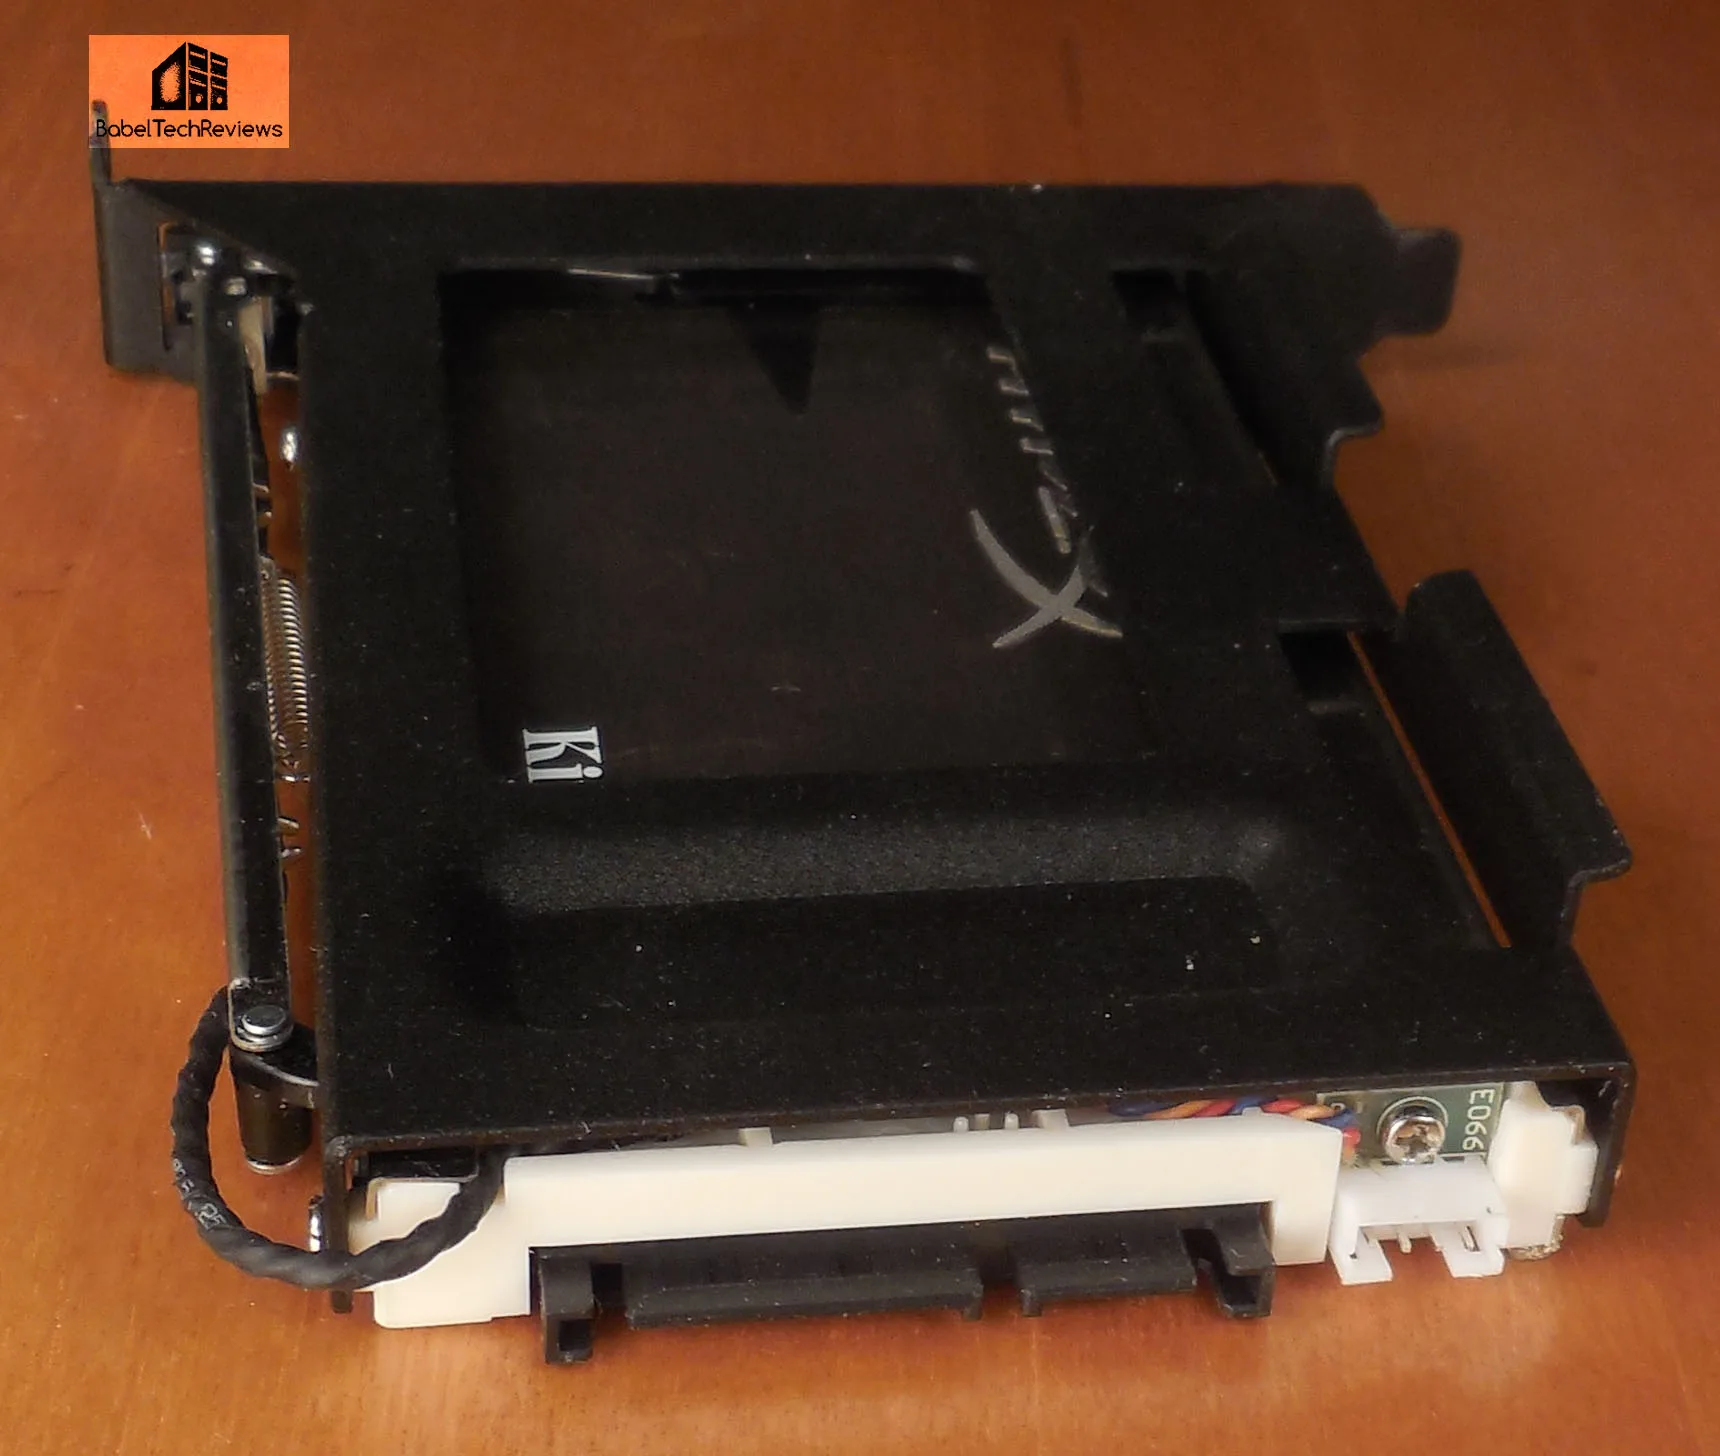
The DriveXpander needs no performance review. It uses a SATA cable from the PC’s motherboard to connect directly to the back of the drive, and its function is to hold the drive firmly until it is easily ejected from the back of the case. It is a pass-through device and it is solidly made of metal and plastic. For those concerned with longevity and ejecting a drive or drives daily, the DriveXpander uses an exclusive VisionTek NSS drive connector that allows for over 50,000 drive insertions.
We are using three identical 240GB Kingston HyperX SSDs for our testing. We will compare performance of the SSD on SATA held in place by the DriveXpander with an identical HyperX SSD inside of the Drive Wallet connected by USB 3.0.
VisionTek suggests that the DriveXpander increases the functionality of a PC (or Mac Pro) by:
- adding additional storage capacity when internal bays are filled or are not accessible.
- offering quick and easy bare drive status verification.
- providing individual drive access from a storage array with minimal or no system down time.
- enabling removable storage to be added to the rear of a system – especially handy for HTPCs
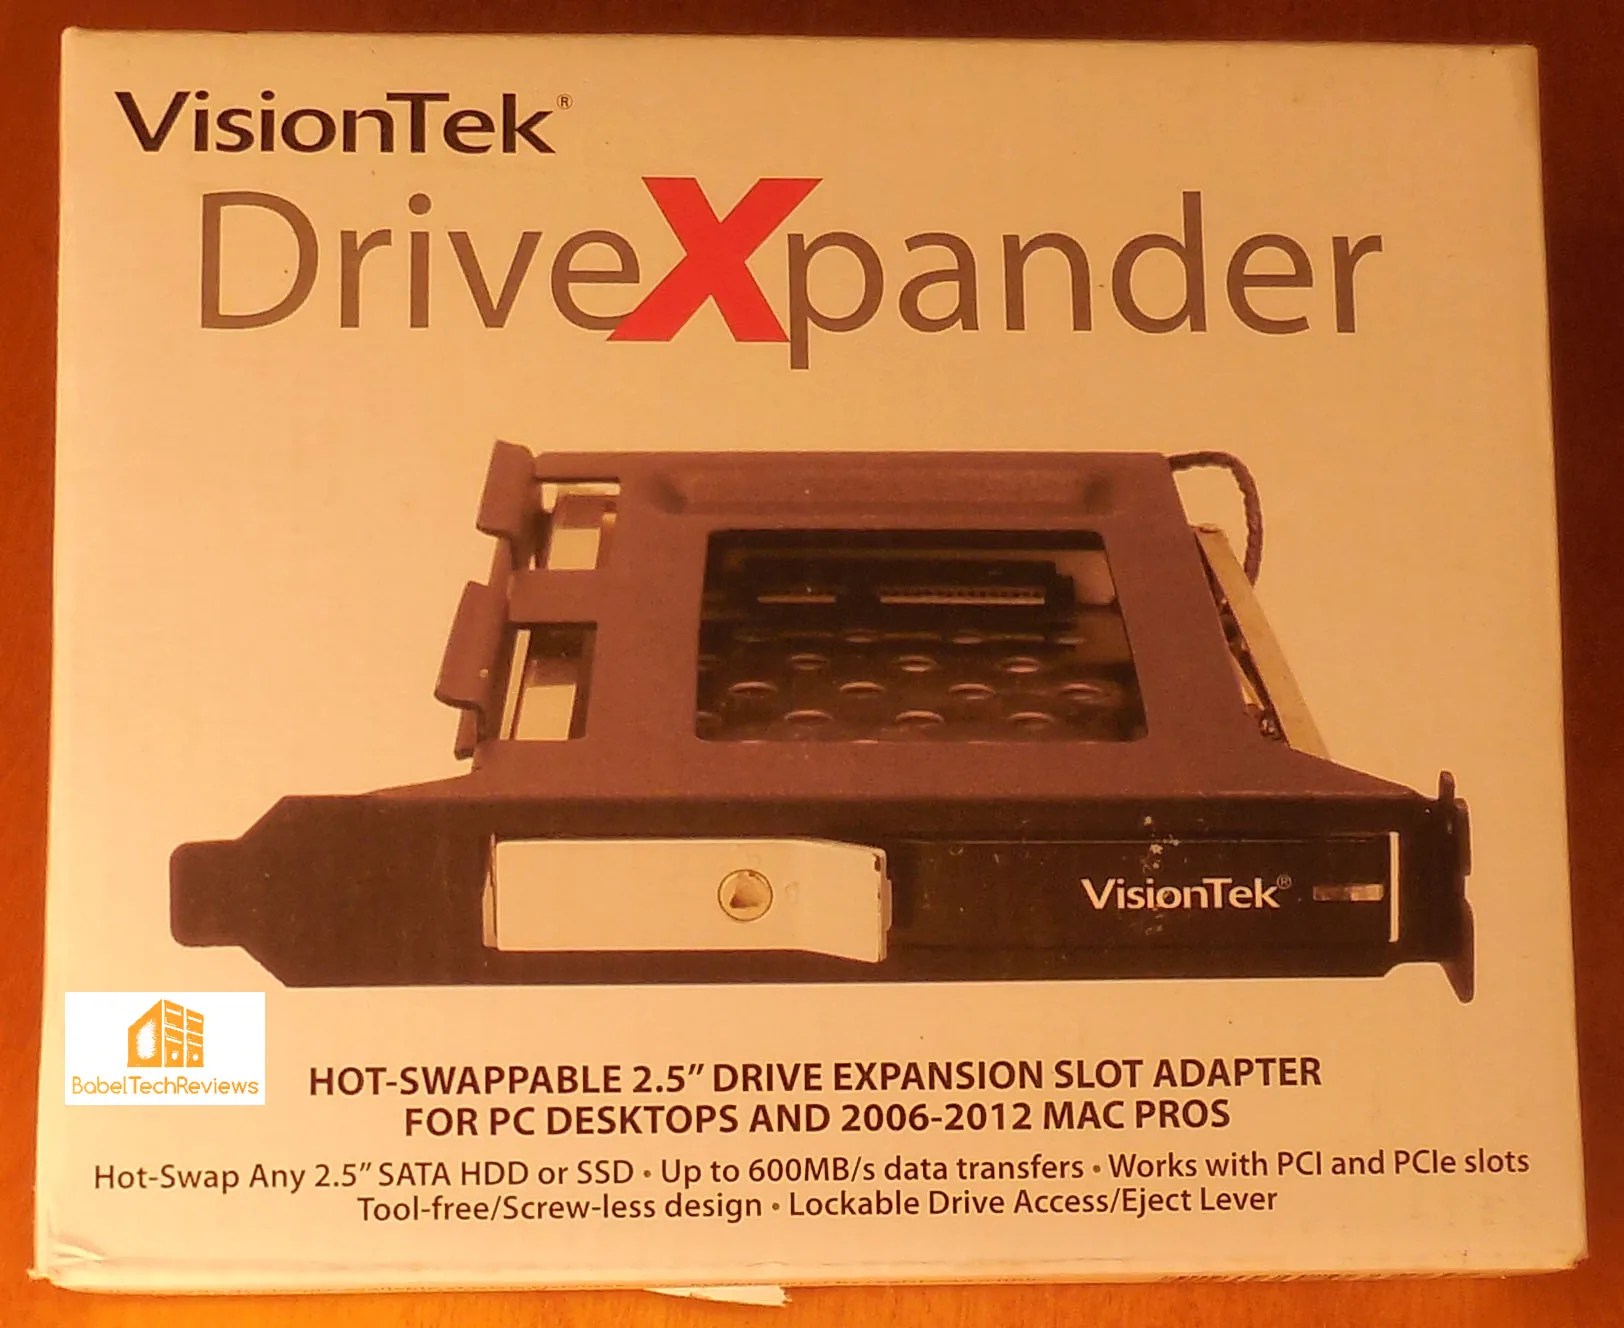
Unboxing the DriveXpander
The box is small but it explains what it does. It mentions “up to 600MB/s data transfers”, but it is more of a pass-through device that uses your own SATA connection and power to connect to the DriveXpander instead of directly to the drive for ease of repeated insertion and removal.
This is the other side of the box:
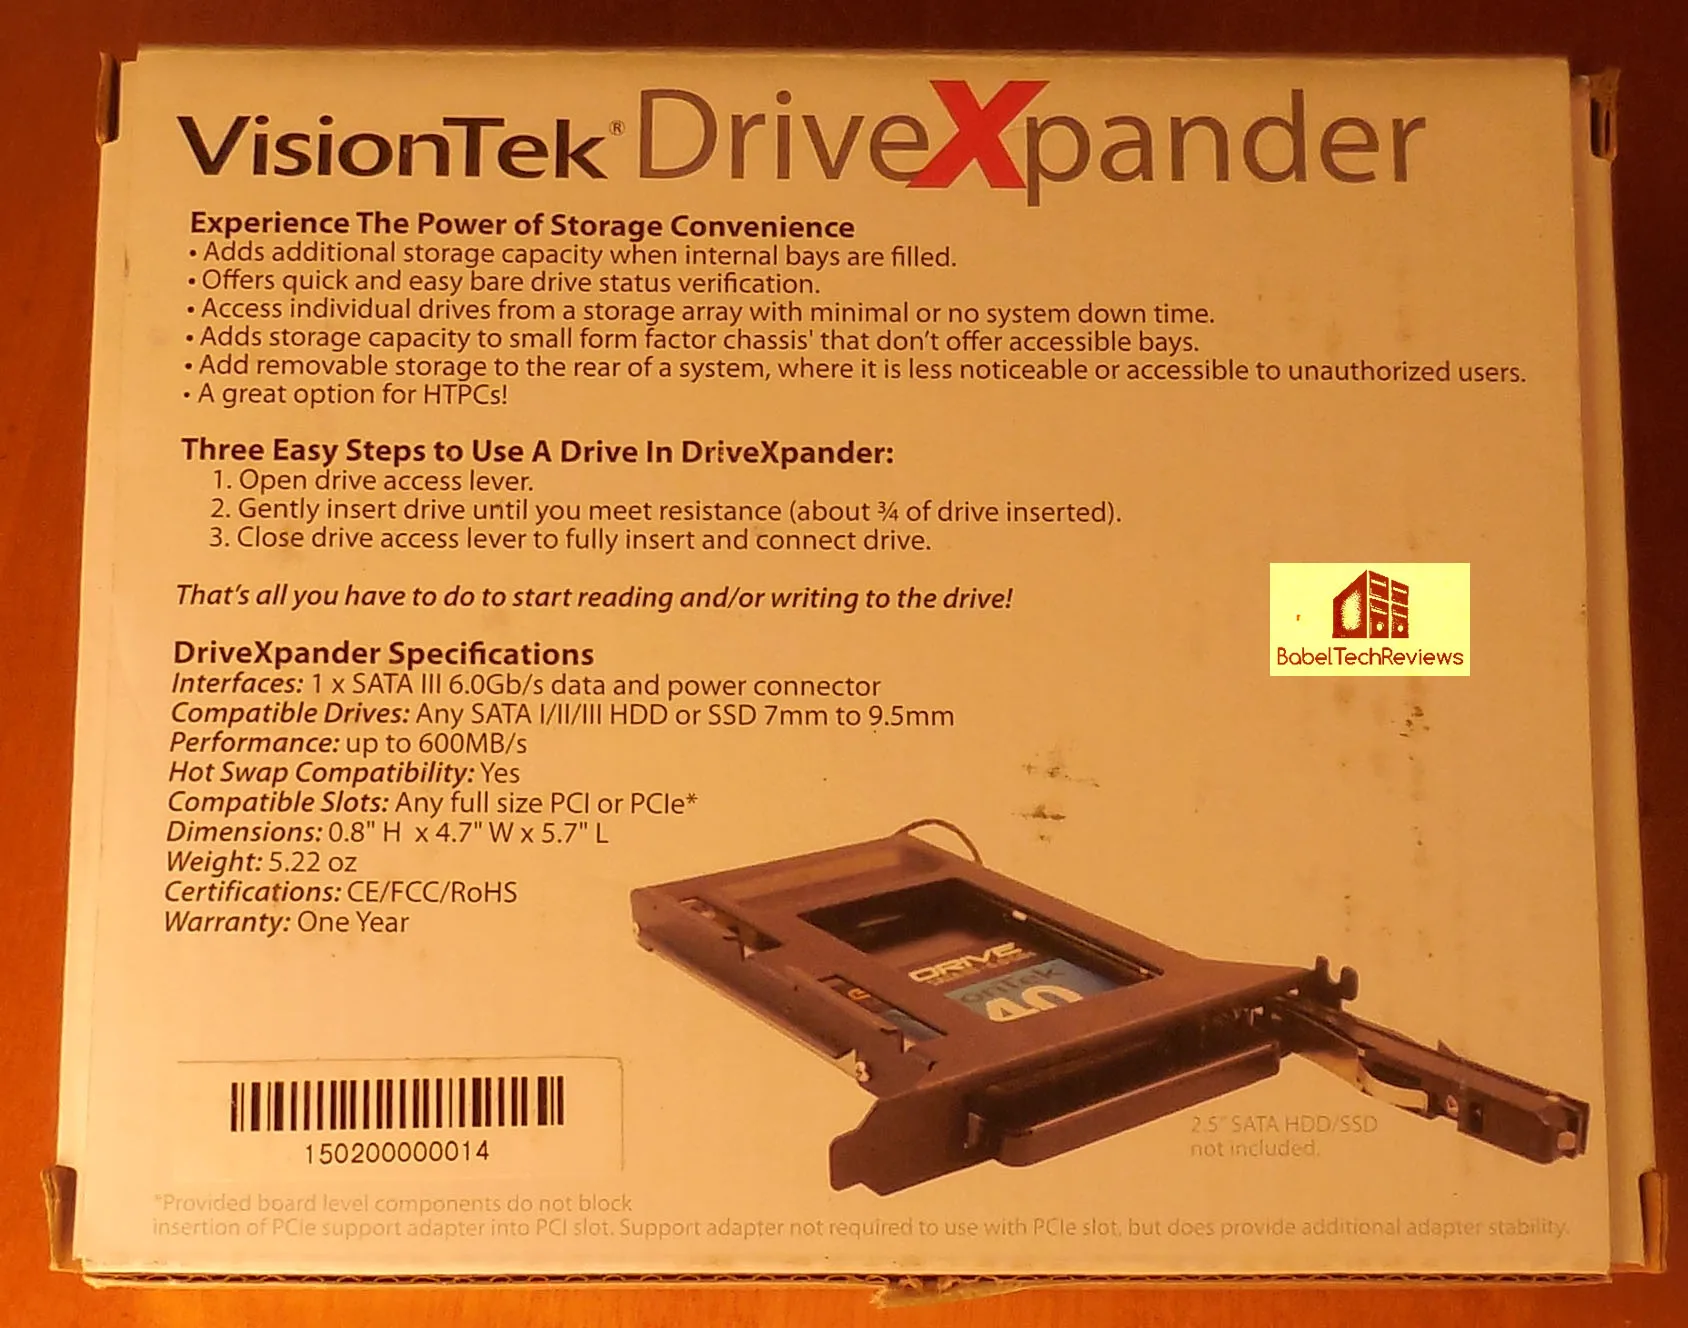
The reverse of the box emphasizes the DriveXpander’s ease of use. Install it and then just slide the drive in. Here are the pass through connectors.
 There are several accessories included in the box – a PCI/e lockdown screw, a red SATA cable, a molex to SATA power connector if you are lacking one; and a key to lock the drive firmly in place. There is also a decal attachment (bottom) for your drive to allow the drive to slide in and out with less friction. Finally, there is a PCIe slot stability adapter for a snug fit whether a PCIe or PCI slot is chosen.
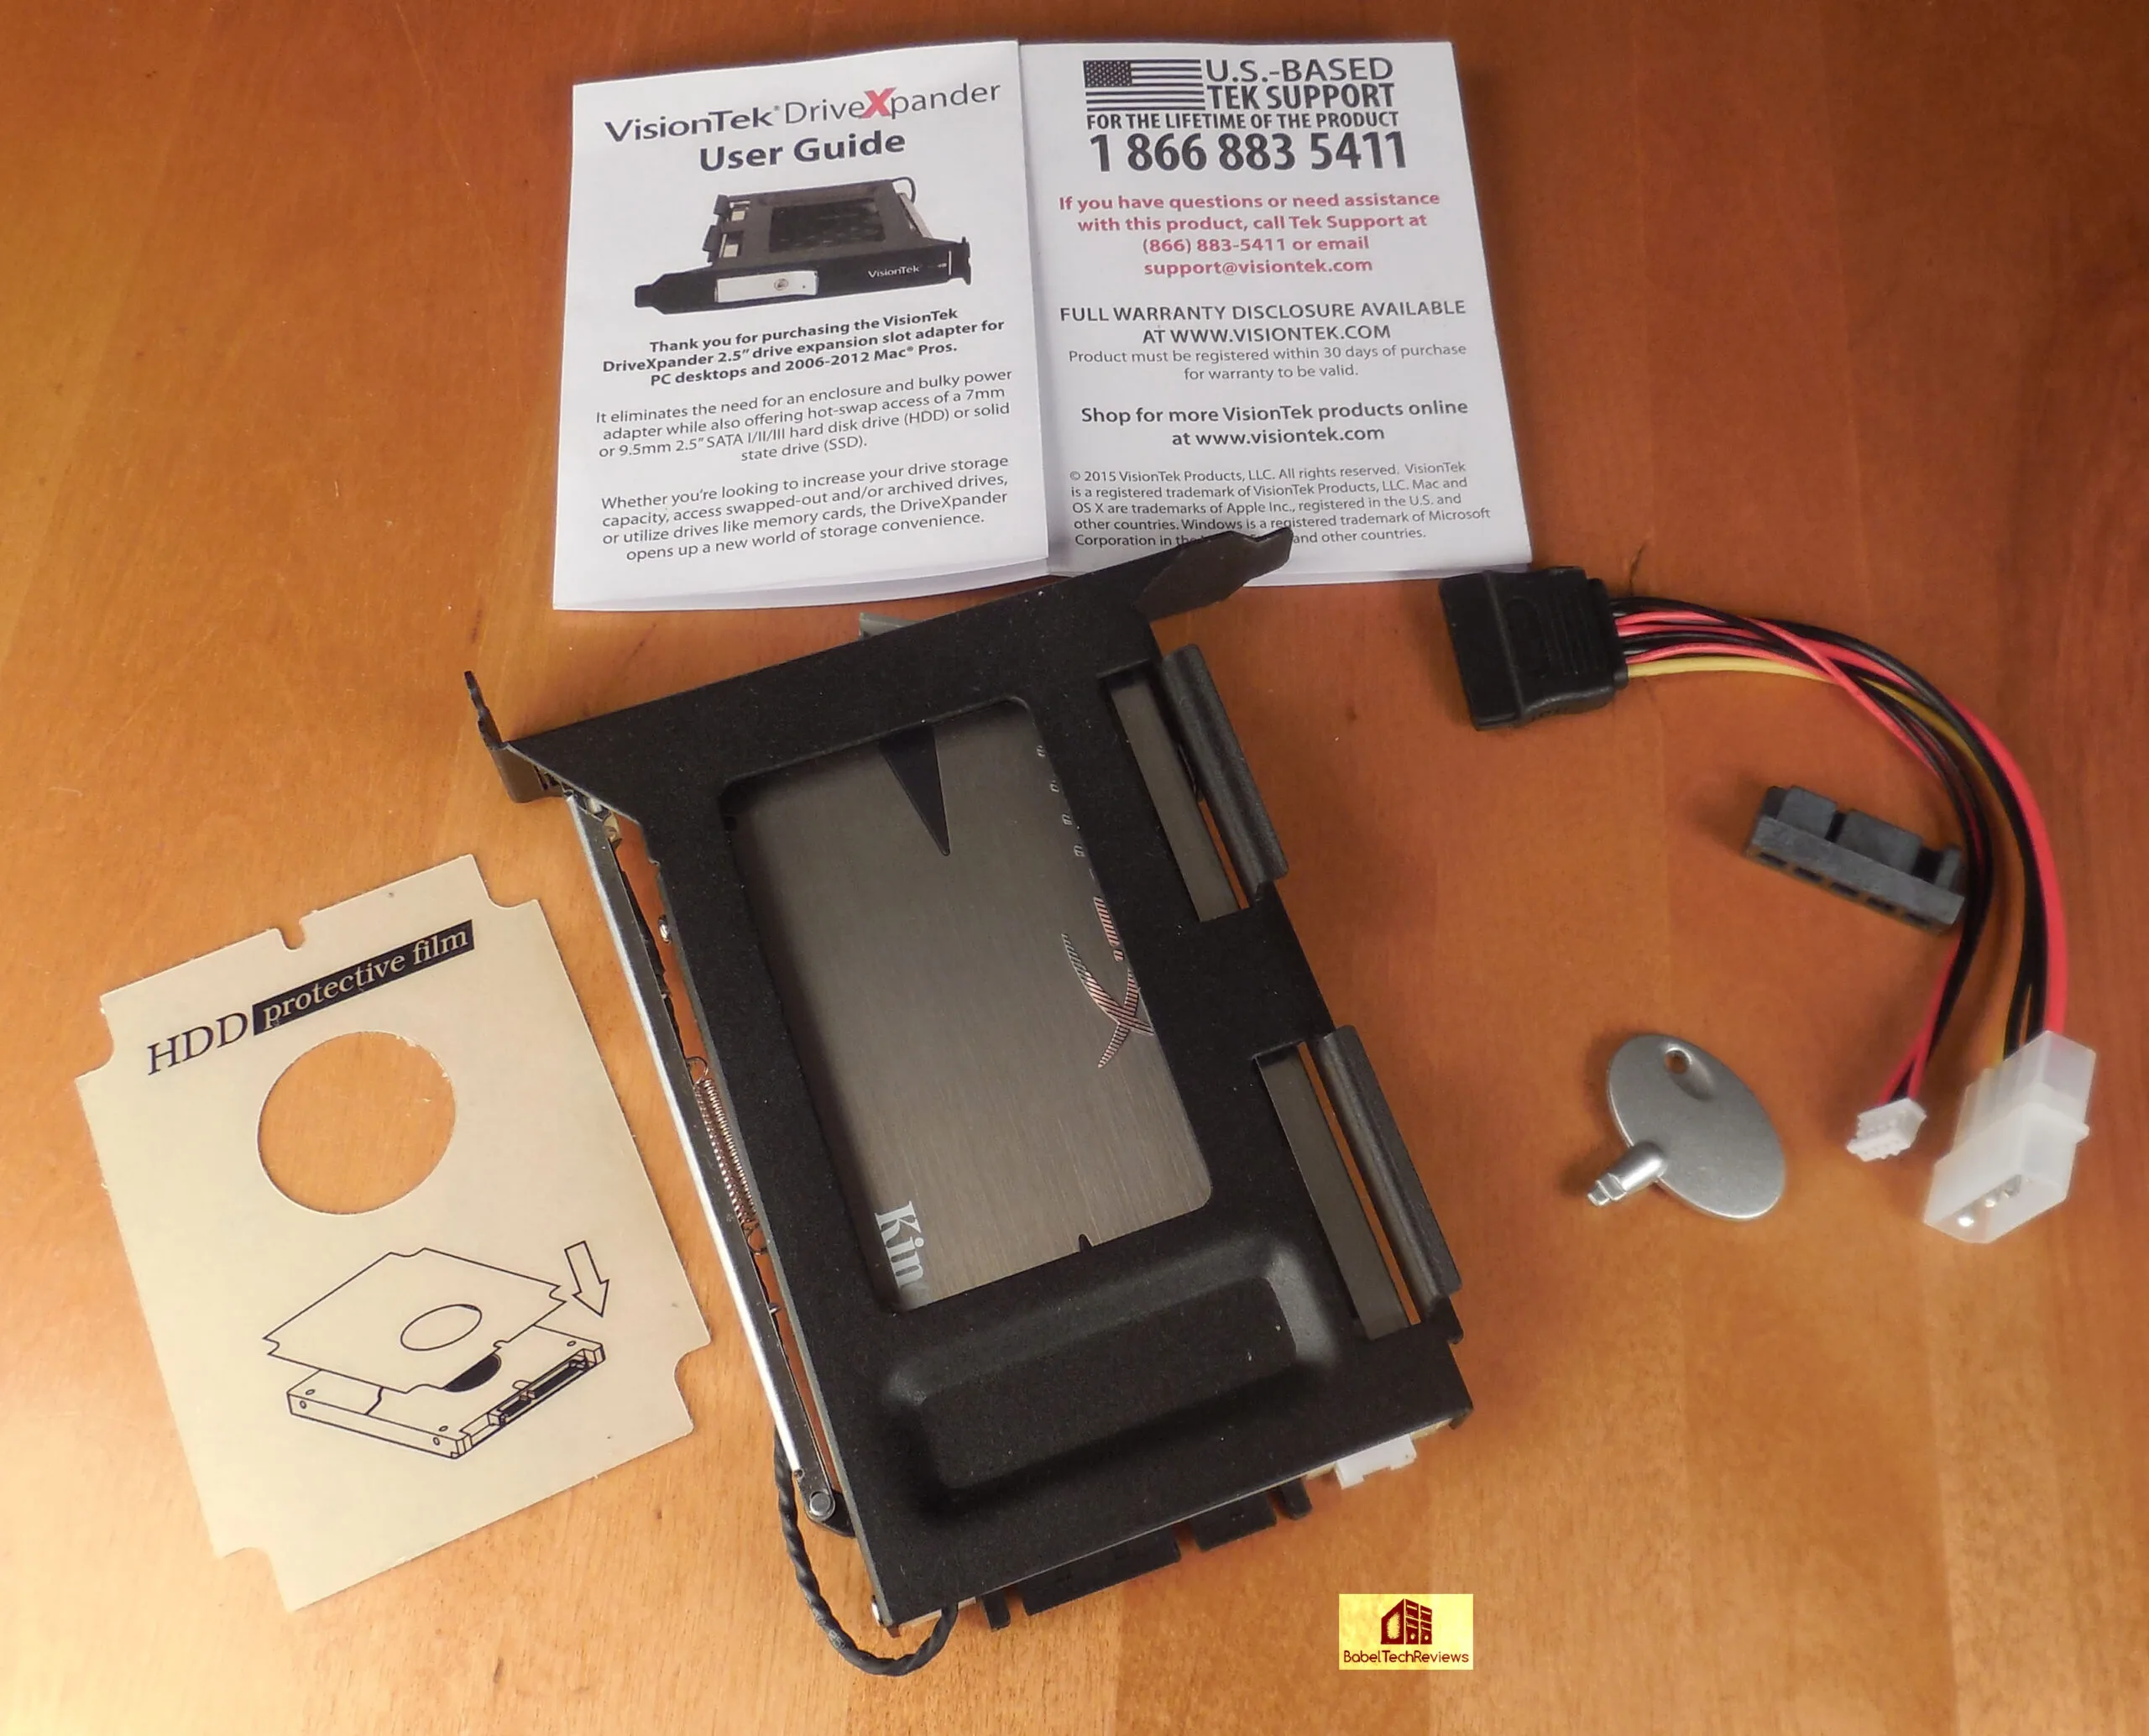
We found that the non scratch cover can be applied only once to a single SSD because it a stick-on decal. If one is planning to eject multiple drives many times, one might instead consider affixing the non-scratch film to the DriveXpander’s cage floor instead. To prevent theft, the DriveXpander features a special shaped key lock for long-term drive installation. Included also is a useful printed user guide that is refreshingly helpful and written in plain English, which has become very rare.
To Add A New Drive
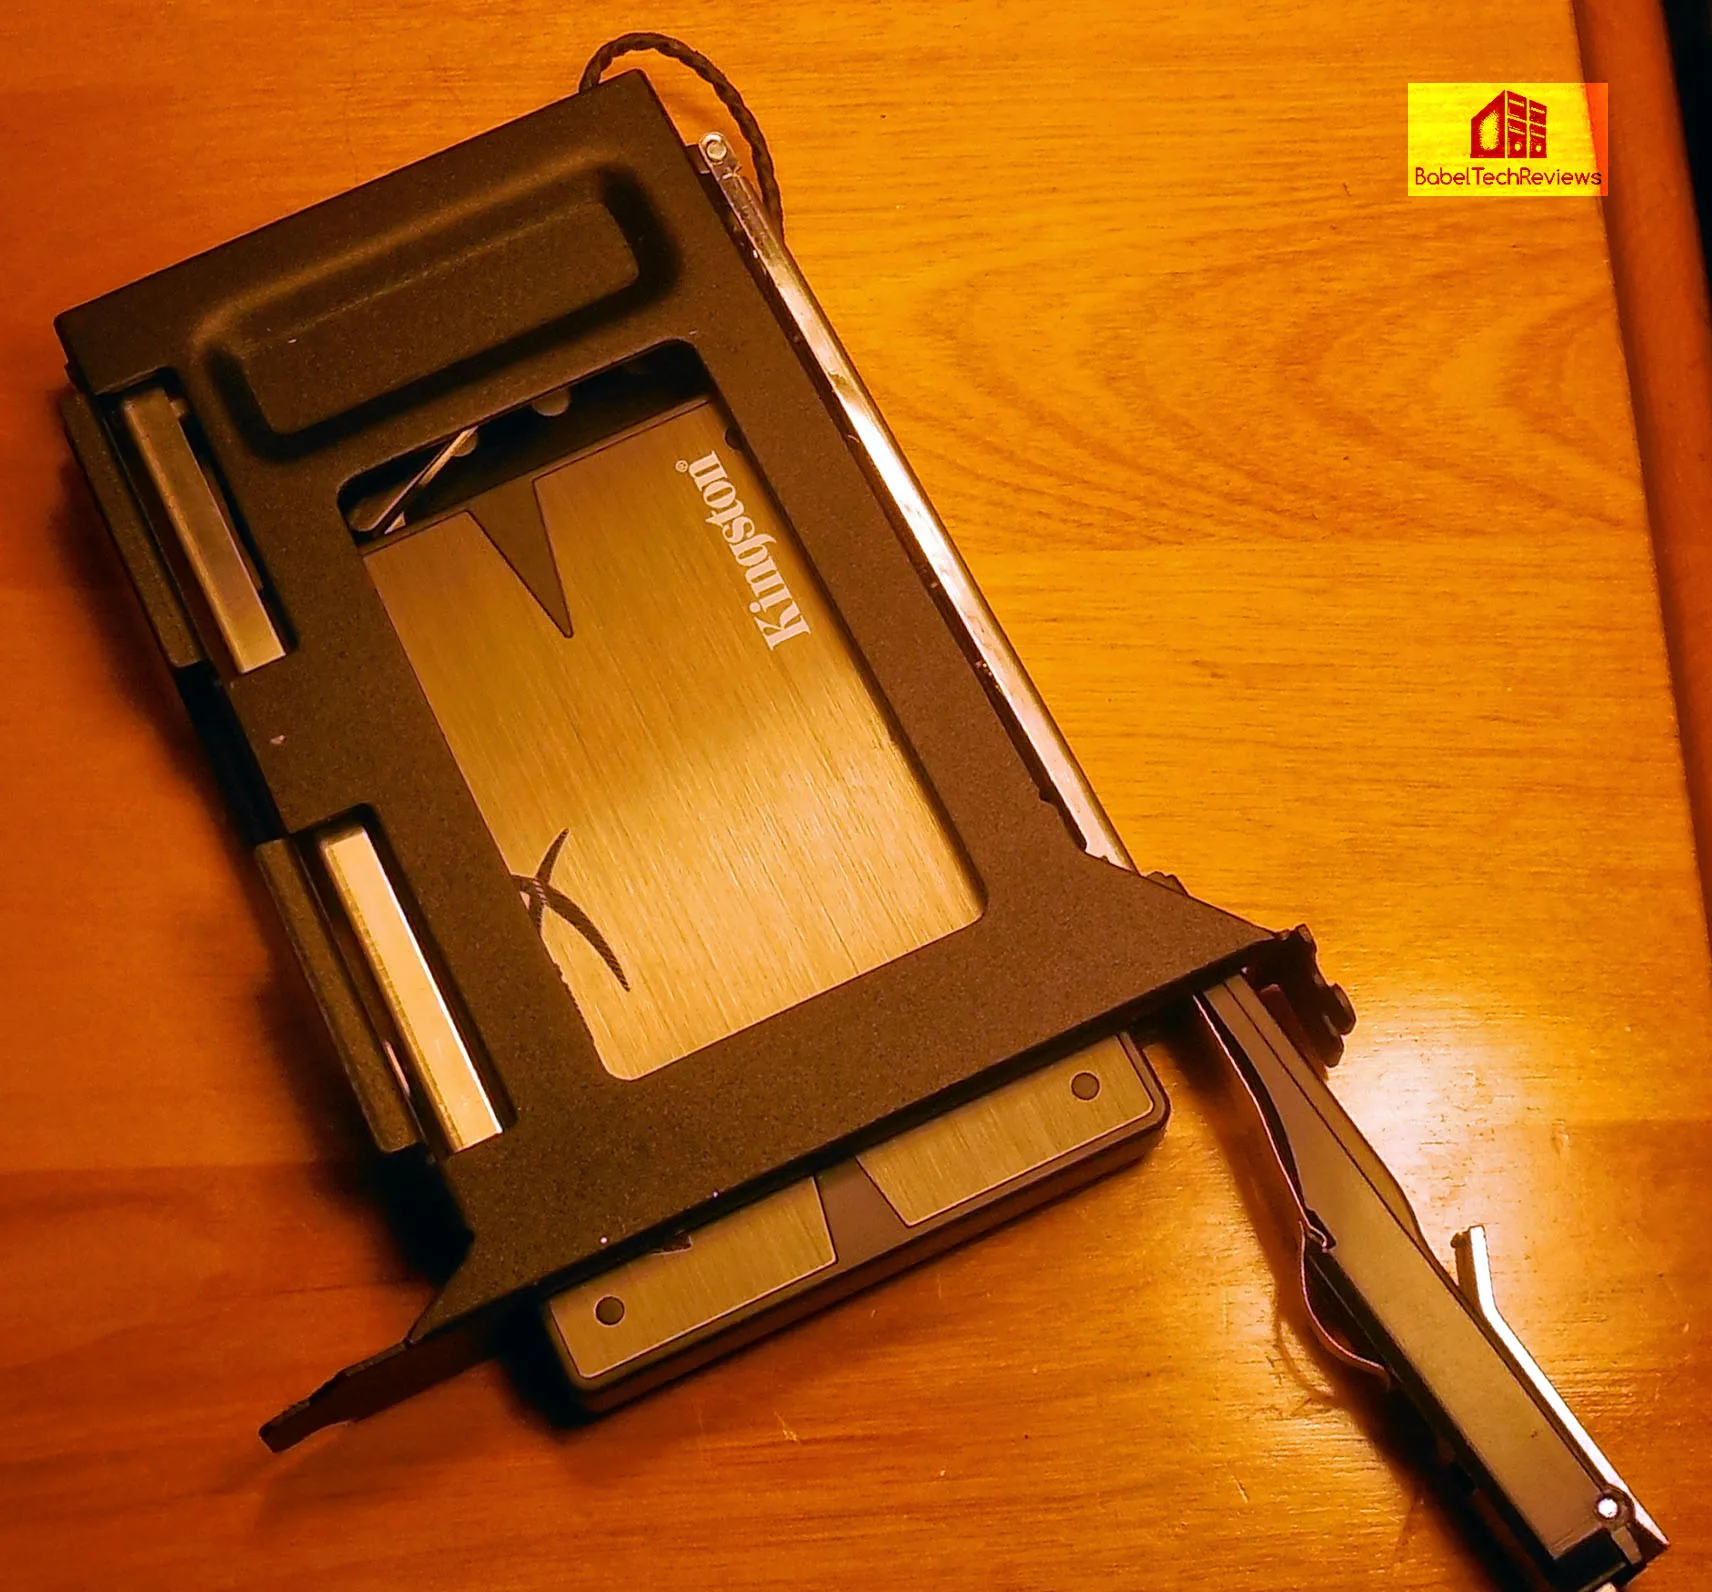
First, you open the case on the PC and install the DriveXpander into the slot so that it is supported by the PCI/e slot. Screw down the tab so it is held securely to the case and install a SATA cable and power connector into the back of the Drive Xpander. In the photo below, the HyperX SSD is inside the DriveXpander which is turned over to show the connectors.
The installation is as simple as adding a PCIe expansion card.
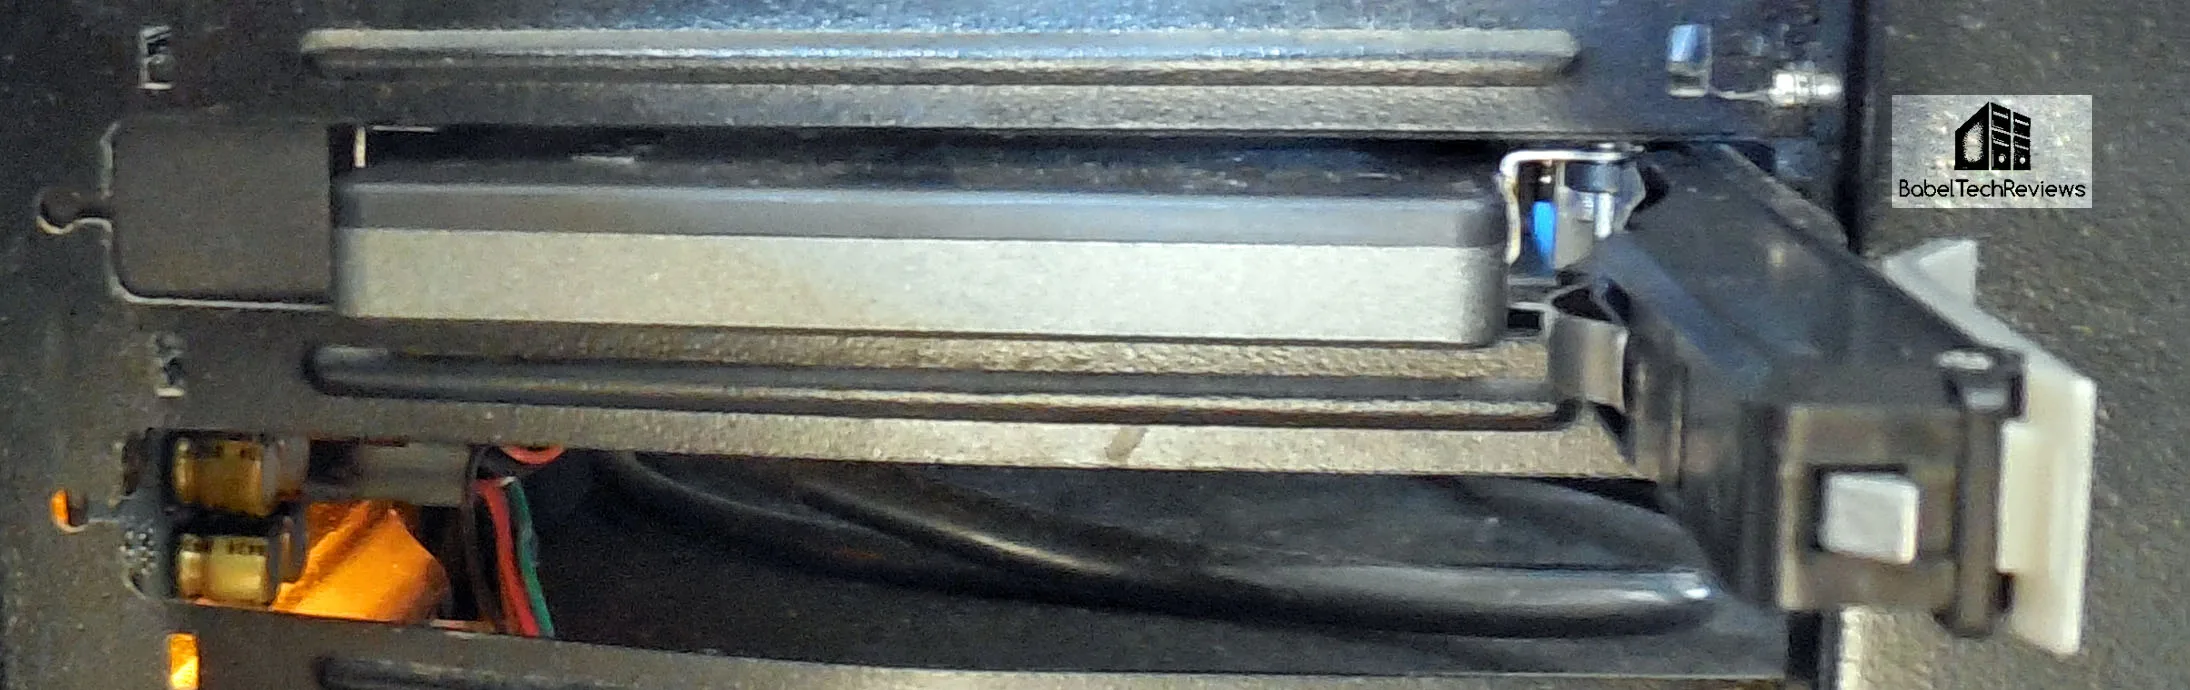
The DriveXpander eliminates the need for any external enclosure or power adapter for tool-free and screw-less drive use. After an quick installation, users can read and write to a 2.5″ SATA I/II/III hard drive or SSD (7mm to 9.5mm).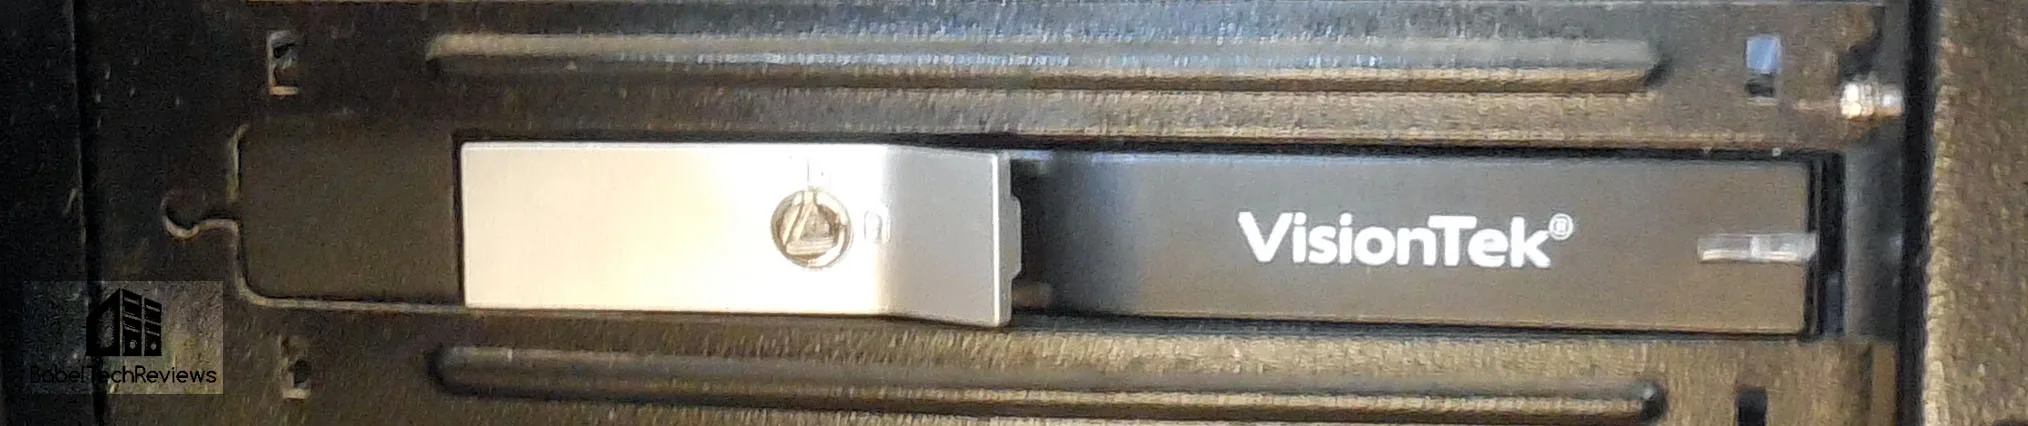
- Pull the drive access lever on the DriveXpander.
- Insert a drive until resistance is felt.
- Close the DriveXpander’s drive access lever to fully insert and connect drive.
 Since the DriveXpander only perfectly fits PCI slots, the box includes a custom PCIe slot stability adapter (below on PCIe slot immediately above “5X Protection”) for a snug, secure fit on either expansion slot type.
 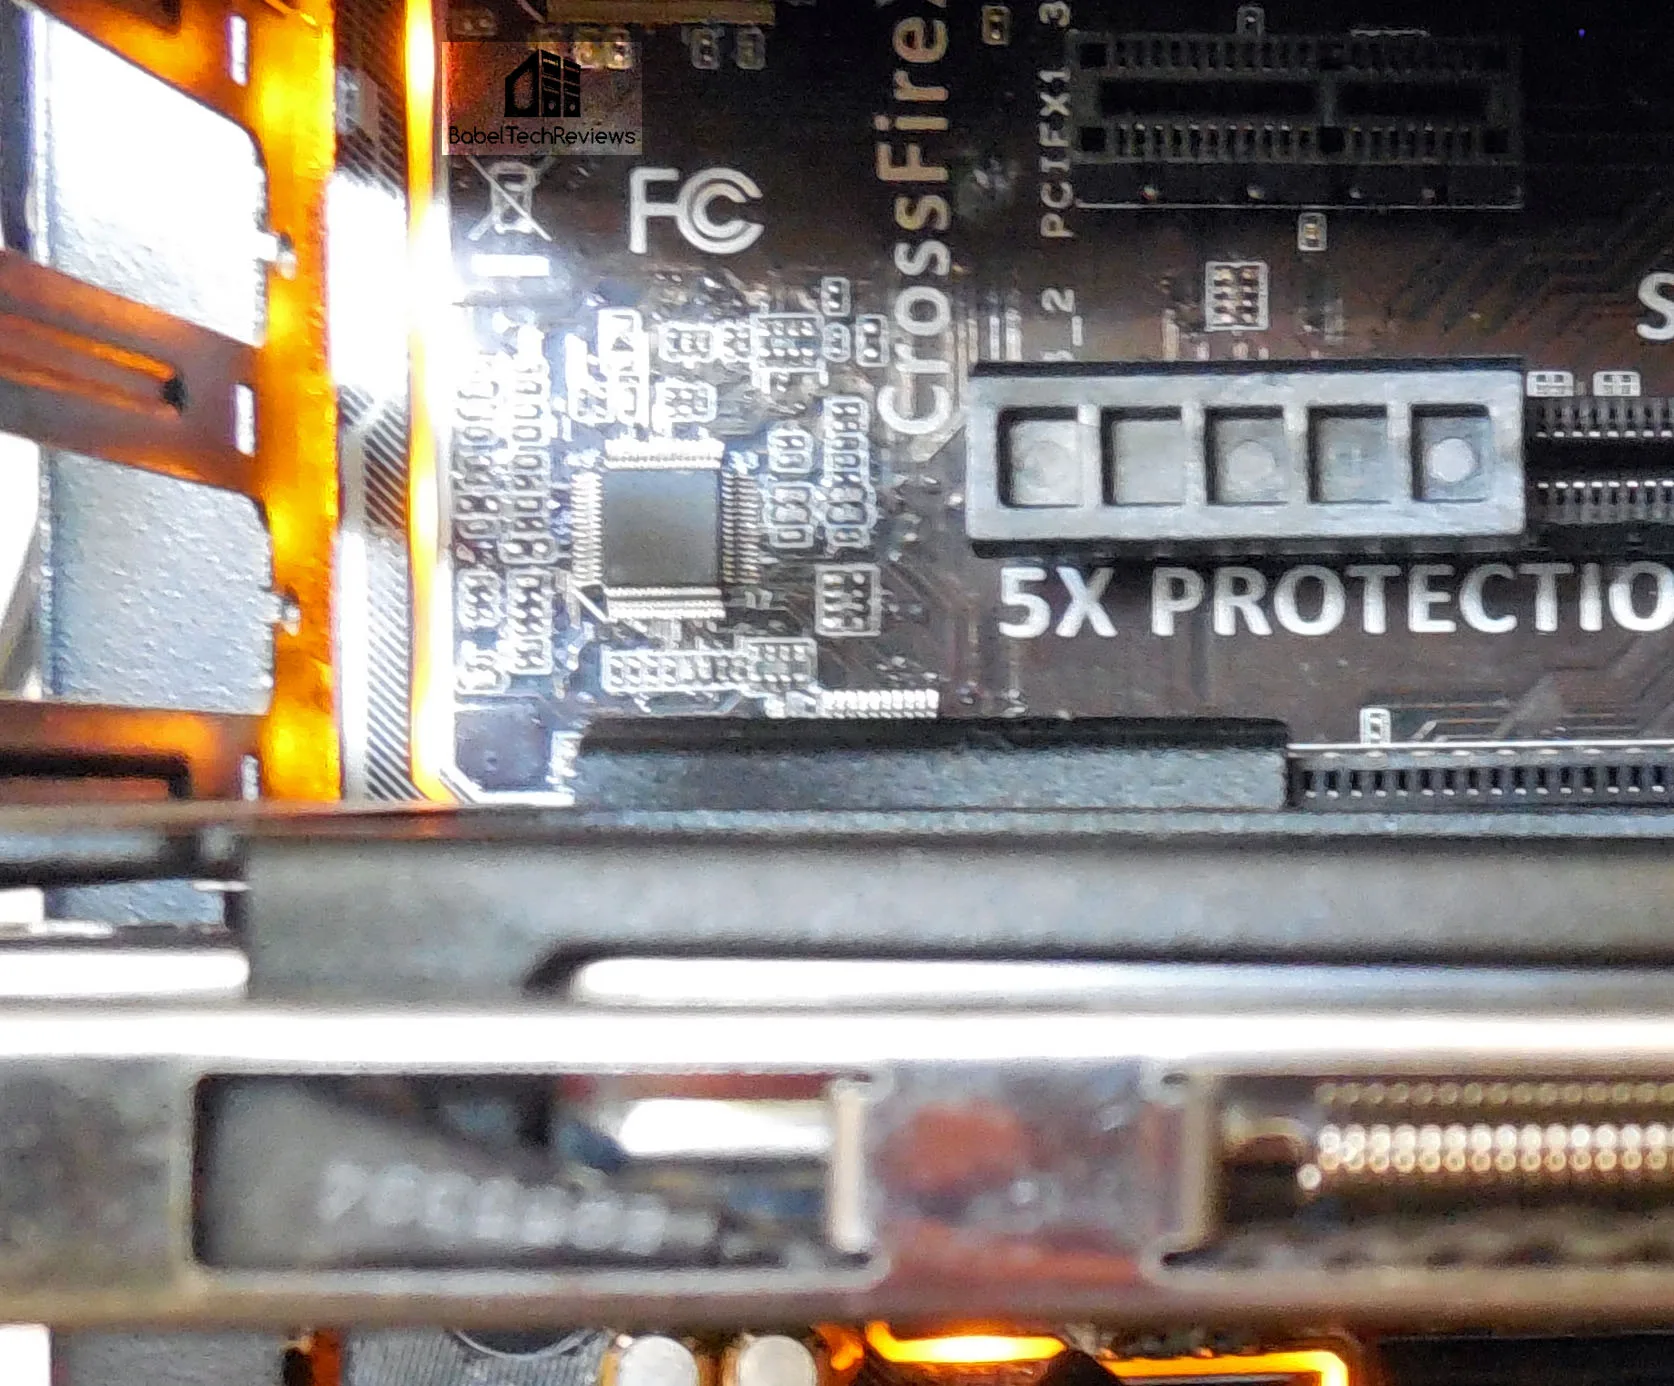 Without the adapter, there is a little bit of play on PCIe slots.
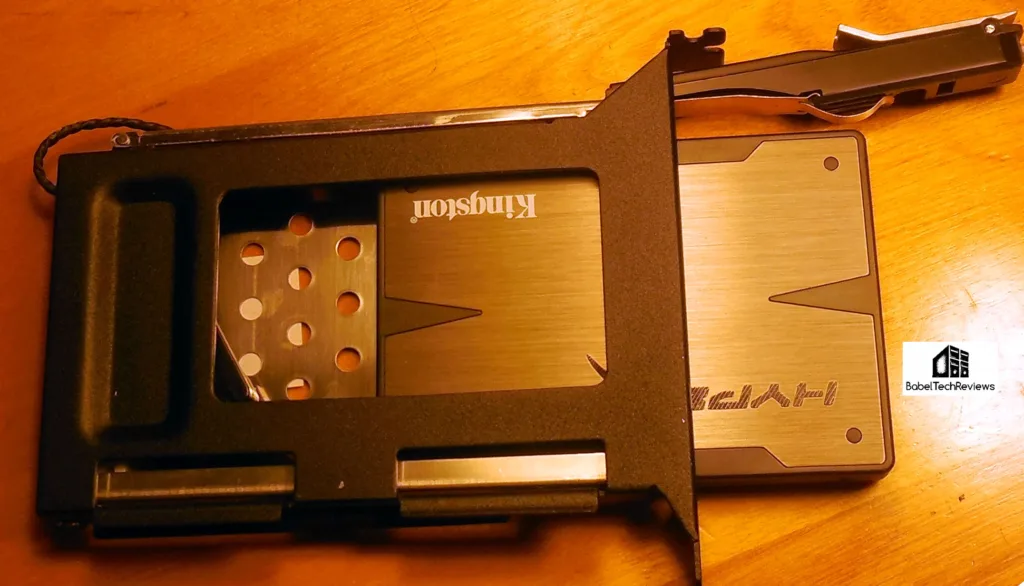
The DriveXpander features a patented non-scratch SATA (NSS) connector that makes a direct connection with a drive’s connector leads so users can install and eject a drive or drives over 50,000 times with confidence.
A perforated backplate and open cage design also ensures trouble-free drive use by providing effective passive drive cooling. We tested temperatures comparing all three SSDs under load and over time, and found that the SSD in the DriveXpander was just as cool as the SSD in the Thermaltake drive bay while the SSD in the Wallet Drive had reached +5F higher temperatures since it is fully enclosed.
DriveXpander receives BTR’s Editor’s Choice Award!
We love it! Instead of opening our case panel, or working from USB 3.0, we now have instant direct physical access to our SSD which can be changed out instantly, one for another. DriveXpander will remain in our own benchmarking PC and we feel that it deserves BTR’s Editor’s Choice Award.
The $19.99 MSRP DriveXpander includes all data and power cables required for Plug and Play operation and is available directly from VisionTek as well as from select e-tailers such as Amazon, Tiger Direct, and Dell.
On the next page, let’s look at VisionTek’s Wallet Drive and compare its performance over USB 3.0 to an identical drive using SATA
VisionTek’s USB 3.0 Hot Swappable Wallet Drive
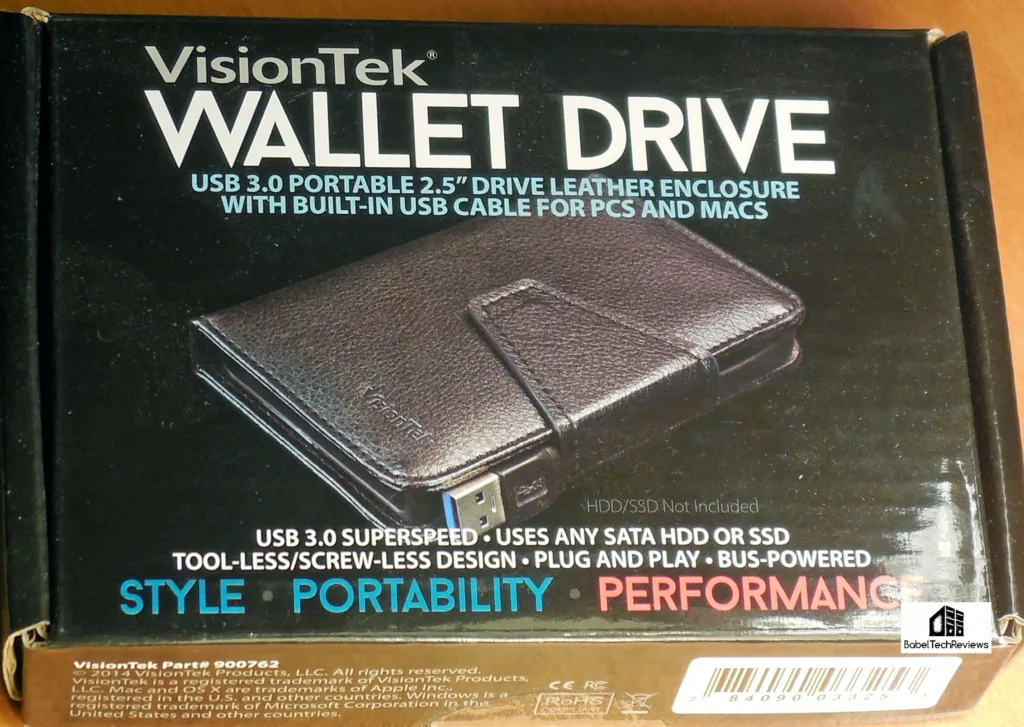
For less than $20, this bus-powered Wallet Drive enclosure fits in a shirt pocket to offer convenience and performance with plug and play design for instant install and hot-swapping of HDDs and SSDs. The Wallet Drive’s leather cover with magnetic flap closure conceals a hot-swappable, screw-less drive tray with an integrated 7″ long USB 3.0/2.0 connecting cable. Any SATA hard drive or solid state drive can simply be slid into the Wallet Drive to deliver data transfer speeds up to 600MB/s with nearly any PC using the built-in USB 3.0 (or USB 2.0) cable.
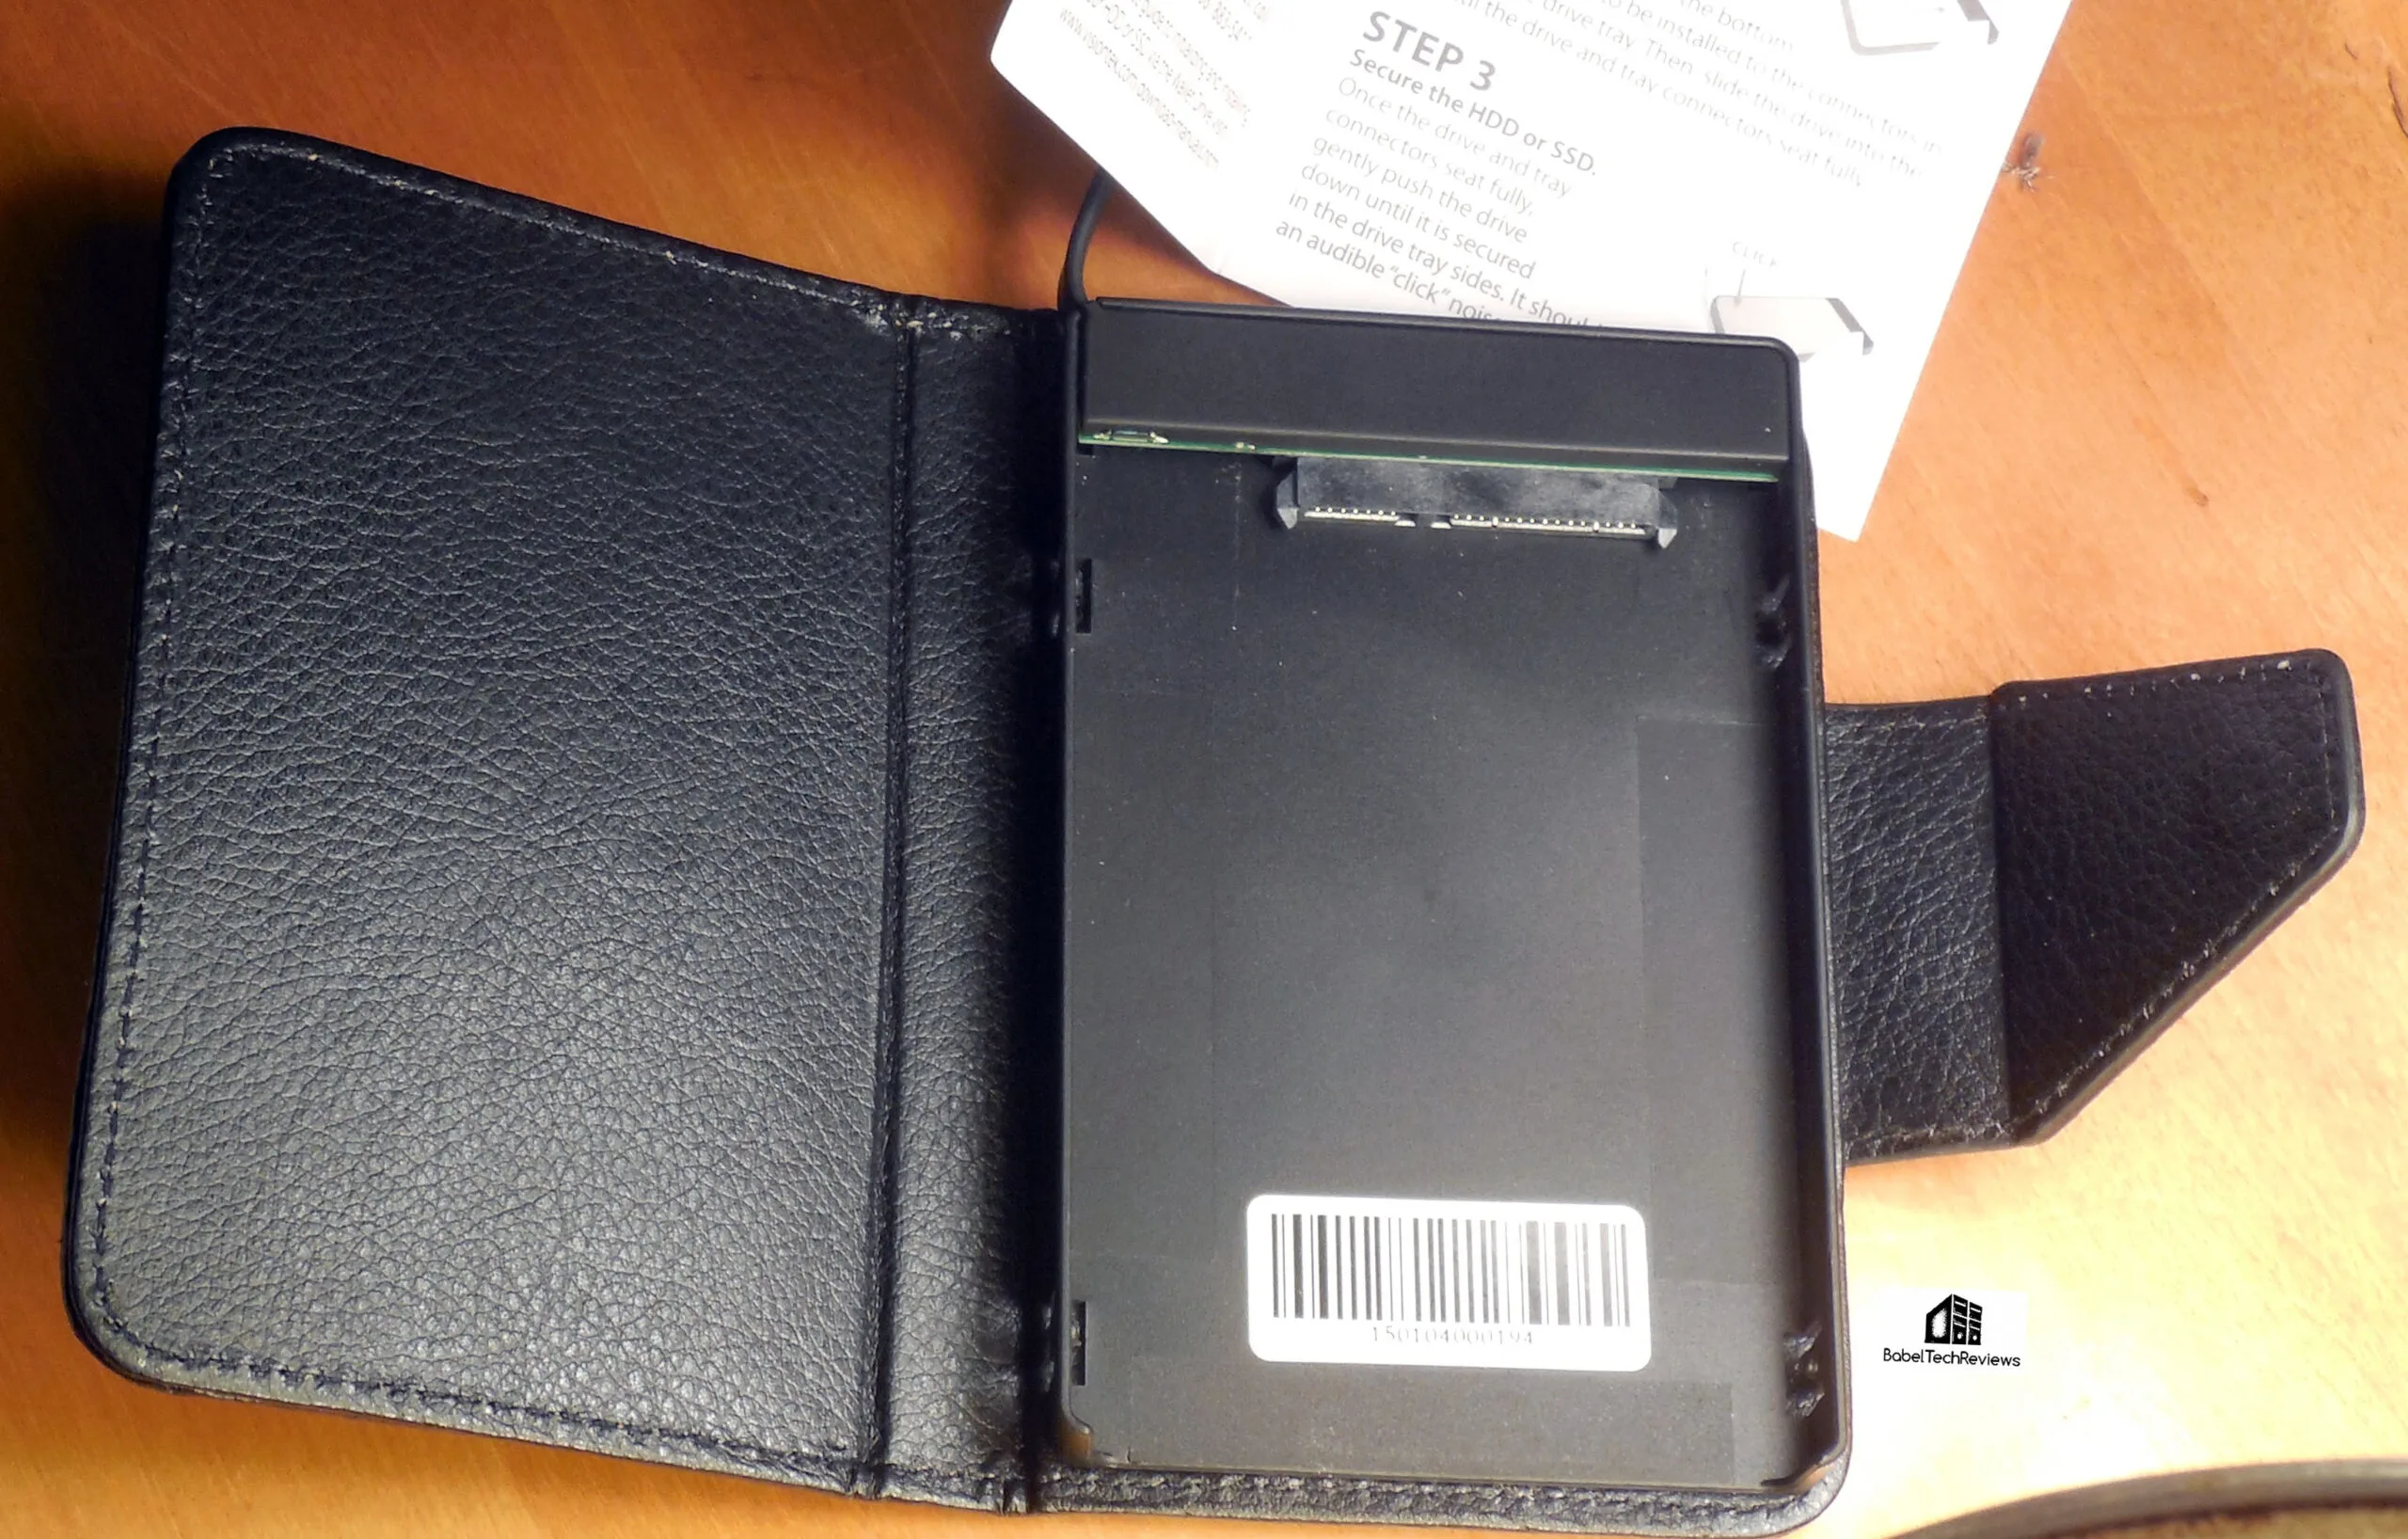
To start using data with the Wallet Drive, just slide any 2.5″ 7mm or 9mm SATA HDD or SSD into the drive tray. The pressure fit tray snaps tight and securely holds the drive by its magnetic clasp.
No AC adapter is required as the SSD inside the Wallet Drive draws its power from the USB bus.. After a drive is inserted into the Wallet Drive’s drive tray, it can be connected to a PC by using the attached 7 inch long USB cable. We found that 7 inches was a little short for connecting to a desktop and would have preferred a longer and also a retractable solution.
Unboxing
 The box emphasizes USB 3.0, plug and play, bus-powered, tool-less, and fast performance.
We installed a 240GB HyperX SSD into the Wallet Drive, plugged it into a USB 3.0 port on our PC and compared its performance with an identical SSD directly connected to a SATA port using the DriveXpander’s pass through connectors.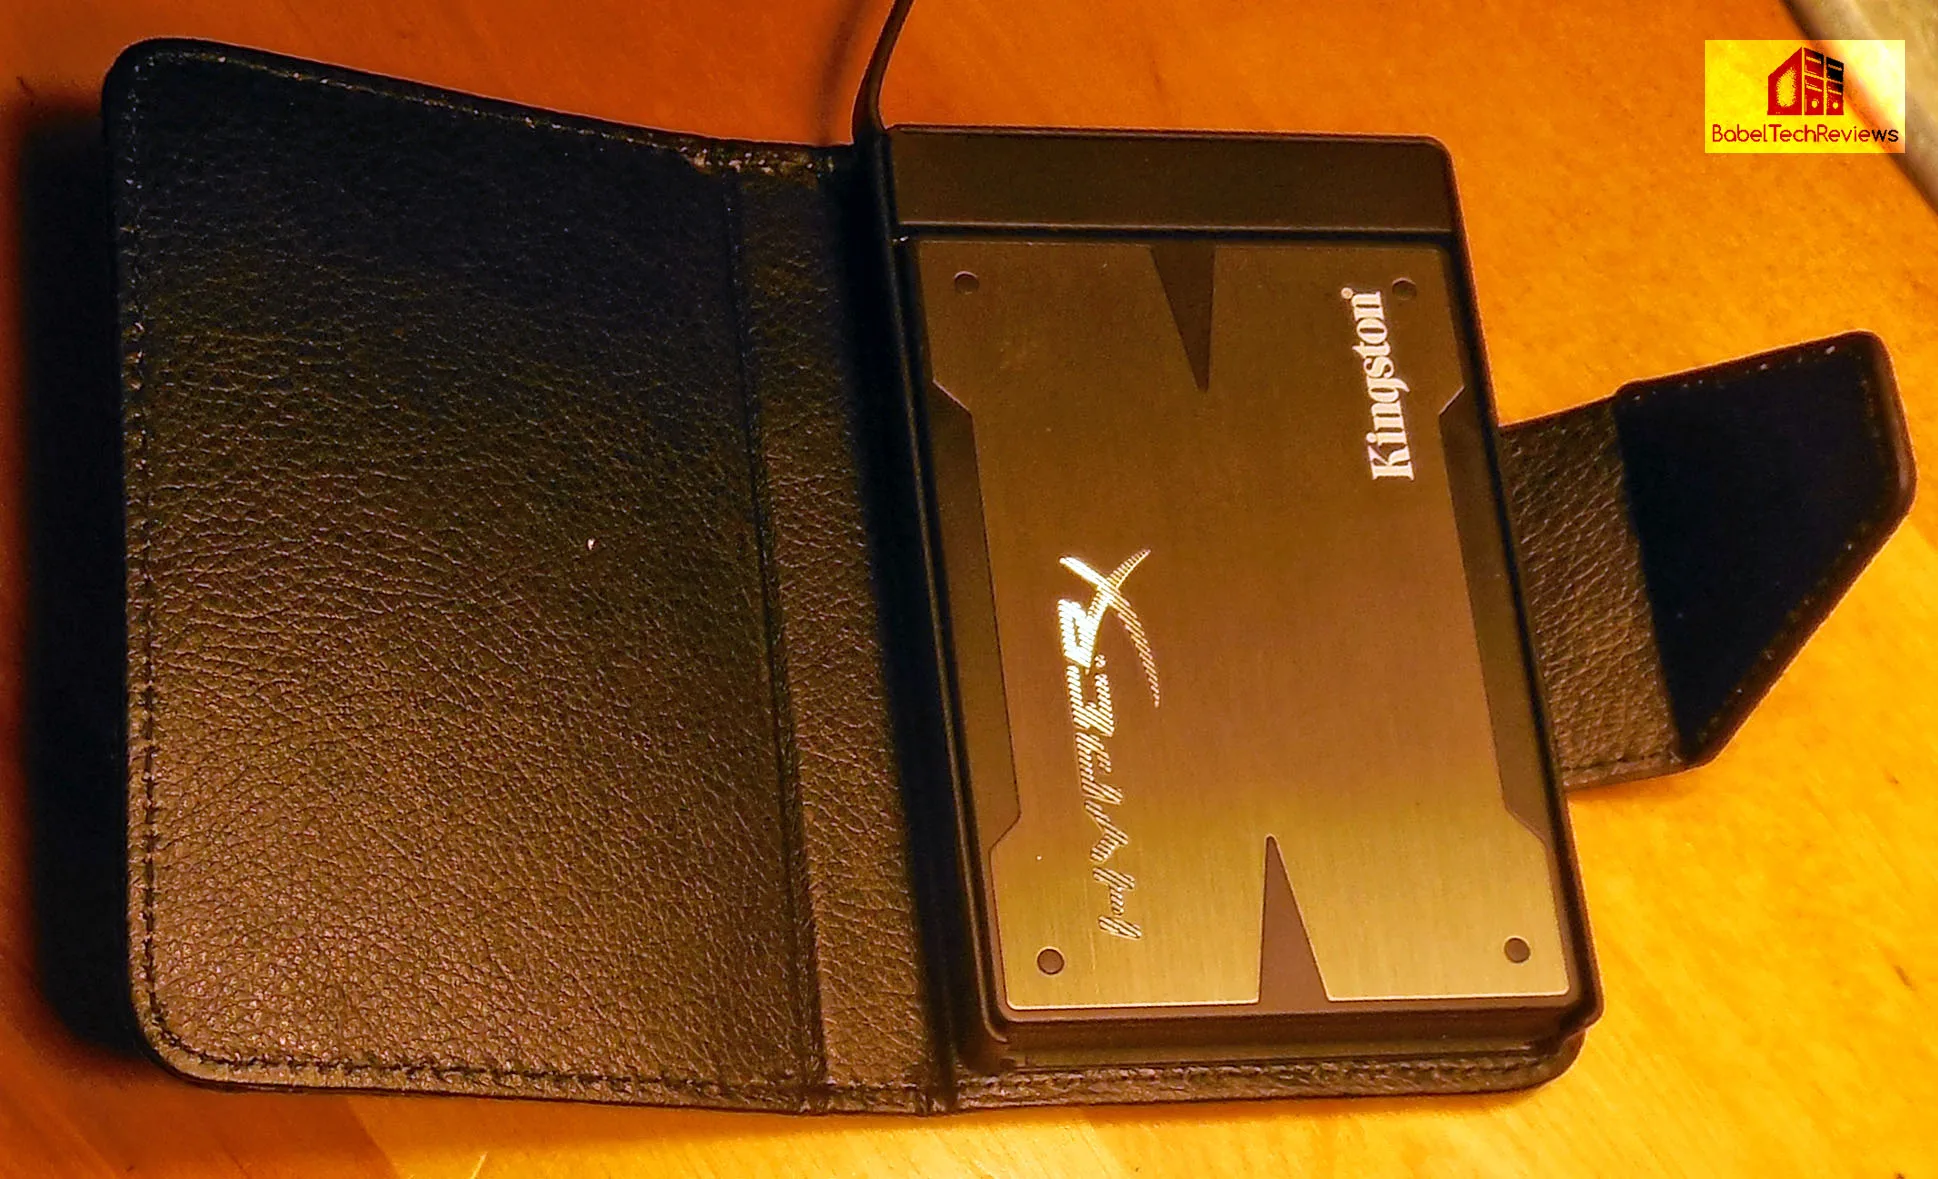
Before we look at performance, check out our test bed.
Test Configuration – Hardware
- Intel Core i7-4790K (reference 4.0GHz, HyperThreading and Turbo boost is on to 4.4GHz; DX11 CPU graphics), supplied by Intel.
- ASUS Z97-E motherboard (Intel Z97 chipset, latest BIOS, PCOe 3.0 specification, CrossFire/SLI 8x+8x)
- Kingston 16 GB HyperX Beast DDR3 RAM (2×8 GB, dual-channel at 2133MHz, supplied by Kingston
- GeForce GTX 780 Ti, 3GB, reference clocks, supplied by Nvidia
- VisionTek DriveXpander, supplied by VisionTek
- VisionTek Wallet Drive, supplied by VisionTek
- EVGA 1000W power supply unit
- Cooler Master Seidon watercooler, supplied by Cooler Master
- Onboard Realtek Audio
- Genius SP-D150 speakers, supplied by Genius
- Thermaltake Overseer RX-I full tower case, supplied by Thermaltake
- ASUS 12X Blu-ray writer
- HP LP3065 2560×1600 30″ LCD display
- Monoprice Crystal Pro K display.
Test Configuration – Software
- Nvidia GeForce 347.52 WHQL drivers
- . High Quality, prefer maximum performance, single display.
- Windows 7 64-bit; very latest updates
- Latest DirectX
- All games are patched to their latest versions.
- VSync is off in the control panel.
- AA enabled as noted in games; all in-game settings are specified with 16xAF always applied; 16xAF forced in control panel for Crysis.
- All results show average frame rates.
- Highest quality sound (stereo) used in all games.
- Windows 7 64, all DX10 titles were run under DX10 render paths; DX11 titles under DX11 render paths
- The Benchmarks Synthetic
- SiSoft Sandra 2014
- AS SSD benchmark
- ATTO benchmark
- HD Tune
- HD Tach
- File transfer timed
How we tested
We tested using all identical 240GB Kingston HyperX SSDs. We used the OS on one SSD. Another SSD was connected to a native SATA port using the pass-through connector of the DriveXpander, and we then compared its performance to the other SSD inside the Drive Wallet which was attached to a USB 3.0 port on the test PC.
Always make sure to use a USB 3.0 port to connect the Drive Wallet. The ports are different from each other, and using a USB 2.0 port instead of 3.0 will slow the data down to USB 2.0 speed transfers which are painfully slow in comparison with USB 3.0.
50GB File Copy Times
One task that we find quite useful is using the Wallet Drive to quickly and easily move large files from one PC to another. Our first test copied the 49.9GB files of NBA:2K15 using first the SATA drive directly connected to the motherboard versus copy times using the Wallet Drive over USB 3.0.
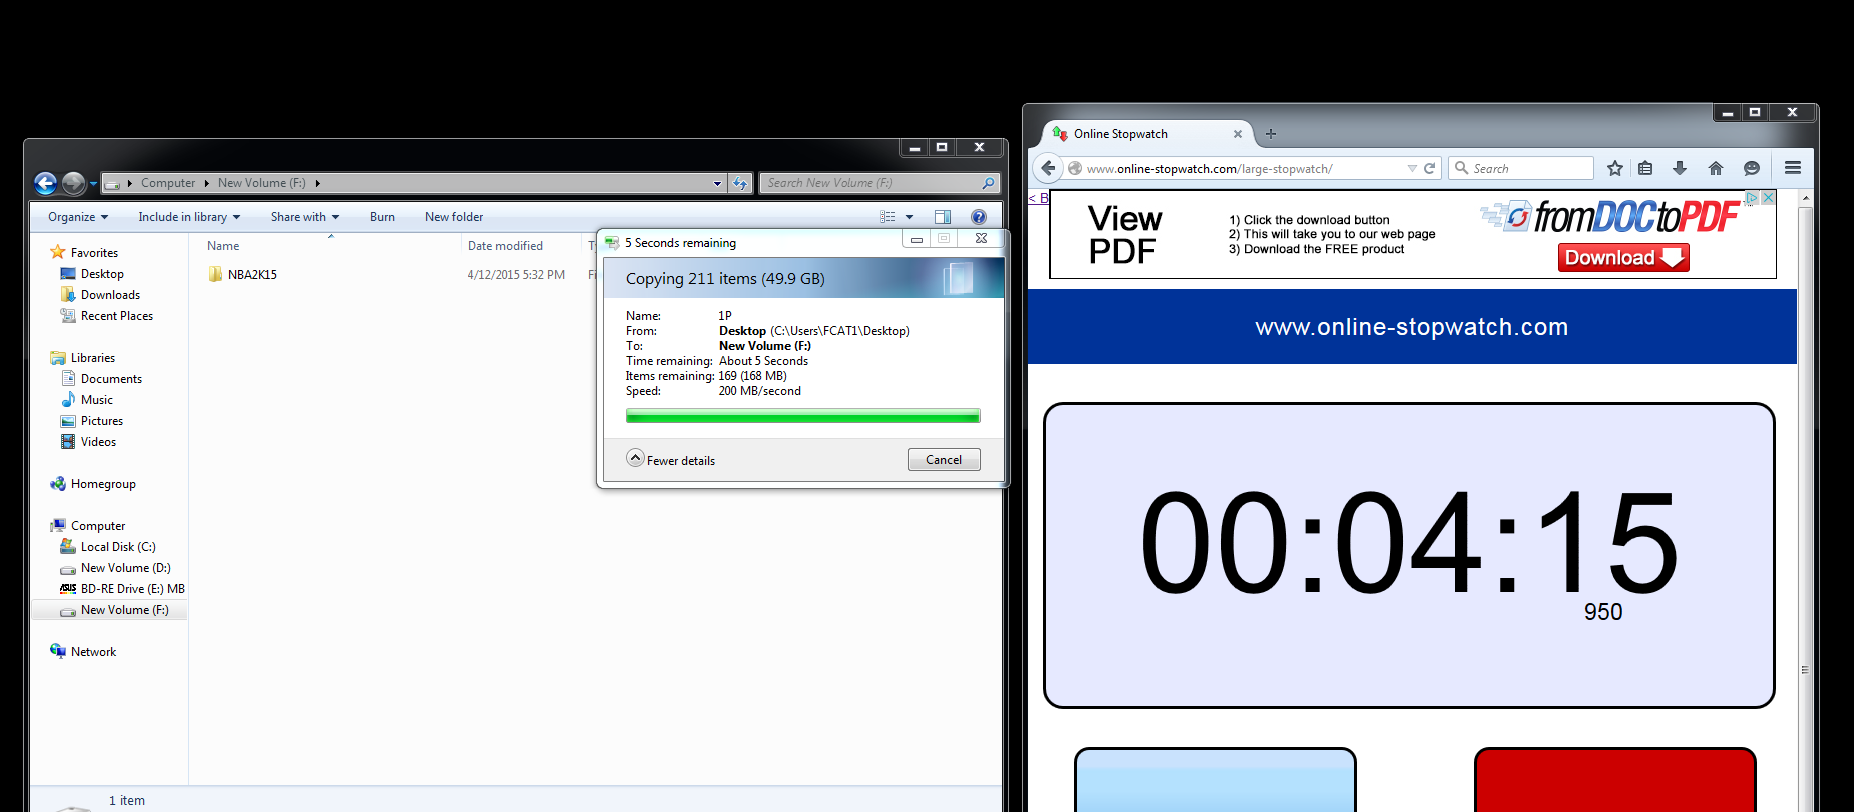
It took 3 minutes and 41 seconds to copy the NBA:2K15 folder from the SATA drive using the SATA cable and less than a minute longer using the Wallet Drive over USB 3.0 for a total of 4 minutes and 25 seconds for the same 49.9GB copy.
Initialization
When you first plug in a brand new SATA drive, it may need to be initialized by Windows before it becomes recognizable and plug and play. On the other hand, the VisionTek Drive Wallet mini enclosure is recognized instantly by Windows and drivers are loaded immediately and it is ready for use.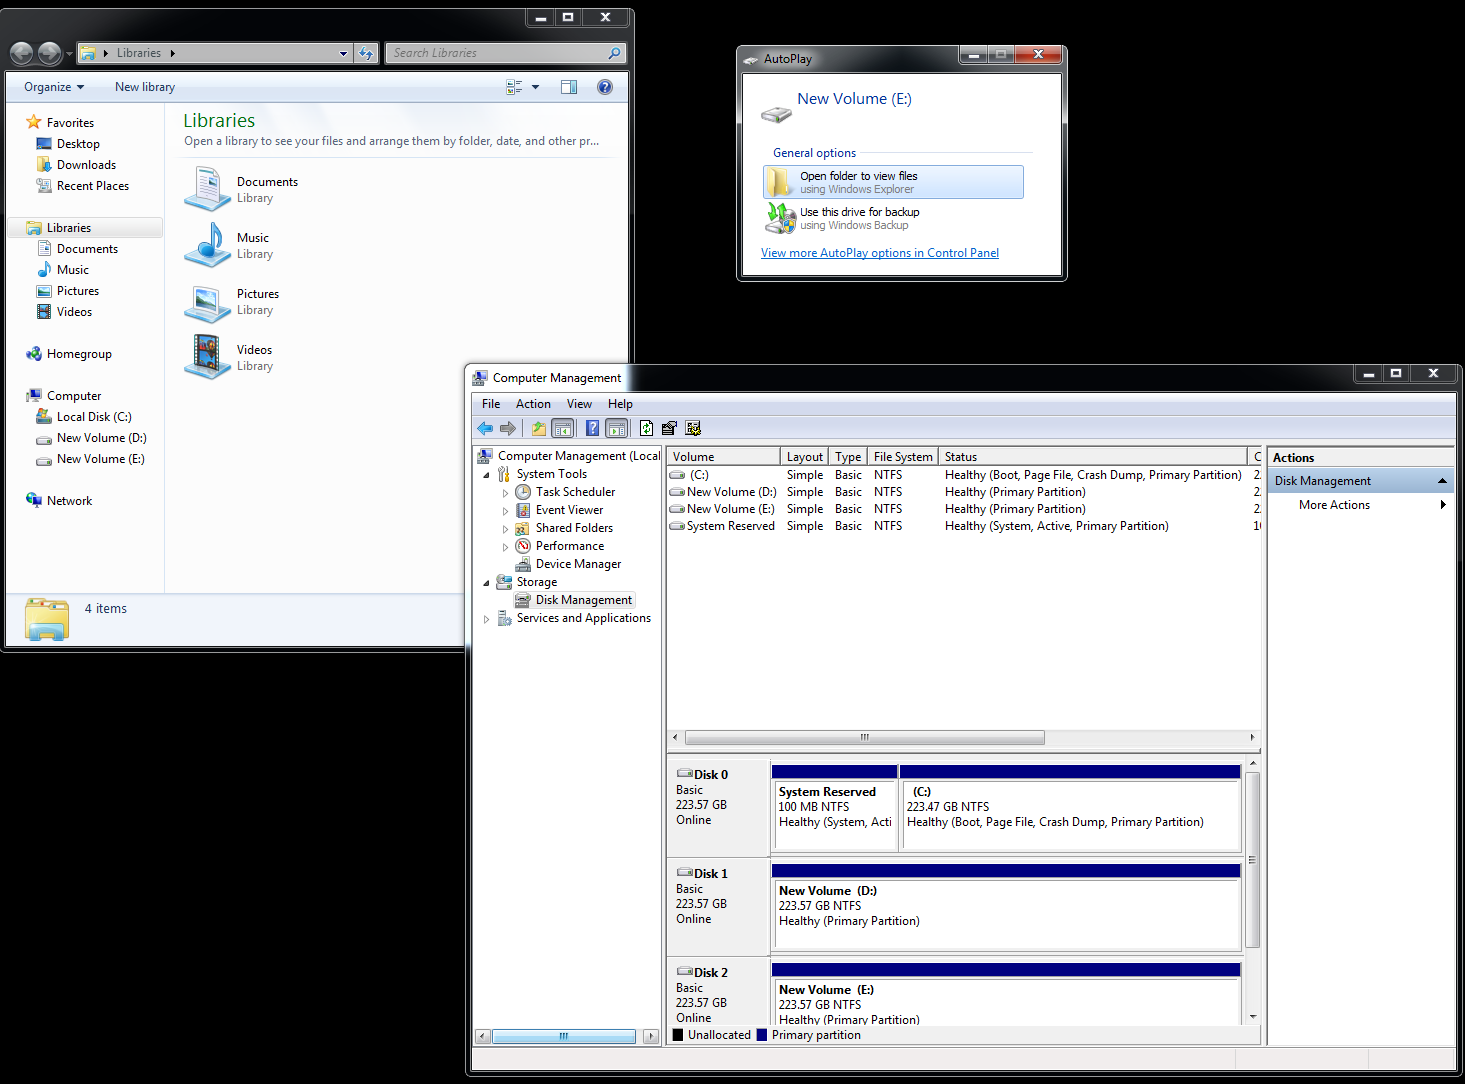
Since we are using our HyperX SSD in the VisionTek USB 3.0 enclosure, we will rely on synthetic benchmarks to test the drive independently of our main hard drive based PC.
The Benchmarks
As we need to compare drive speeds over USB 3.0 versus over the native SATA interface, there is no better tool than SiSoft’s Sandra 2015. There are several versions of Sandra 2015, including a free version of Sandra Lite that anyone can download and use. It is highly recommended! SiSoft’s Sandra 2015 was released late last year. It has quite a few improvements over Sandra 2014 and there are regular service packs released to keep it up to date.
First we run the 2015 Sandra benchmark suite with the SATA drive on its native port and then the same benchmarks with the USB 3.0 Wallet Drive.
Here are the Physical Disks Read results with the Kingston 240GB SATA SSD connected to the motherboard using a SATA connector. Sandra identifies the 240GB Kingston HyperX SSD natively connected to a SATA port on Drive D as a Kingston SATA SSD, while the 240GB HyperX SSD connected via USB 3.0 is identified as “ASMT 2105 USB 3.0”, for the controller that VisionTek uses. 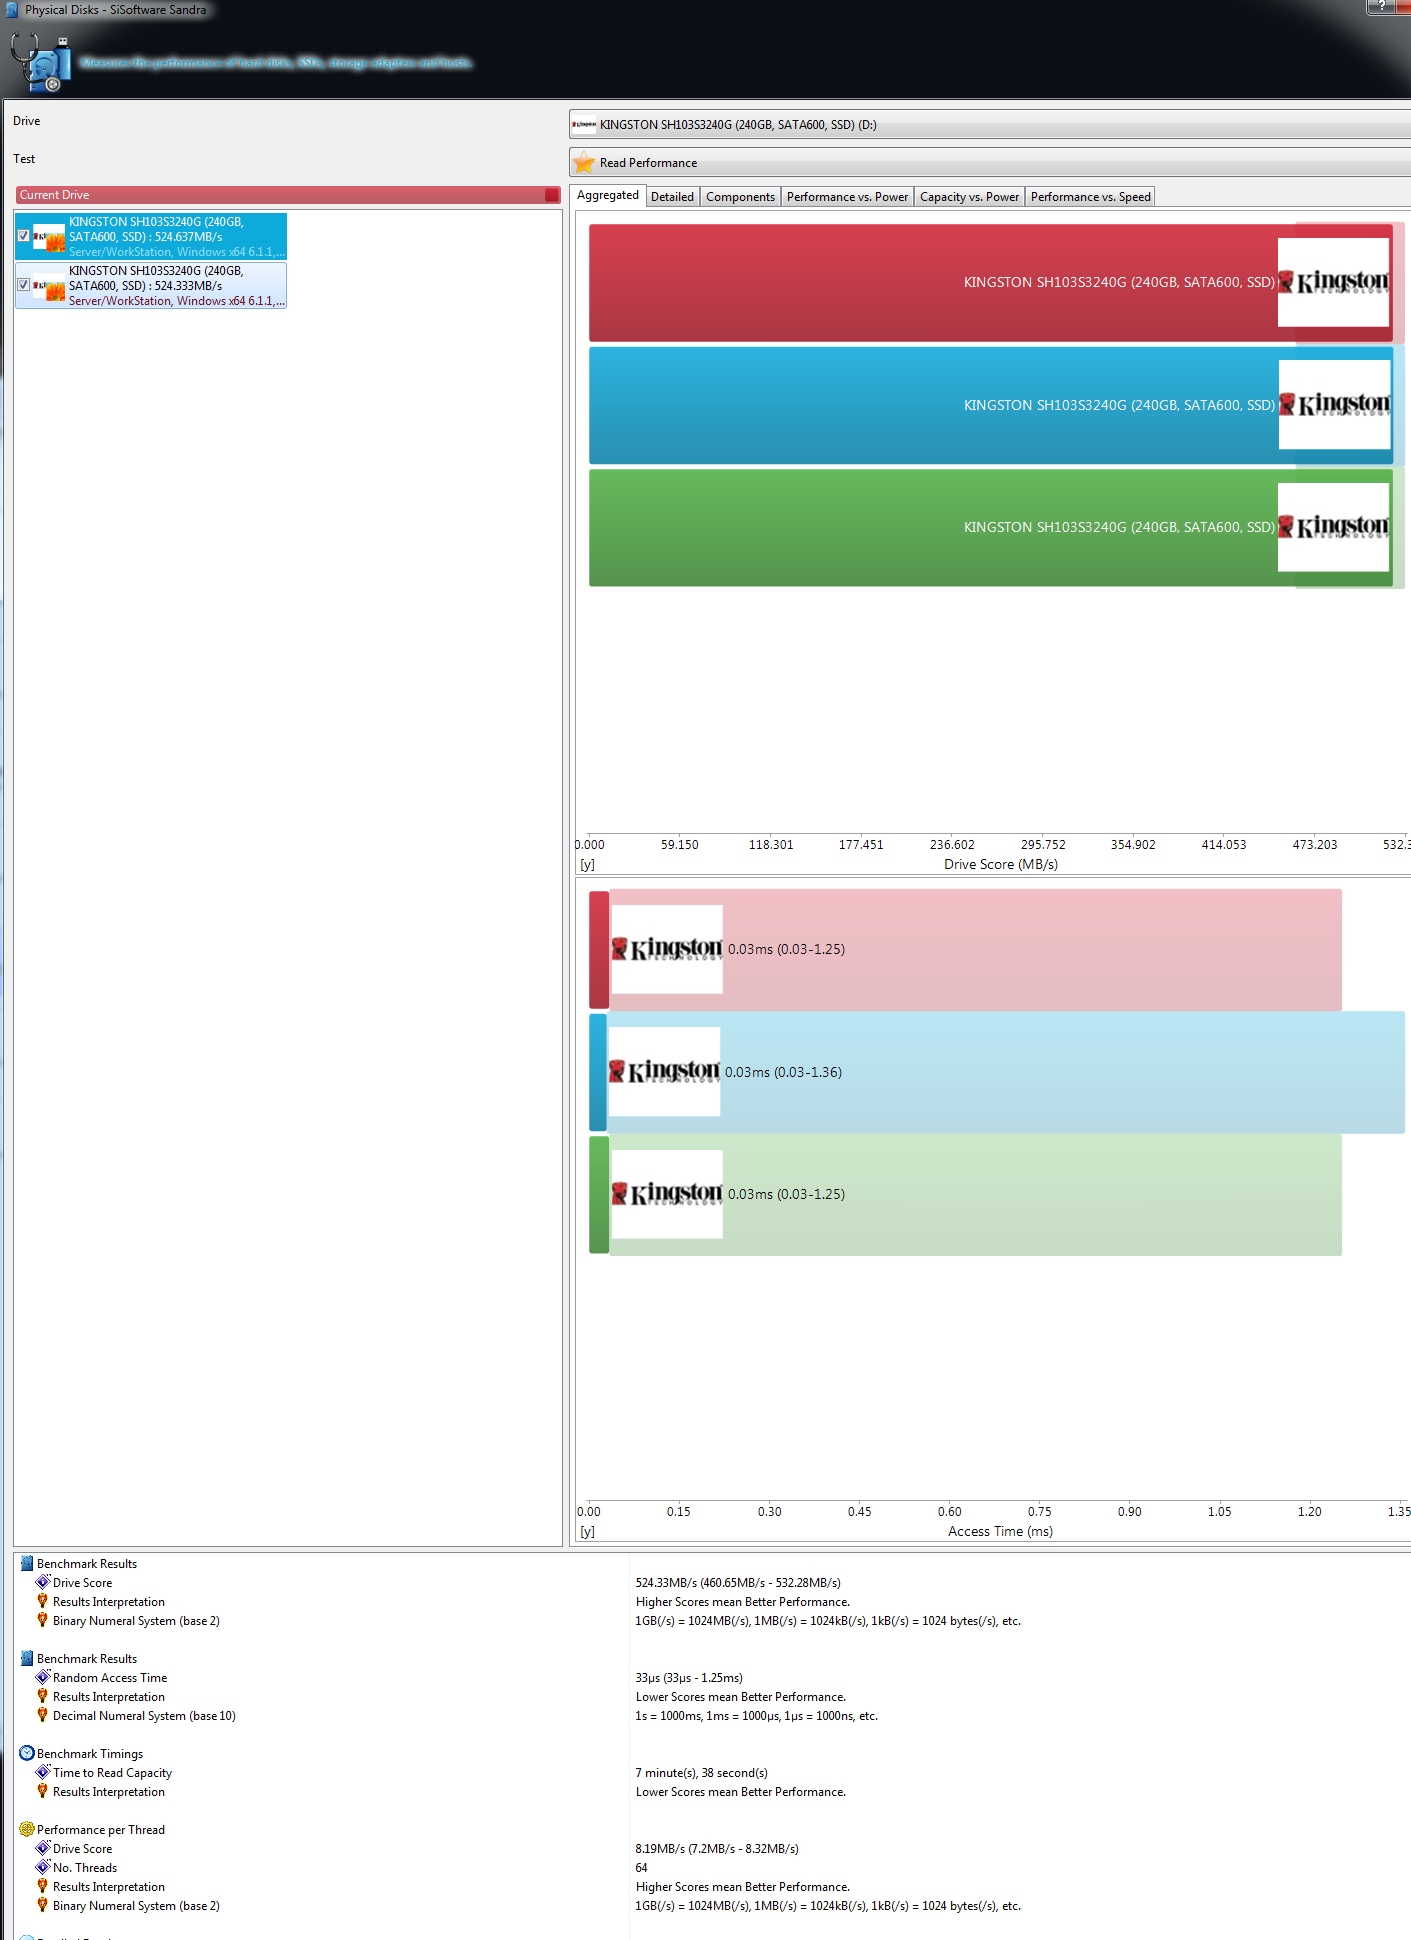
It scores 524.33MB/s on the native SATA port. Now here are the Kingston results for the 240GB HyperX SSD in the Wallet Drive enclosure plugged into a USB 3.0 port at 285.7MB/s .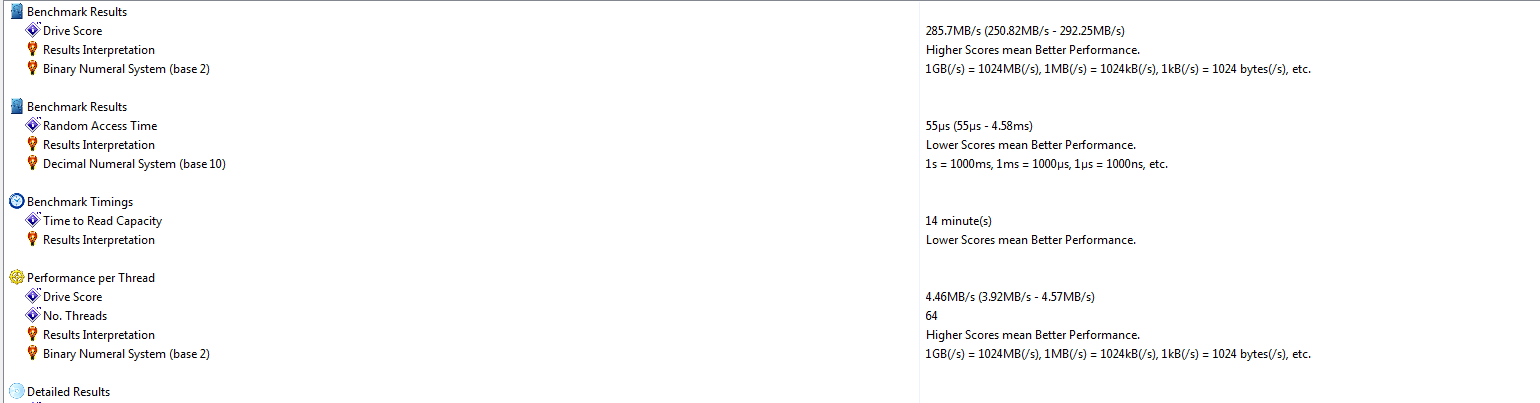
You can see in the ranking that the HyperX drive in the VisionTek Wallet Drive mini enclosure is slower than the HyperX SSD connected to the motherboard’s SATA port.
Now the next Sandra test is up, File System bandwidth using the SSD connected directly to SATA.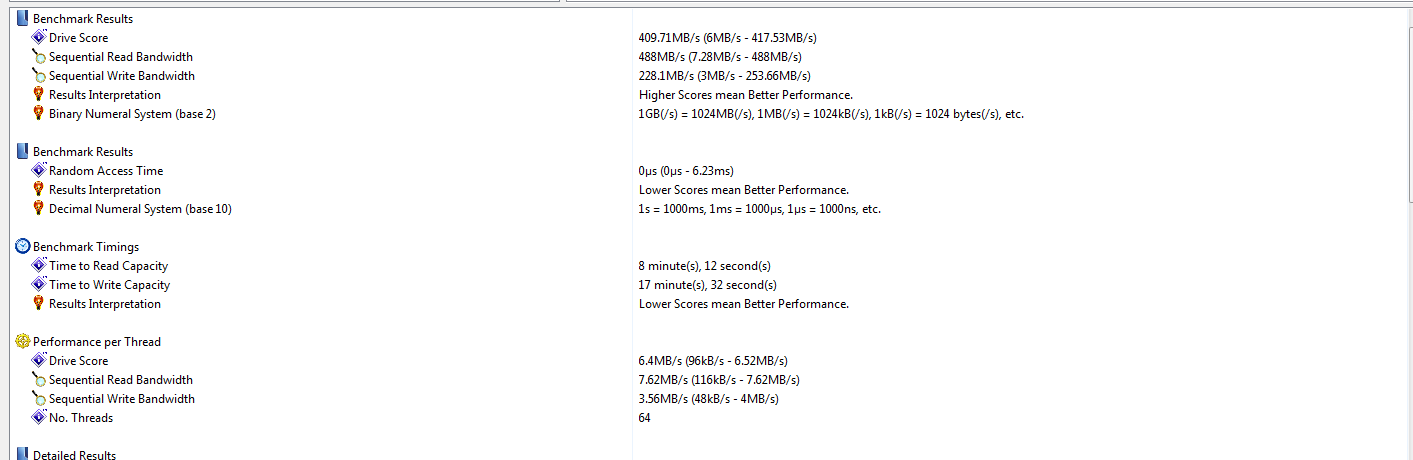
Now the Hyper X SSD File File System bandwidth results with the Wallet Drive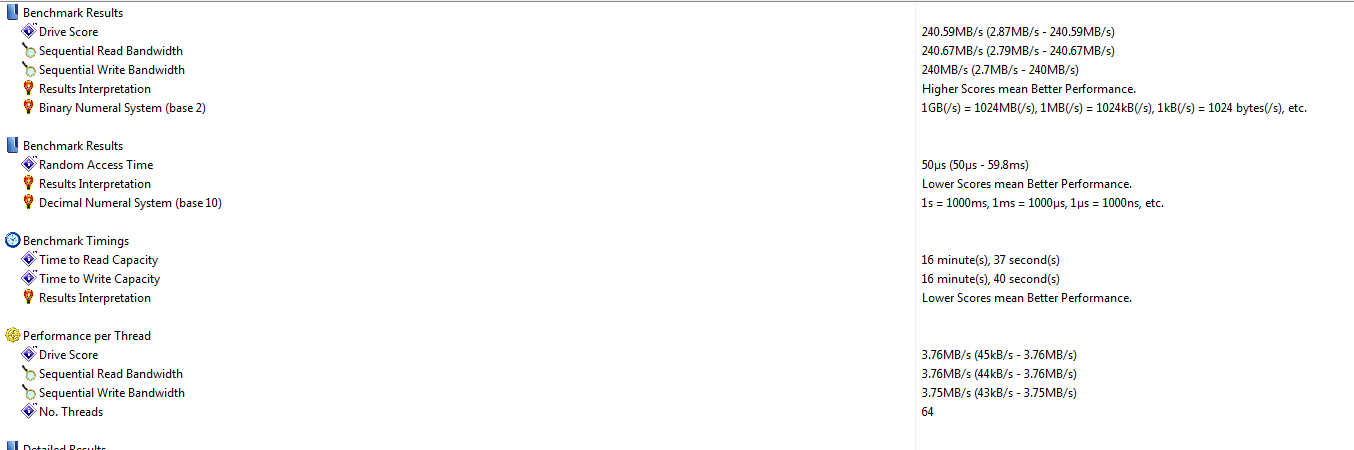 :
:
Again, the native SATA SSD (409.71) has better performance than the SSD in the VisionTek Wallet Drive USB enclosure (285.7MB/s) although USB 3.0 is very fast
CrystalDiskMark is a HDD benchmark utility for your hard drive that enables you to measure sequential and random read/write speeds. Here are some key features of “CrystalDiskMark”:
- Measure sequential reads/writes speed
- Measure random 512KB, 4KB, 4KB (Queue Depth=32) reads/writes speed
First up is the Kingston SSD directly connected to the SATA port.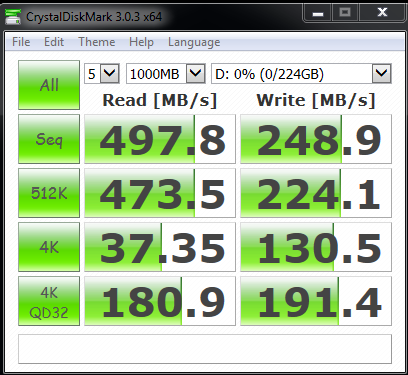 Now the the HyperX SSD in the VisionTek Wallet Drive USB 3.0 enclosure.
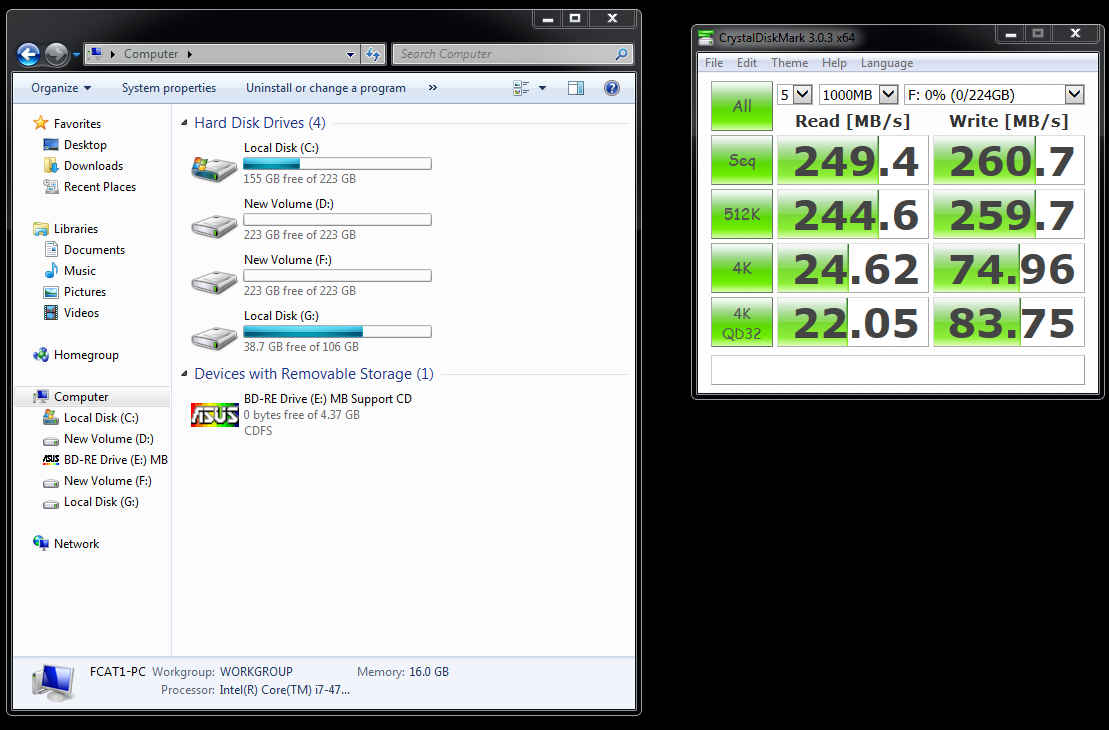 Again, the performance with the Native SATA SSD enclosure is better in Reads, although Writes are much closer.
HD Tune is a hard disk utility which has the following functions and measures the performance of:
- Transfer Rate
- Access Time
- CPU Usage
- Burst Rate
- Random Access test
- Write benchmark
- Hard Disk information which includes partition information, supported features, firmware version, serial number, disk capacity, buffer size, transfer mode
- Hard Disk Health
- S.M.A.R.T. Information (Self-Monitoring Analysis and Reporting Technology)
- Power On Time
- Error scan
- Temperature display
First up is the Kingston SSD directly connected to the SATA port.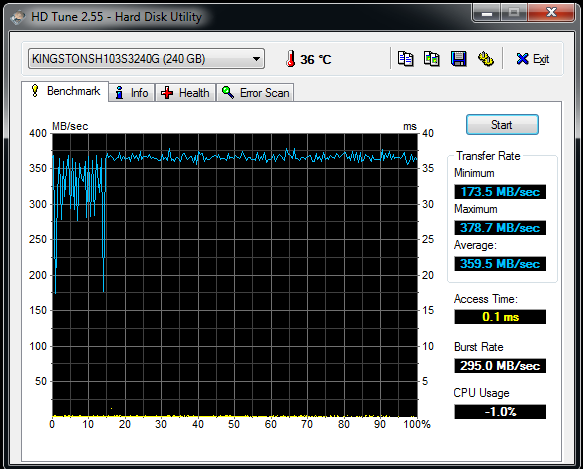 Now the the HyperX SSD in the VisionTek Wallet Drive USB 3.0 enclosure.
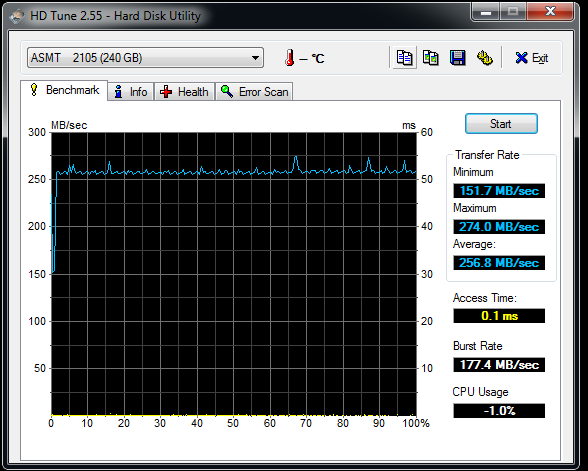 Native SATA performance is always faster but USB 3.0 is certainly usually “good enough”.
AS SSD is especially designed for Solid State Drives (SSD). The tool contains synthetic and practice tests. The synthetic tests determine the sequential and random read and write performance of the SSD without use of the operating system caches. In Seq-test the program measures how long it takes to read and write a 1 GB file.
In the 4K test, read and write performance for random 4K blocks are determined. The 4K-64-thrd test are similar to the 4K procedure except that the read and write operations on 64 threads are distributed as in the usual start of a program. In the copying test, two large ISO file folders are created, programs with many small files, and a games folder with small and large files. These three folders are copied by the OS copy command with the cache turned on.
The practice tests show performance with simultaneous read and write operations AS SSD gives an overall “score” after it runs the benchmarks. These scores and comparisons are summed up in the performance summary charts.
First up is the Kingston SSD directly connected to the SATA port.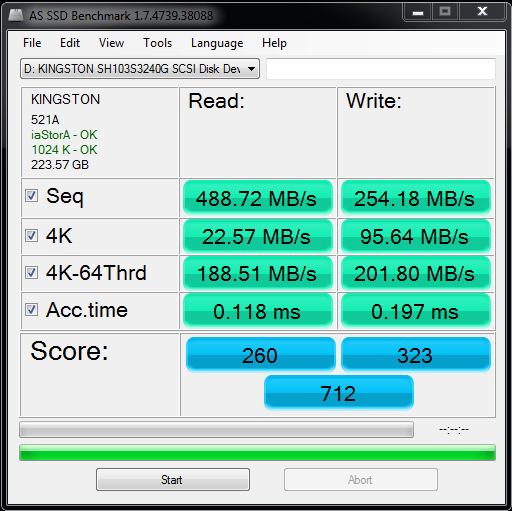 Now the the HyperX SSD in the VisionTek Wallet Drive USB 3.0 enclosure.
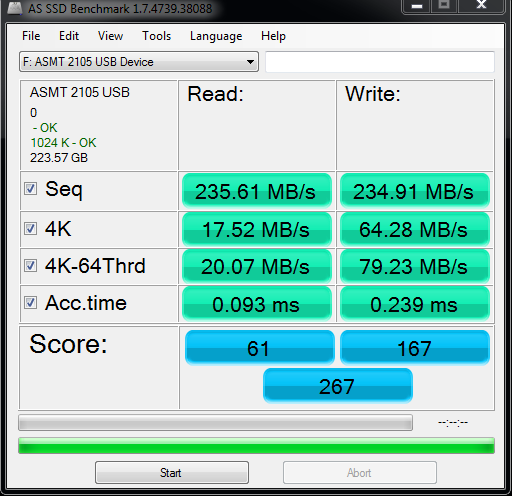
ATTO is a disk benchmark. The ATTO Disk Benchmark measures a storage system;s performance with various transfer sizes and test lengths for reads and writes. Options are available to customize the tests, including queue depth, overlapped I/O and even a comparison mode.
First up is the Kingston SSD directly connected to the SATA port.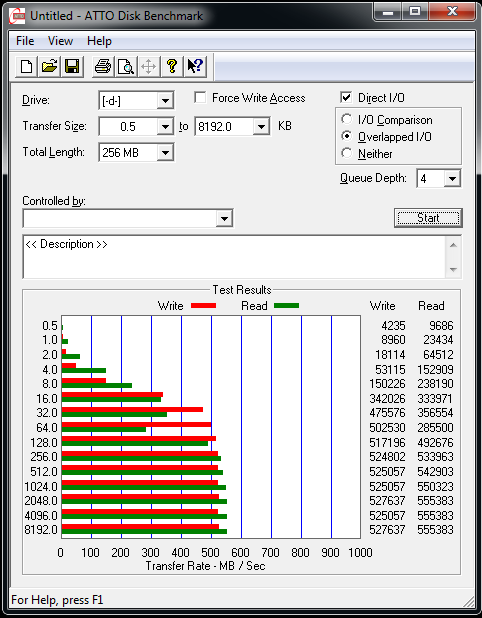 Now the the HyperX SSD in the VisionTek Wallet Drive USB 3.0 enclosure.
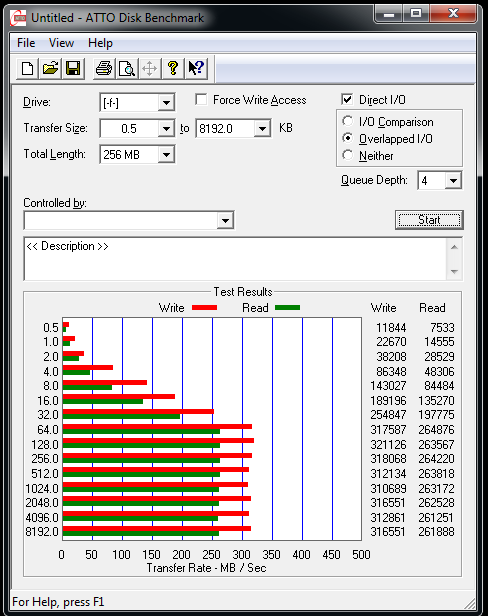
HD Tach is a low level hardware benchmark for random access read/write storage devices including SSDs and HDDs. HD Tach uses custom device drivers and low level Windows interfaces to determine the physical performance of the device. It is no longer supported and needs to be run in compatibility mode for Windows 7.
First up is the Kingston SSD directly connected to the SATA port.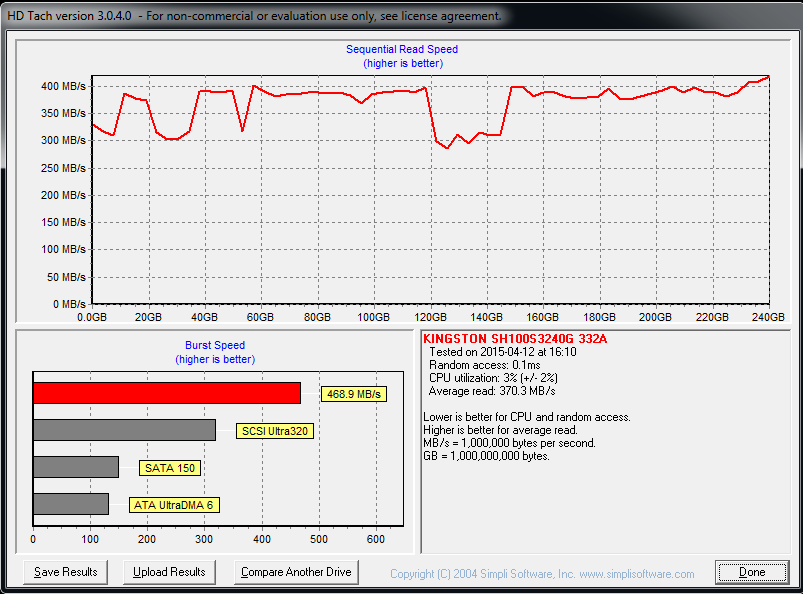 Now the the HyperX SSD in the VisionTek Wallet Drive USB 3.0 enclosure.
The VisionTek enclosure provides very good transfer rates over USB 3.0 although Native SATA performance will be better.
Warm Operating Temperatures
One thing we did note is that the Wallet Drive enclosure will get warm to the touch after using the Kingston HyperX SSD over an extended period. It did not get uncomfortable as it only reached about 5 F higher than an identical SSD in the air cooled Thermaltake drive cage.
Wallet Drive Conclusion (and Xpander recap)
This has been quite an enjoyable exploration comparing Kingston’s HyperX 3K SSD performance in the VisionTek Wallet Drive USB 3.0 enclosure to an identical drive using the VisionTek DriveXpander enclosure. The performance of the HyperX drive is excellent using the VisionTek controller although native SATA SSD speeds are better.
It is pretty exciting to now be able to transfer very large files – using up to a 2TB SATA drive – when coupled with a VisionTek Wallet Drive – just as one would use a flash drive. And as prices become more competitive on high capacity SSDs, we expect that this way of transferring files may become popular as using the Wallet Drive is just simple plug and play and extremely convenient.
For its $19.99 price, the VisionTek Drive Wallet USB 3.0 enclosure is a great time-saver in transferring large files over USB 3.0 and it is especially worth it if you already have a SATA drive you are going to repurpose.
Pros
- The new VisionTek Wallet Drive allows for re-tasking an existing 2.5″ HDD or Solid State Drive
- The Wallet Drive is perfect for adding a new SSD to create a high-performance ultra-portable external drive. VisionTek’s Wallet Drive mini-enclosure also allows the user to use a 2.5″ HDD or SATA drive anywhere as a flash drive for portable storage up to the currently available maximum 2TB capacity, over a bus-powered USB 3.0 connection.
- The Wallet Drive protects the SSD or HDD by placing it inside of a solid enclosure.
- The warranty is a solid 3 years, backed by VisionTek’s excellent service.
Cons
- The SSD has no cooling and may get a little warm inside the Drive Wallet.
- The USB 3.0 cable is a little short, and retractable would be great.
The Verdict for the Wallet Drive
- Recommended
The DriveXpander has received BTR’s Editor’s Choice Award.
We are giving the VisionTek Wallet Drive USB 3.0 enclosure our BTR “Recommended” Award as it is well-designed, compact, solid and durable, while being perfectly functional and easy to use! It is also a very effortless and easy way to transfer large files between PCs very quickly while at the same time, it protects the precious drive.
Next up from BTR, a HyperX Cloud Gaming headset review. We are also working on our GTA V performance/IQ evaluation which due this weekend.