The EVGA Z490 FTW Motherboard Overclocking Review – the Long Road to a Stable Overclock
We have recently upgraded our Core i7-8700K/Coffee Lake platform to i9-10900K/Comet Lake, and have been testing it using an ASRock Z490 Steel Legend motherboard. Since we were unable to gain any performance from overclocking, we asked EVGA for a review sample of the Z490 FTW motherboard.
The last EVGA motherboard that BTR evaluated was the Z370 FTW which allowed our i7-8700K to reach 4.8 GHz on all cores for regular use and for benching. We are going to review the $329 EVGA Z490 FTW motherboard using a RTX 2080 Ti by comparing it with the midrange ASRock Z490 Steel Legend motherboard with our i9-10900K at stock, and then we will overclock it.
It has been a long road to a solid performance increase from a stable overclock that required us to not only change the motherboard, but we also had to make several other upgrades. Core i9-10900 “K” CPUs are multiplier unlocked and can be overclocked beyond their stock speeds with hiqh-quality cooling. At stock, although all 10 cores are rated to run at 3.7 GHz, individual cores each have the potential to reach much higher speeds by selectively using Intel’s Boost and Velocity Boost which means there is very little room for increasing performance by manually overclocking. We started out using a EVGA CLC 280mm CPU cooler in a Focus G case, and later we upgraded to a Phanteks P400 case to house a DeepCool 360mm AIO cooler.
Comet Lake is Intel’s latest tenth generation platform and it brings some new features over the Coffee Lake platform although their IPC for gaming are identical So far, we have found that the biggest advantage to the Comet Lake flagship i9 CPU over Coffee Lake’s flagship i7 processor are the extra four cores of the i9. A Core i9 Comet Lake gamer using 10 cores plus HyperThreading doesn’t have to consider background processes while gaming, and the extra four cores over Coffee Lake’s CPU may be helpful for better handling upcoming multi-threaded game ports from the next generation of console games. In addition, we are also looking for a higher all core clockspeed well-above the 4.8GHz day-to-day overclock of our i7-8700K.
EVGA’s Z490 Motherboards
EVGA has introduced another Z490 motherboard in addition to the FTW that we are reviewing – the $549 Z490 DARK – their top board. The Z490 FTW is currently available from EVGA for $329. The primary difference, besides several added features between the two motherboards, are a 18 phase power delivery system for the DARK while the FTW is 14 phase. The ASRock Z490 Steel Legend uses a 11 phase power design.
The EVGA Z490 FTW is a step down from the DARK. Besides using a 18 phase power delivery instead of 14, the DARK has two extra native SATA ports, an extra USB header, and overclocking support for DDR4 to 4600MHz instead of 4400MHz. The DARK also has an upgraded Ethernet, an additional PCIe slot, and the PCB is ten layers instead of six. These are not really major downgrades for most enthusiasts although an extreme overclocker would definitely pick the DARK over the FTW. A motherboard may make a difference to achieving a higher CPU overclock. The FTW Z490 MB was able to overclock our i9-10900K while our ASRock Z490 Steel Legend couldn’t.
EVGA Z490 boards include cable cutouts to make cable management easier. These boards also feature metal-reinforced PCIe slots for supporting heavy video cards, 2-Way SLI/CrossFire support, multiple RGB headers, M.2 slots, Intel Gigabit NICs, switchable dual-BIOSes, and Realtek’s upgraded 7.1 Channel 1220 audio. Here are the EVGA Z490 FTW motherboard’s features from their website.
DESIGN DETAILS
- • Supported CPUs – Intel® Socket 1200, 10th Generation Intel® Core i9/i7/i5
• Socket Type – Intel® Socket LGA1200
• PCH – Intel® Z490
• DIMM QTY – 4 DIMM Dual-Channel
• Memory Type – DDR4 4400MHz+
• Memory Capacity – 128GB
• 6.0Gb/s Ports/Controller – 4/Intel® Z490 PCH
• RAID Support – RAID 0, 1, 5, and 10
• SATA 6.0Gb/s Ports/Controller – 2 / ASMedia ASM1061
• USB 2.0 Ports/Controller – 5 Ports (4 from internal headers / 1 from Update Port for flashing BIOS)/ Intel® Z490 USB Hub
• USB 3.2 Gen1 Ports/Controller – 4 (2 from internal header / Intel Z490 PCH
• USB 3.2 Gen2 Ports/Controller – 4x USB3.2 Gen2 Type-A/1x USB3.2 Gen2x2 Type-C/1x USB3.2 Gen2 Type-C (internal header)
• Network Speed – 10/100/1000
• Network Ports/Controller – Intel® i219V PHY
• WiFi/BT – Intel® AX201 WiFi 6/BT 5.1 module, preinstalled in the • M.2 Key-E 32mm Slot
• Audio – 7.1 Channel Realtek + EVGA NU Audio
• Audio Controller – Realtek ALC1220 + SV3H615
• Display Output – DP 1.2 / HDMI 1.4
• PCIe Slot Arrangement – 2×16, 1×1
• PCIe x16 Mechanical Slots – 2
• PCIe x16 Mechanical Arrangement – 1×16/8, 1×8 PCIe x1 Mechanical Slots – 1
• M.2 Key-M – 2x 110mm (Up to 32Gbps)
• M.2 Key-E – 1x 32mm (Vertical)
• Fan Headers – 7x 4-Pin (2x CPU PWM, 5x PWM/DC)
• BIOS Type – Latest UEFI BIOS with mouse/keyboard control, OC Robot, In-BIOS Stress
• Software – EVGA ELEET X1 Tuning Utility
KEY SPECS
• Supports Intel® Core™ 10th Generation Processor Family for LGA1200 socket
• 150% Increased Gold Content
• Intel® Z490 Chipset
• NVIDIA® SLI® Ready Enthusiast Layout
• 4 DIMM Dual-Channel up to 128GB 4400MHz+
• PCI Express® 3.0 Ready
• 5 USB 2.0 Ports (4 from internal headers/1 from Update Port)
• 4 USB 3.2 Gen1 Ports (2 rear panel, 2 from 1 internal header)
• 5 USB 3.2 Gen2 Ports (4 Type-A rear panel, 1 type-C Header)
• 1 USB 3.2 Gen2x2 Port (1 Type-C rear panel)
• 1 PS/2 (Mouse+Keyboard support)
• Intel® Optane Support
• 6 SATA 6.0Gb/s (4 on Intel® Z490 PCH/2 from ASMedia ASM1061)
• 2 M.2 Key-M 110mm up to 32Gbps
• 1 M.2 Key-E 32mm
• 1 DisplayPort 1.2 / 1 HDMI 1.4
• 1 Intel® i219V Gigabit NIC (10/100/1000)
• 1 Intel® WiFi 6/ BT 5.1 module, preinstalled
DIMENSIONS
• Width: 9.6in – 244mm
• Length: 12in – 305mm
• Form Factor: ATX Form Factor
ACCESSORIES
• EVGA Quick Installation Guide
• Rear Case I/O Panel
• 2 SATA 6G Data Cables
• 2x M.2 Thermal Pad
• 2x Antenna for WiFi
• Case Badge
• USB Flash Drive
• Contains Driver and Manual
###
The specs and the design look great. An important consideration for any enthusiast are the warranty and product support should anything go wrong.
Warranty & Support
EVGA’s Z490 motherboards come with a 3 year warranty, and registration is recommended. A further warranty extension
is available upon registration within 30 days of purchase. For more details please visit: www.evga.com/warranty/motherboards/.
In addition, EVGA provides outstanding support including a 24/7 telephone hotline staffed by helpful professionals. We have had multiple opportunities to use their hotline over the past decade, and we have always received high-quality and fast service – even on the weekends. EVGA is a rare company that will allow you as a seller to transfer the remaining portion of your warranty to the second-hand buyer, and they can even cross ship RMA products so you can get back up and running quickly!
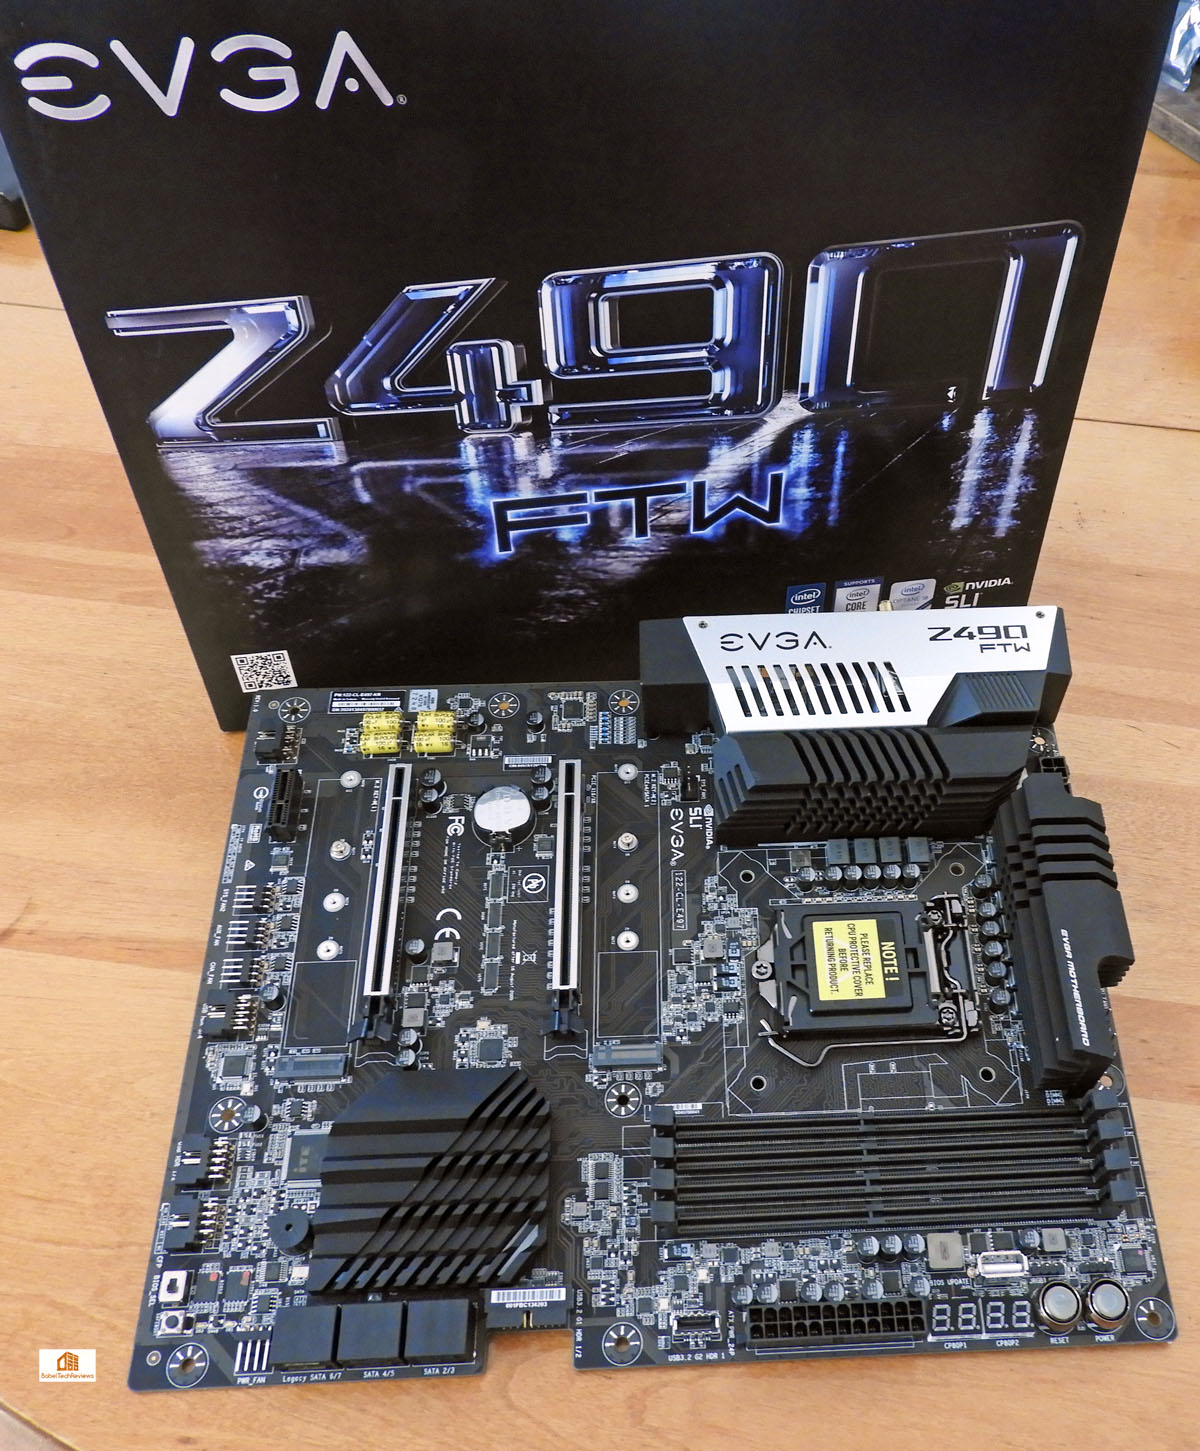
The EVGA Z490 FTW is a good-looking motherboard with excellent specifications, so let’s unbox it for a closer look before we install, test, overclock, and benchmark it.
The EVGA Z490 FTW motherboard
Unboxing and Installation
The EVGA Z490 FTW motherboard is a good-looking industrial design board using silver components to contrast with a black PCB without using any stenciled designs on the board. There are typical component placements, and some of the traces are visible. The FTW includes a silver shroud over the back panel with vents that extend to the VRM heatsinks. There are 4 RAM slots supporting up to 128GB DDR4, and 2 PCIe slots that are full X16 slots that will support mGPU in an 8x+8x configuration. If you need a high bandwidth (HB) SLI bridge for two GeForce cards, make sure to get the bridge with the 2-slot spacing. 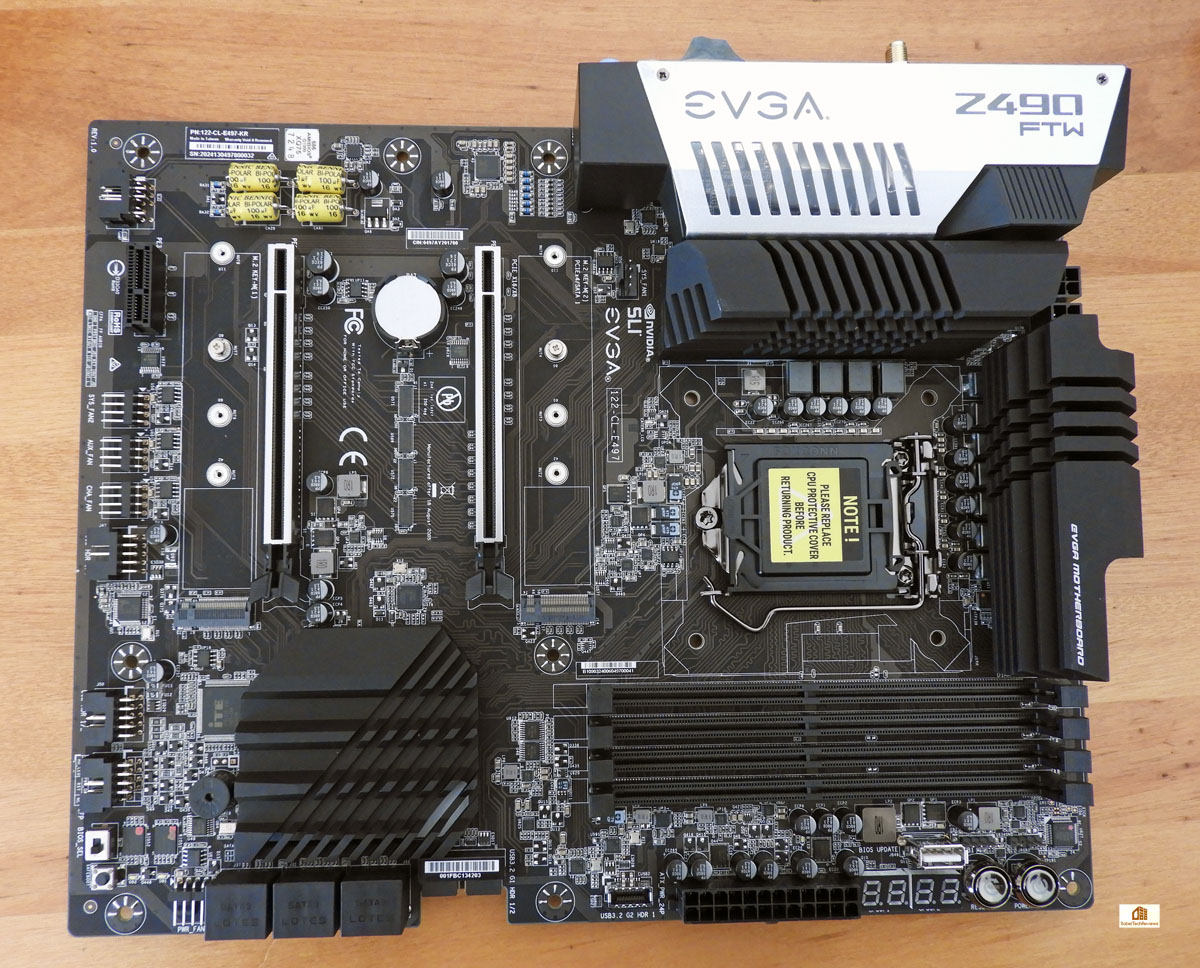
There are headers on the board for RGB strips. The memory slots as well as the two primary x16 PCIe slots (1×16/8, 1×8 in dual graphics mGPU mode) are reinforced in order to support heavy graphics cards. 
 We do not like the placement of the right angle connectors at the bottom of the board as the spacing is too tight for many cases including the Focus G and the Phanteks P400. You may have to remove the PSU – or as with the P400, you may have to remove the motherboard just to replace or install a new fan. The only vertical socket is for the ATX power connector and we would have instead preferred that it be right angle.

There is also a third PCIe slot at the bottom using the bandwidth from the chipset. There are two Key M M.2 slots for PCIe storage – 2x 110mm (Up to 32Gbps) – and one Key E M.2 slot with an Intel AX201 WiFi 6/BT 5.1 module preinstalled. Storage options include six SATA ports (RAID 0, 1, 5, and 10 support).
For convenience, there are seven 4-pin PWM fan headers (2x CPU PWM, 5x PWM/DC), and four are close to the CPU socket with the others at the bottom of the board. For audio, the FTW uses 7.1 Channel Realtek + EVGA NU Audio, and for networking, the FTW uses a single Intel I219-V PHY controller. 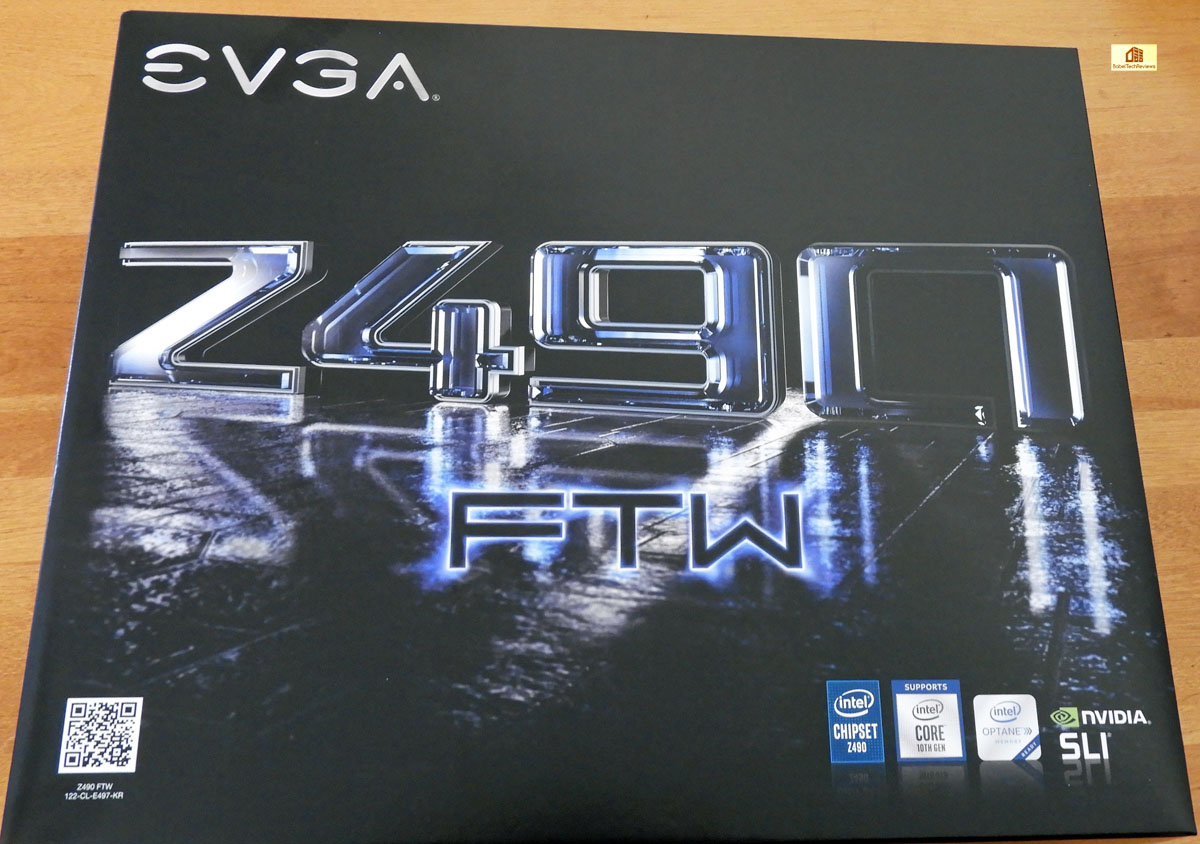
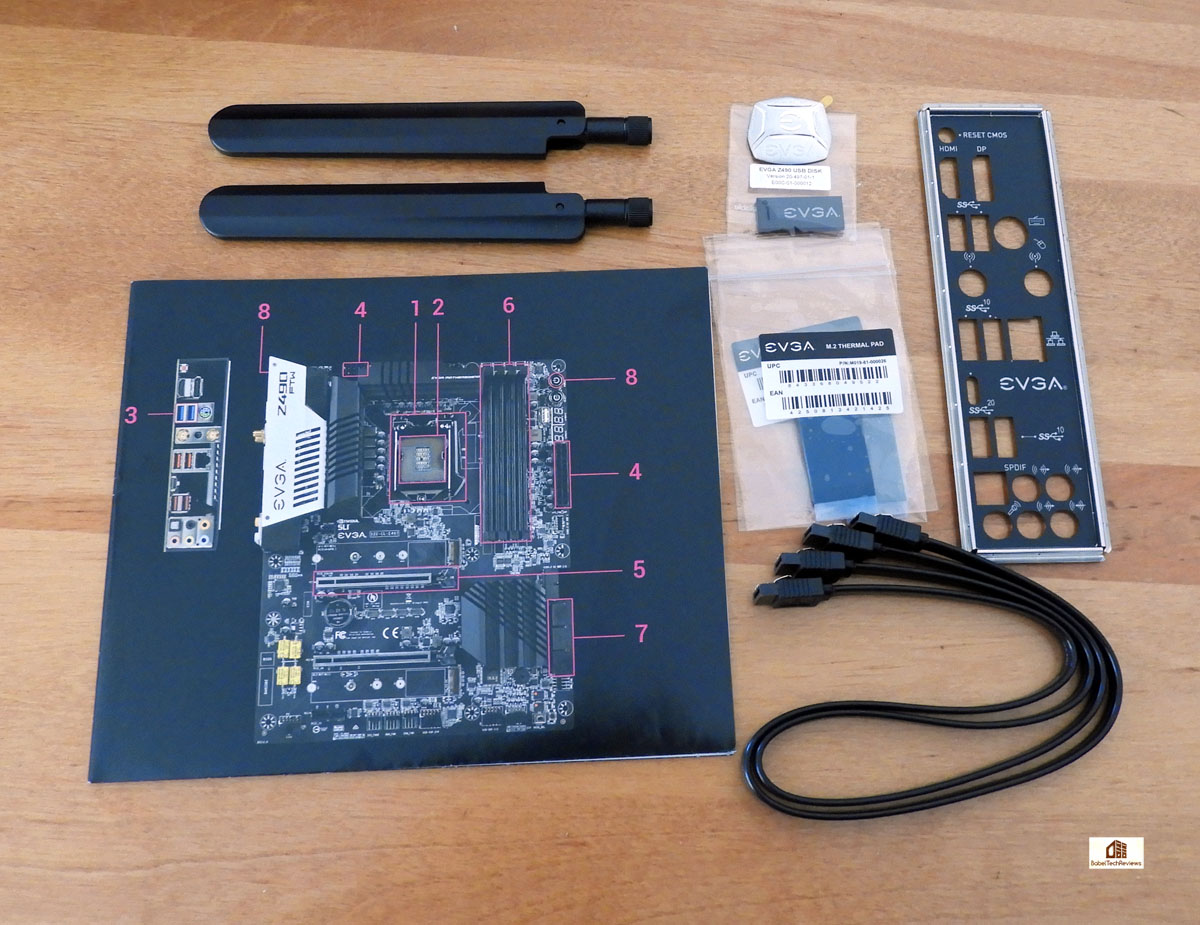
The EVGA Z490 FTW motherboard arrives in a rather plain box with the necessary components for a bare-bones installation.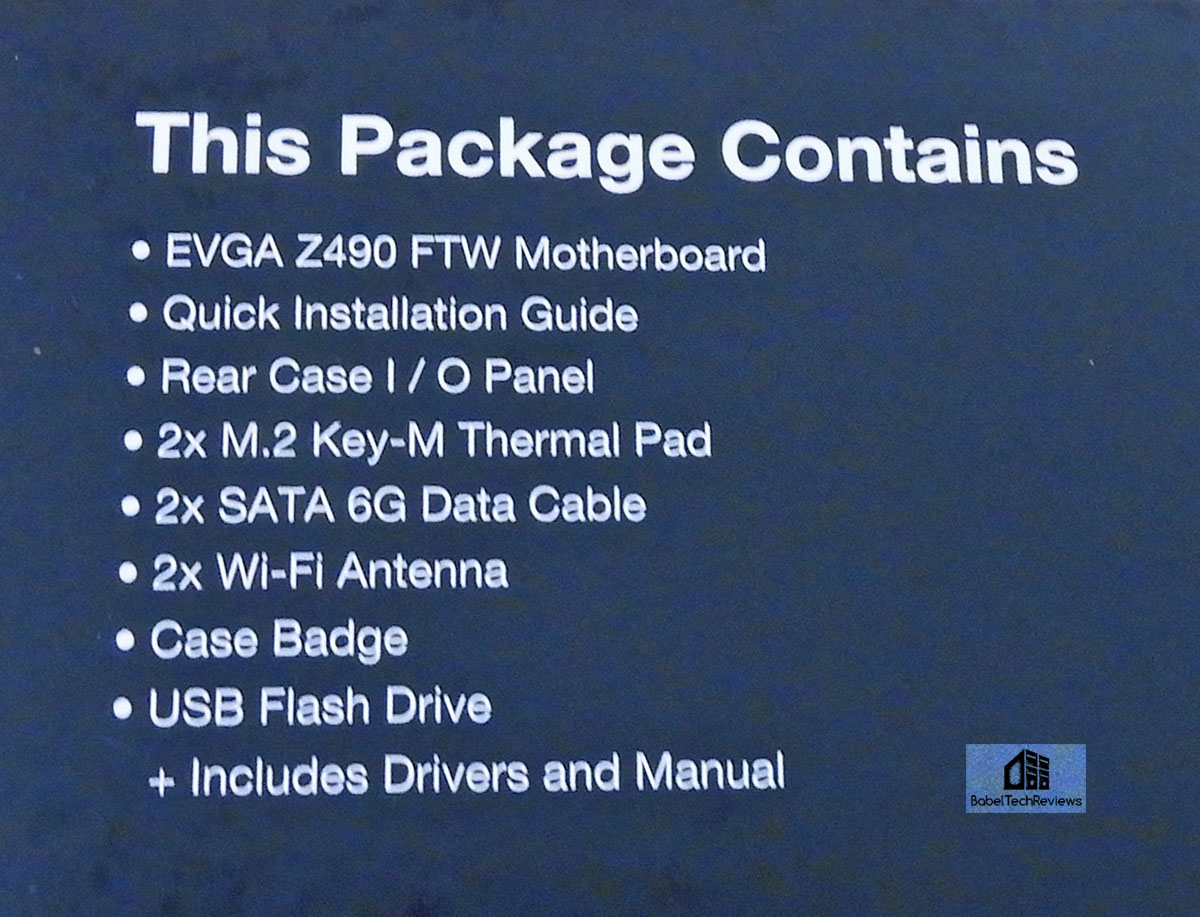 Bucking the modern trend, EVGA still supplies a separate rear case IO panel but we are used to the extra step. Besides the four SATA cables, IO rear panel cover, EVGA badge, mini-flash drive instead of a CD, quick-start guide and Wi-Fi antennas, the bundle is sparse. We really miss having a printed manual, but settled for the .pdf which is still rather basic for 163 pages. However, an experienced builder may not need it. The Z490 FTW is very similar to other EVGA motherboards, and anyone who has used one before will be familiar with its layout.
Here is the back of the FTW motherboard.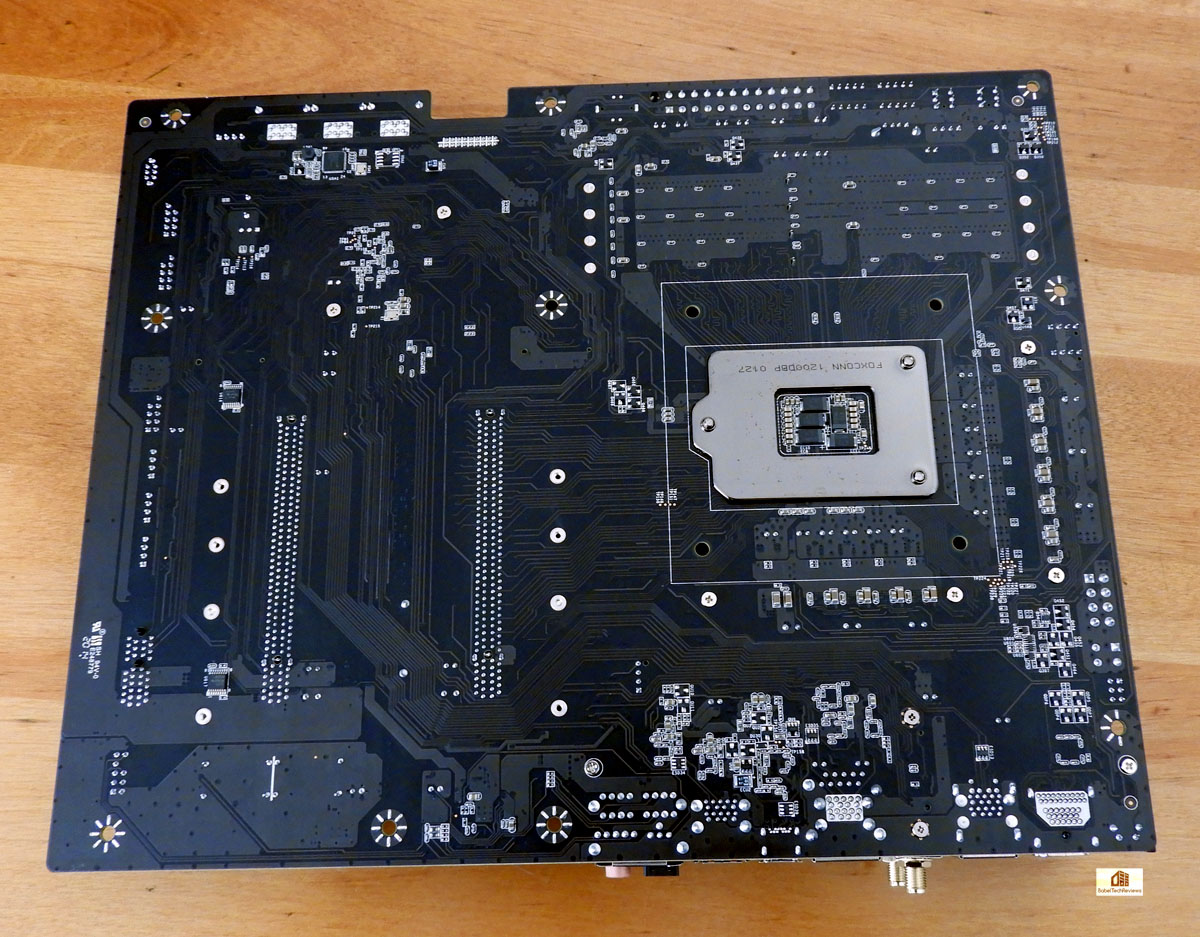
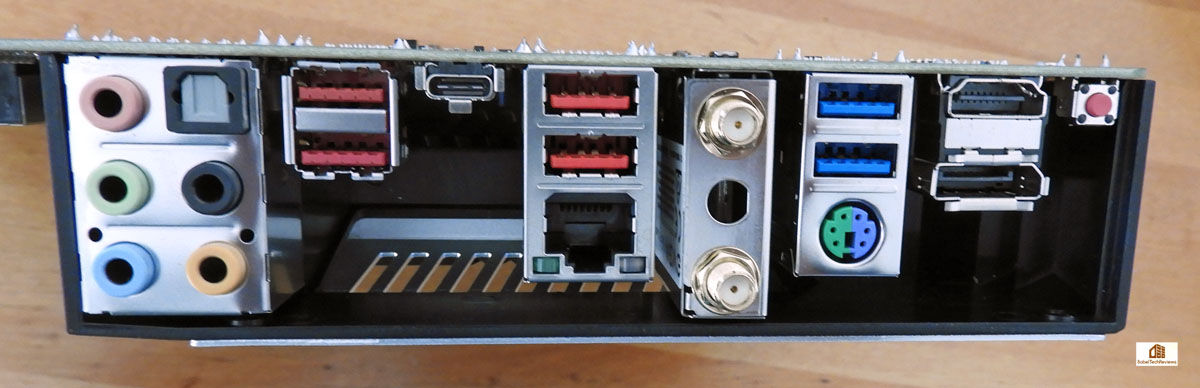
On the rear panel of the EVGA Z490 FTW, there is a Clear CMOS button, HDMI 1.4 and DisplayPort 2.0 video outputs, four USB 3.2 ports (red), the USB 3.1 ports (blue), a USB Type-C port, the Intel network port, the audio jacks, and the two Wi-Fi antennas screw right into their corresponding bases.
Originally we started with an ASRock Z490 Steel Legend which is a mid-range board. We pre-installed the memory and the CPU together with the IO backplate and CPU cooler standoffs and securely fastened them using 9 screws to the standoffs in the Focus G. We used 2x16GB of T-FORCE DARK Z DDR4 at stock speeds of 3600 MHz using the automatic XMP profile 1 in the BIOS. We installed the AIO cooler using Arctic Silver 5 and attached the rest of the cables and wiring.
The ASRock Z490 Steel Legend motherboard was OK for running our i9-10900K at stock speeds but it was unable to attain any performance-gaining overclock with a EVGA CLC 280mm CPU cooler in a Focus G case, so we switched it out for the EVGA Z490 motherboard. We started our build by moving the hardware from our ASRock motherboard to the EVGA motherboard, and then installed it into the same Focus G case.
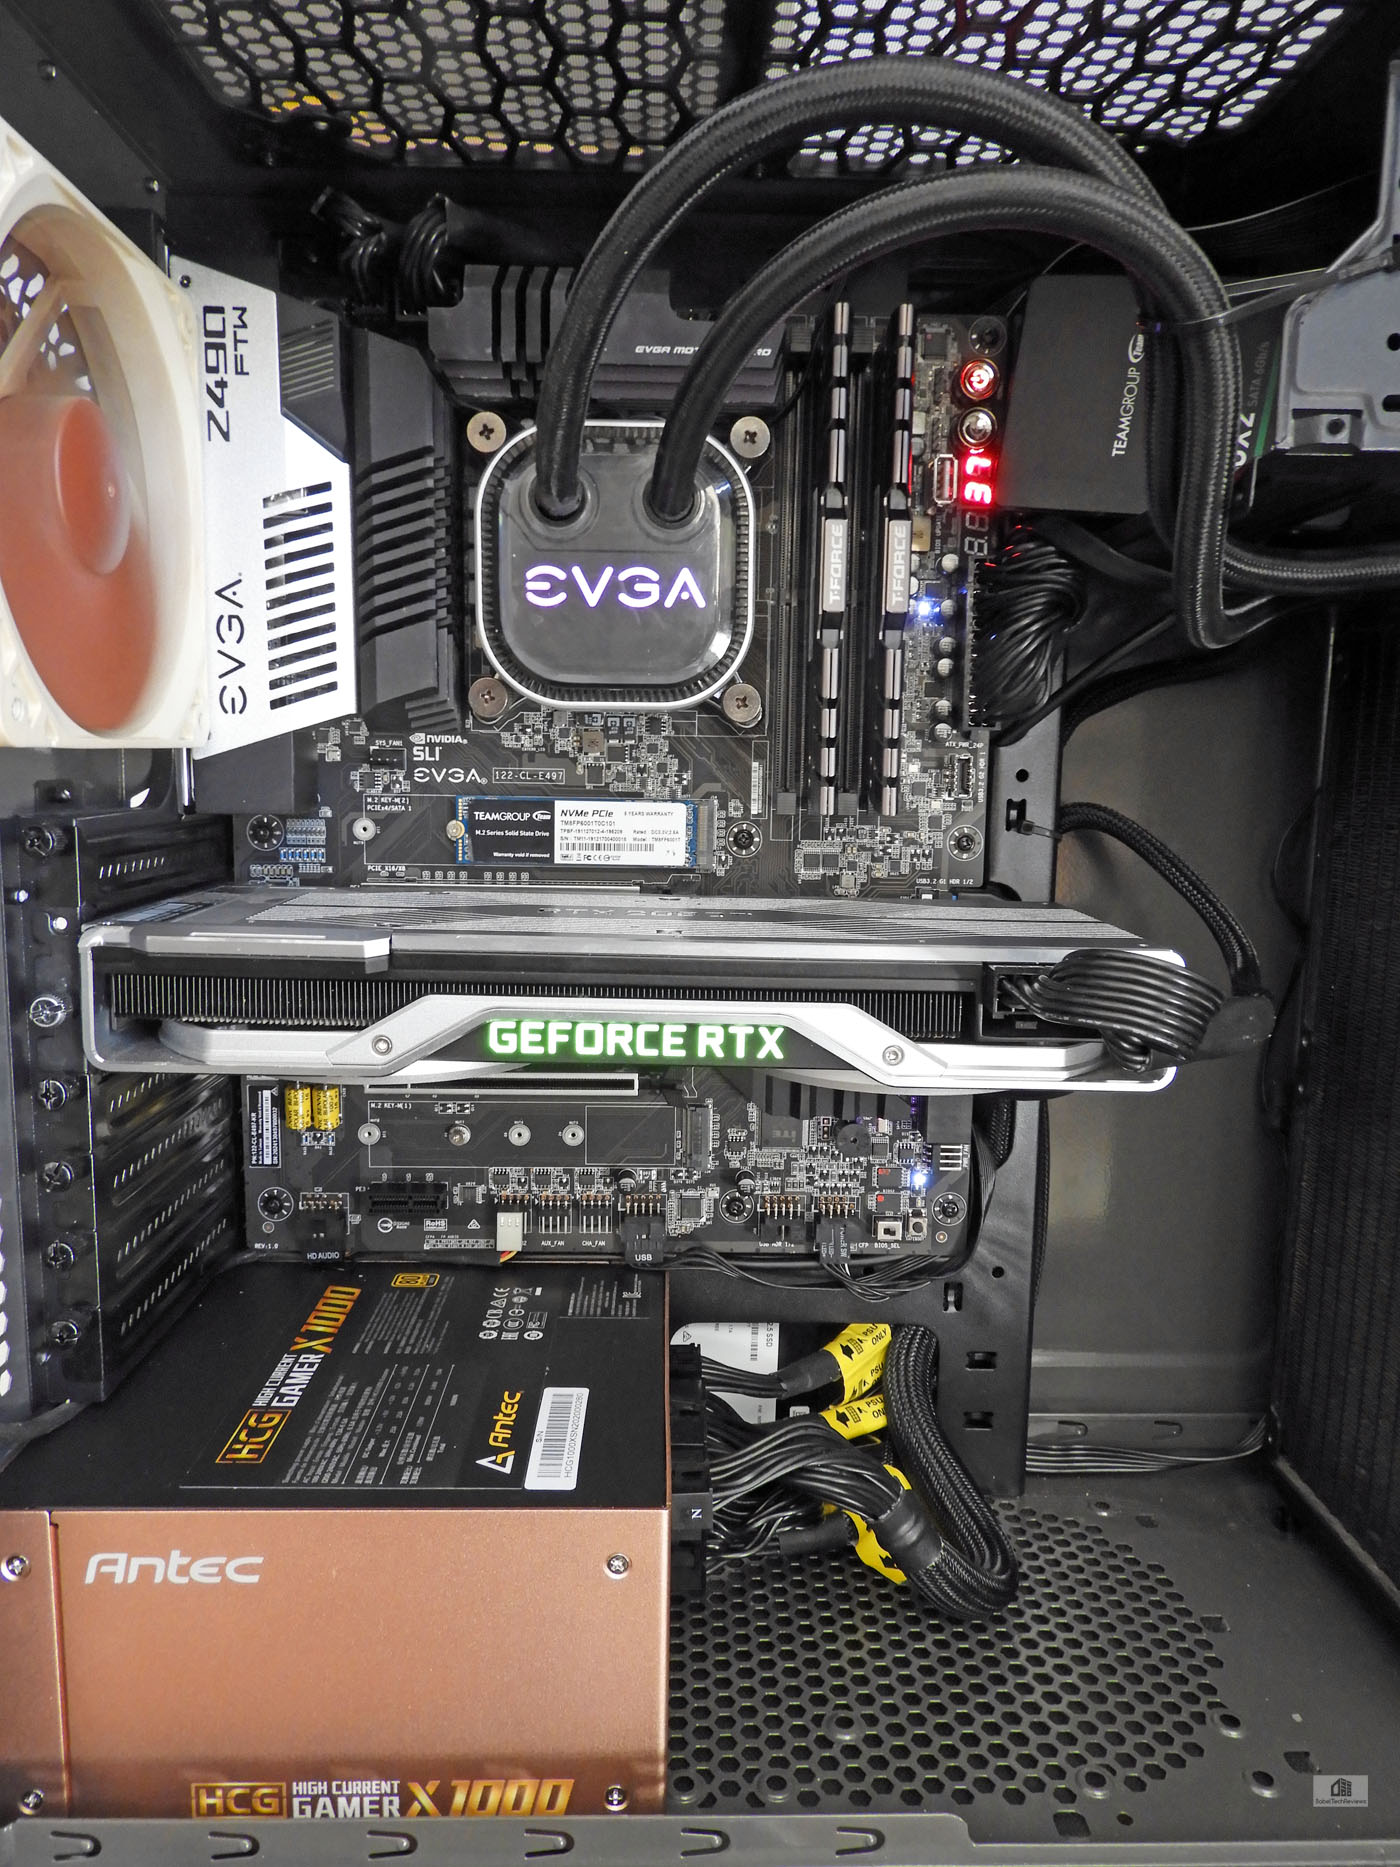
After the FTW build was completed, we got a decent overclock, but the temperatures were too high for the 280mm cooler. So we upgraded to a Phanteks case to house a DeepCool 360mm AIO cooler.

It was now a very easy transplant installation since we had learned to pre-install the HD audio and fan plugs into the bottom connectors before we installed the motherboard.
Well, it was soon time to turn it on. And it started right up and went to the BIOS screen. We picked Advanced and ignored the other three choices for now: Default, OC Robot, and Gamer Mode which sets a conservative overclock.
BIOS
Upon reaching the BIOS by pressing delete after powering on, you are presented with an overclocking-friendly screen. You can navigate the BIOS with a keyboard or mouse, and although it is fully-featured, it is still somewhat minimalist. It’s an advantage as the options are easy to understand and they give full control over a multitude of overclocking options. Usually, screenshots can be saved to a USB flash drive, but it never worked reliably for us so we captured photos of a few of the BIOS options and overclocking-related settings that we used.
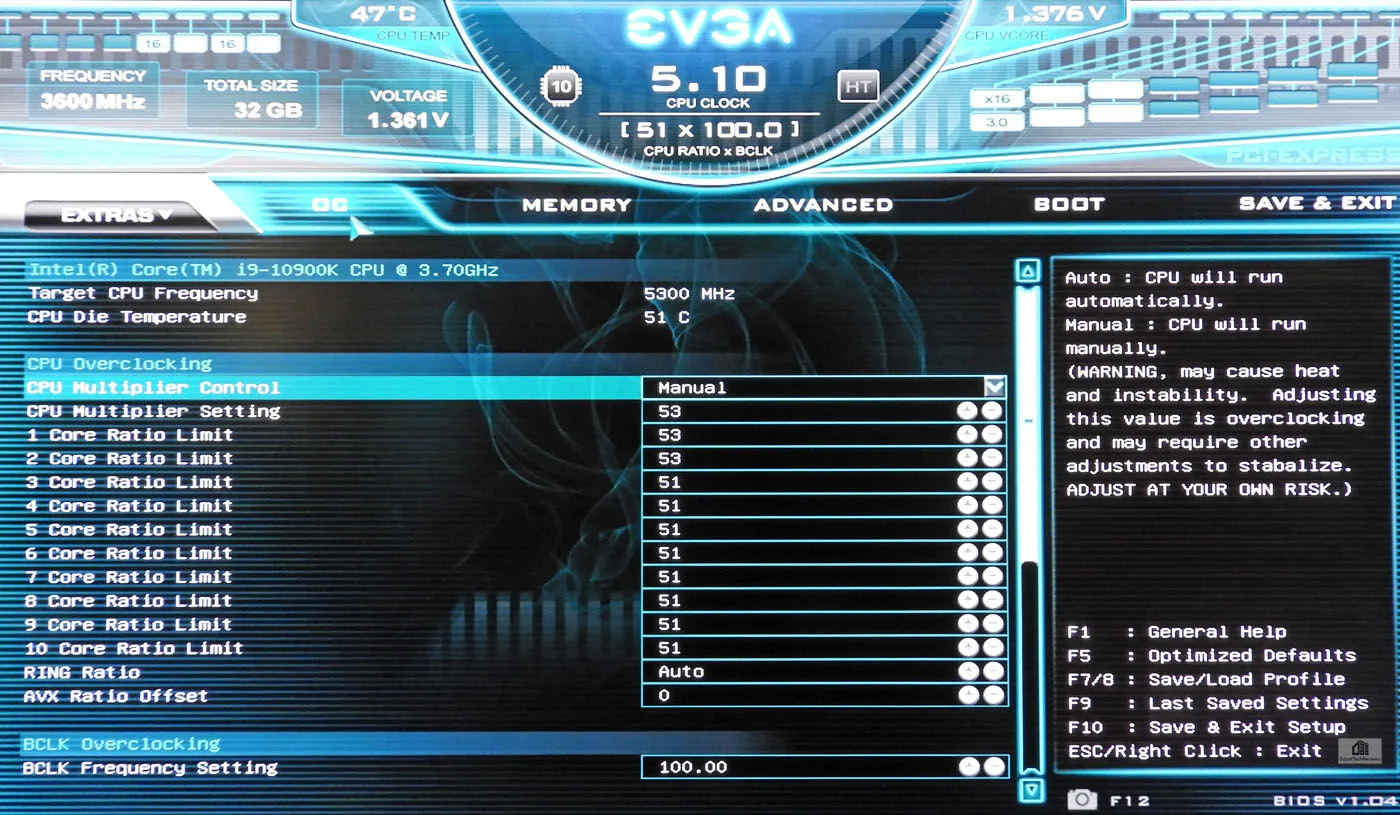
Overclocking is simple. You switch from Automatic (3.7 GHz with multiple automatic stages of Boost) to Manual and are presented with options to set the multiplier up or down. Setting the overall CPU Multiplier setting sets the individual cores to the same frequency or they may be adjusted individually as shown above.
We settled a multiplier of 51 for 5.1 GHz on all cores. We also made sure the AVX Ratio offset was set to zero because we wanted all 10 cores to turbo to 5.1 GHz without any exception for demanding software or even for ‘power viruses’ like Prime95.

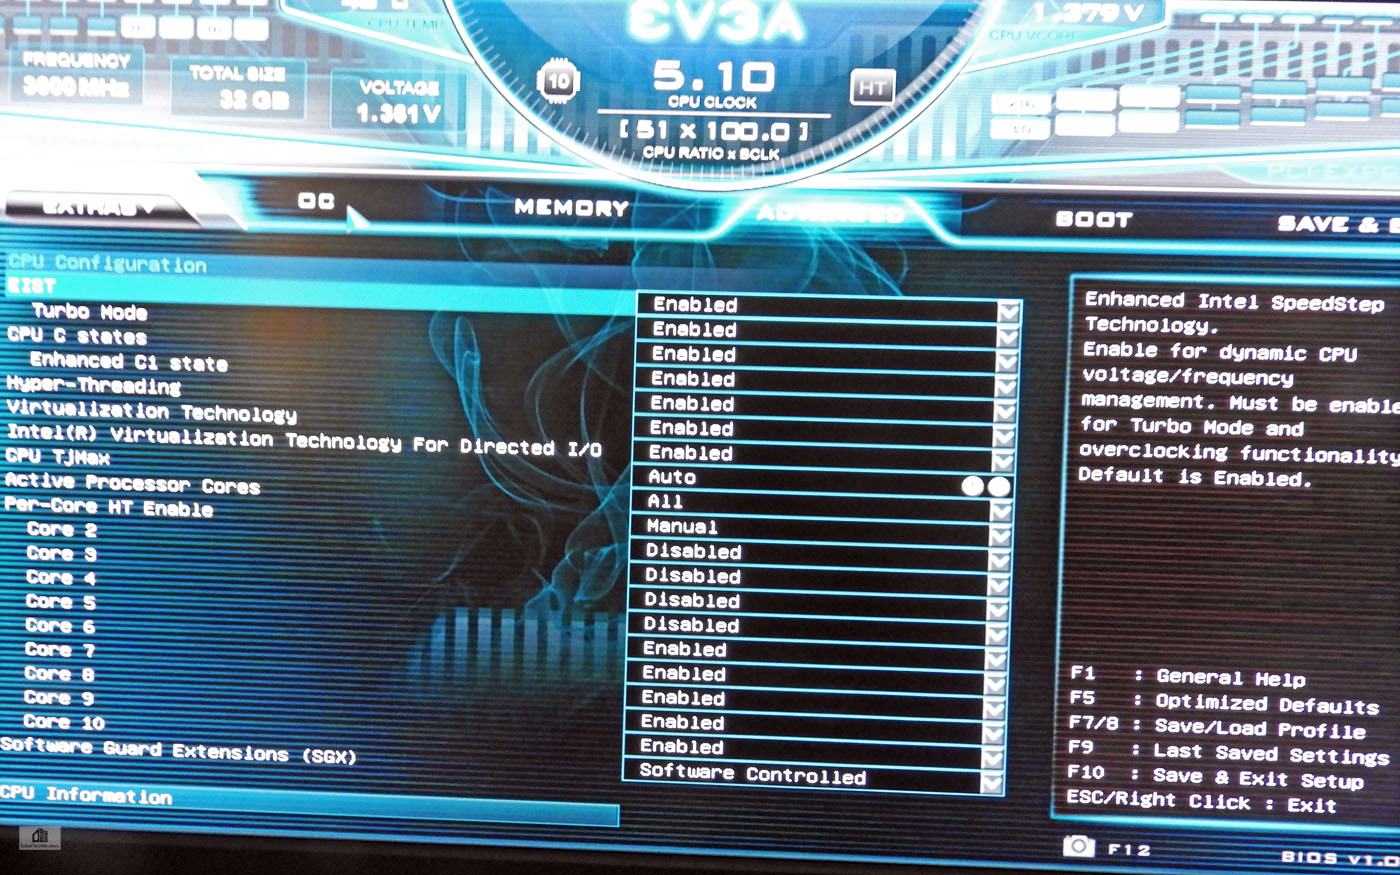
The BIOS offers options to set the BCLK Frequency but we only overclocked the core. Individual cores may have their HyperThreading enabled or disabled for those who want the ultimate in overclocking options. We enabled HT on all cores at 5.1GHz for overall better performance and benchmark repeatability although we were able to get a higher overclock on some cores by selectively disabling it .
 Unlike with many motherboards that allow excessive voltage to flow to a highly overclocked CPU, the FTW is a rare board that did not allow excessive spikes even with the automatic setting at 5.1 GHz. However, we also found that setting the voltage manually to 1.335V in Vcore was enough to stabilize the CPU at 5.1 GHz although it still occasionally spiked.
 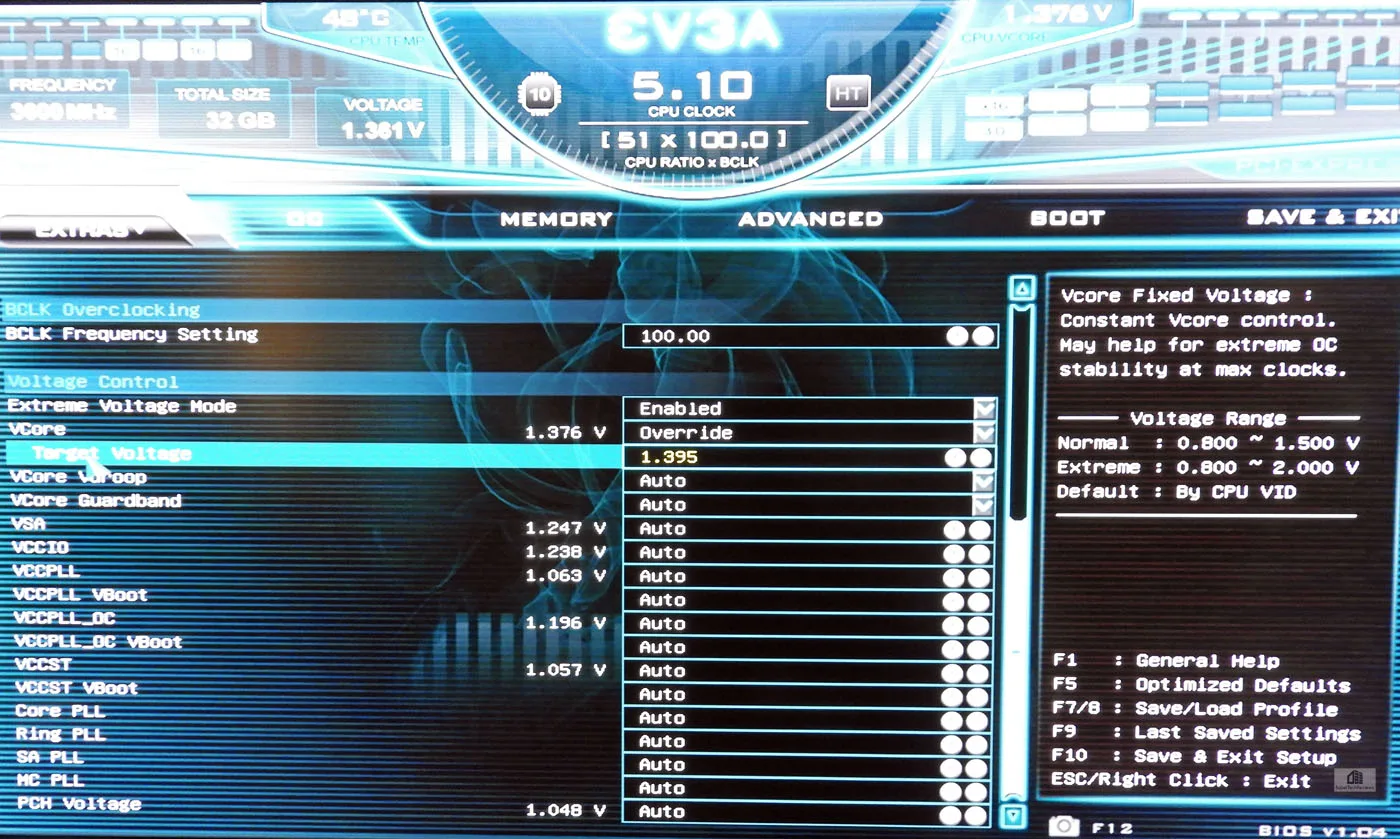 Disabling or enabling Vdroop made no difference to overall stability that we could notice. In the Advanced options, the user is given many options including to further fine-tune the CPU.
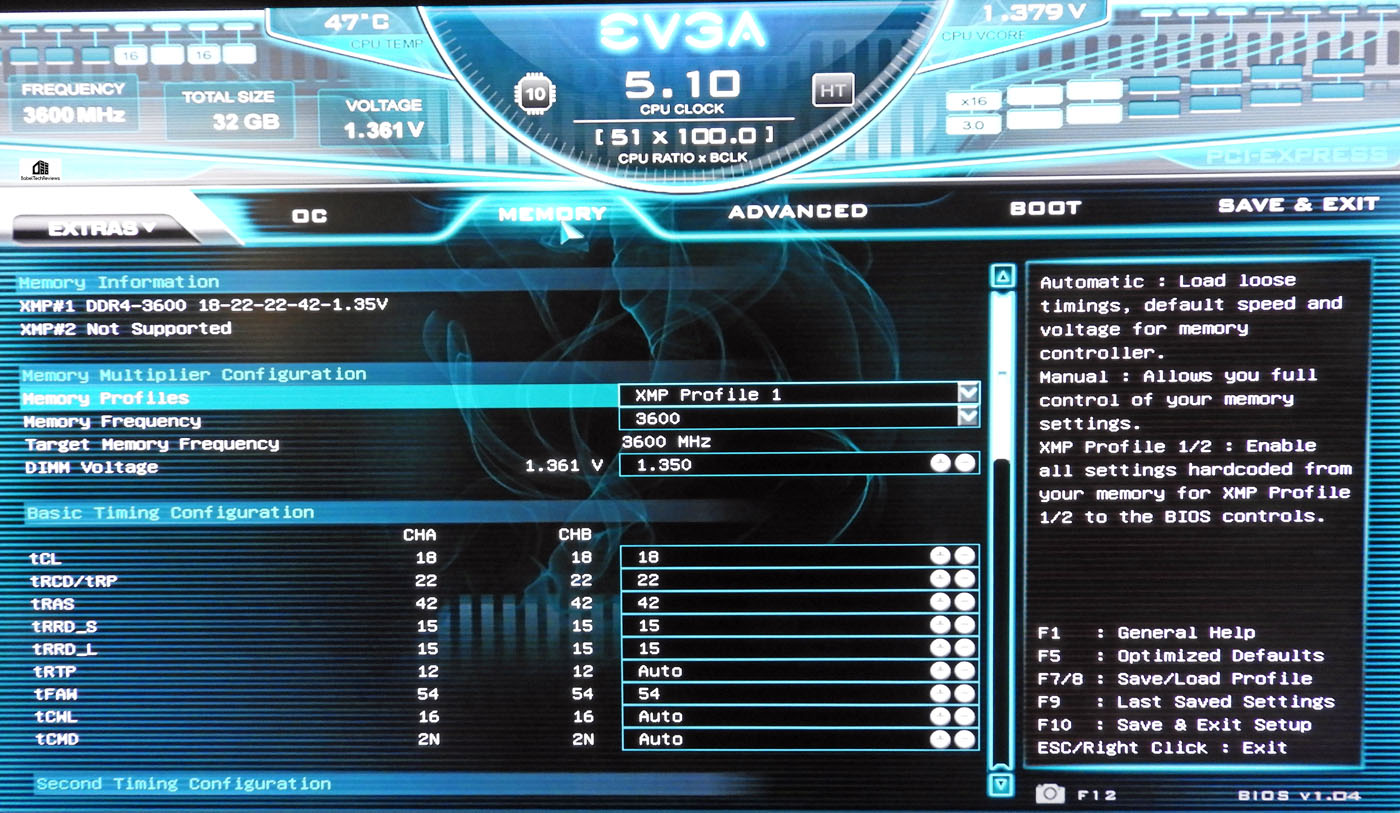
All of the other regular options are in the BIOS, and flashing is made easy by having a dual BIOS. We tried v1.04 but found that we got a better overclock with v1.03.
Overclocking, Voltage, and Temperatures
An i9-10900K overclocked all-core to 4.9GHz or higher requires additional voltage overstock, and temperatures rise dramatically as the voltage is increased to maintain stability for higher overclocks. The ASRock motherboard could not hold a stable overclock without throttling. Although 5.1GHz could be applied, throttling by what we suspect is uneven power delivery caused the CPU cores to throttle significantly, and the overclocked performance was lower than stock performance even though temperatures were not excessive.
Our favorite new EVGA tool is the OC Robot. Watching it closely as it ran through the frequencies told us exactly where to start with our manual overclock and what approximate voltages worked, as well as letting us know where the CPU got into thermal trouble. Here is 4.9GHz.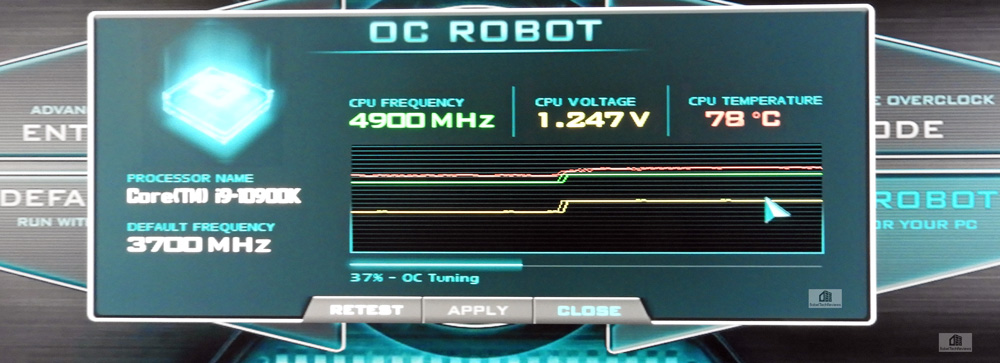 Only 1.247V are needed for all-cores at 4900MHz. Watch what happens when the OC Robot tests 5.0GHz.
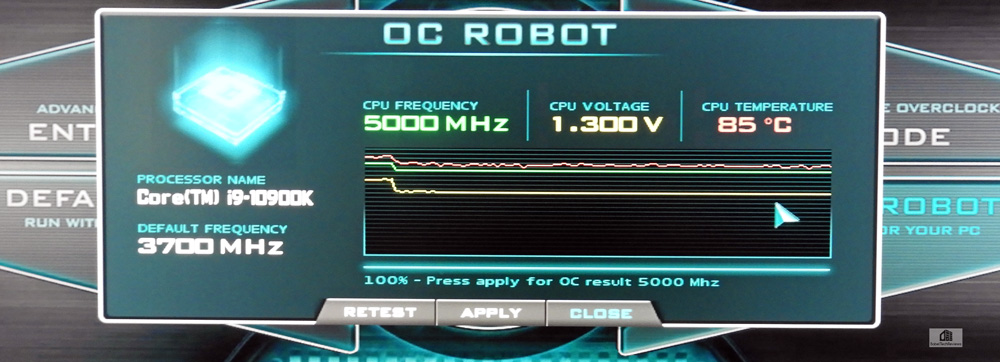
It now takes 1.3V to stabilize an all core 5000MHz OC with the temperatures peaking at 85C. So the Robot continues.
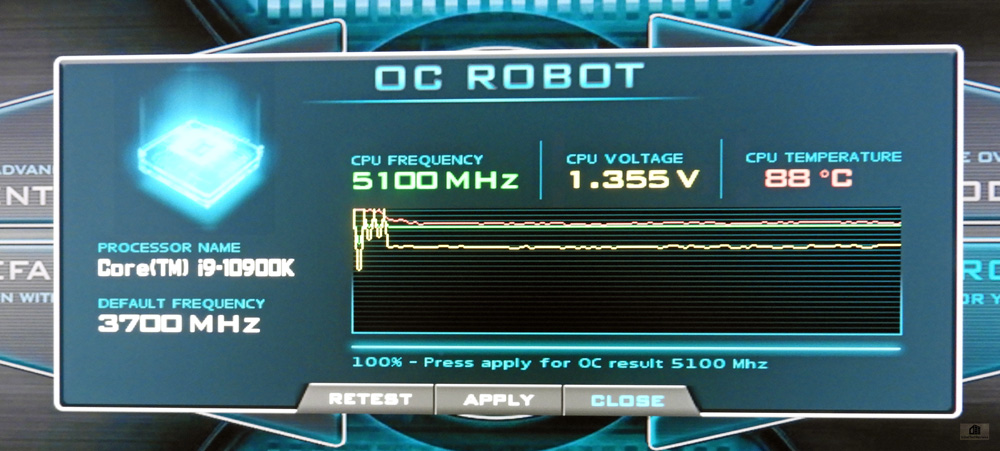
The OC Robot settled on 5.1GHz since 5.2GHz raised the voltage and temperatures dramatically. OC Robot’s 5.1GHz OC is exactly the same overclock that we were able to finally achieve after spending hours manually trying setting after setting. The only difference is that we were able to stabilize 5100MHz at 1.335V instead of 1.355V, and thus we got lower temperatures. Overall, we would give the OC Robot an A- for being a time-saver and for being reasonably accurate. The OC Robot’s result is a great place for an experienced overclocker to begin manual testing and fine-tuning.
When we manually overclocked further to 5.2 GHz, the voltage requirements exceeded 1.4V and temperatures spiked into the 90sC under a full gaming load and near 100C under full load synthetic benches. These benches are often called power viruses and may include OCCT, the Blender Benchmark, and Prime95.
We were unable to use our EVGA 280mm CLC even with a modified aggressive fan profile at 5.2GHz, so we switched out the AIO to a 360mm DeepCool AIO and a larger Phanteks case. Although the temperatures dropped by 5-8C or better, thermal throttling still took place, and the 5.2GHz overclock resulted in overall lower performance than at 5.1GHz. We also tried 5.3GHz with a 2AVX offset, but we couldn’t get the i9 completely stable. So we settled on a maximum stable 10900K overclock with all 10 cores at 5.1GHz and set about benching and comparing performance with stock settings.
Driver Installation
The included EVGA motherboard drivers and programs are no longer on CD but on a flash drive, and they work quickly and painlessly to install all needed drivers. The latest drivers can always be found on EVGA’s website which are what we used before we discovered the tiny flash drive at the bottom of a plastic bag.
Let’s look at our test configuration before we do any benching
Test Configuration
Test Configuration – Hardware
- Intel Core i9-10900K (HyperThreading/Turbo boost On; stock and overclocked. Rocket Lake DX11 CPU graphics)
- EVGA Z490 FTW motherboard (Intel Z490 chipset, v1.3 and v1.4 BIOSes, PCIe 3.0/3.1/3.2 specification, CrossFire/SLI 8x+8x), supplied by EVGA
- ASRock Z490 Steel Legend motherboard (Intel Z490 chipset, latest BIOS, PCIe 3.0/3.1/3.2 specification, CrossFire/SLI 8x+8x)
- DEEPCOOL Castle 360EX AIO 360mm liquid CPU cooler
- EVGA 280mm CLC AIO liquid CPU cooler, supplied by EVGA
- T-FORCE DARK Z 32GB DDR4 (2x16GB, dual channel at 3600MHz), supplied by Team Group
- RTX 2080 Ti Founders Edition 11GB, stock clocks, on loan from NVIDIA
- 1TB Team Group MP33 NVMe2 PCIe SSD for C: drive
- 1.92TB San Disk enterprise class SATA III SSD
- 2TB Micron 1100 SATA III SSD
- 1TB Team Group GX2 SATA III SSD
- 500GB T-FORCE Vulcan SSD, supplied by Team Group
- ANTEC HCG1000 Extreme, 1000W gold power supply unit
- BenQ EW3270U 32 Inch 4K HDR FreeSync Monitor
- SAMSUNG LC27G75TQSNXZA 27″ 2560 x 1440 240Hz 1ms G-Sync Monitor
- Fractal Design Focus G mid-tower PC case
- Phanteks Eclipse P400 ATX mid-tower
Test Configuration – Software
- Nvidia’s GeForce 451.67 WHQL drivers. High Quality, prefer maximum performance, single display
- VSync is off in the control panel
- AA enabled as noted in games; all in-game settings are specified with 16xAF always applied
- Highest quality sound (stereo) used in all games
- Windows 10 64-bit Pro edition; latest updates v2004
- Latest DirectX
- MSI’s Afterburner, latest version.
- CPUZ
- HWiNFO
- Intel XTU
Game-related
- Grand Theft Auto V
- Civilization Vi
- Anno 1800
- 3DMark – Time Spy & Physics
- Superposition
- VRMark Cyan
Synthetic
- Sandra 2020
- AIDA64
- PCMark 8
- PCMark 10
- RealBench
- Cinebench
- NovoBench
- Blender Benchmark
- Wprime
We used MSI’s Afterburner to set the RTX 2080 Ti’s power and temp limits to their maximums.
Let’s head to our performance charts.
Synthetic Benches
SiSoft Sandra 2020
To see where the CPU and motherboard performance results differ, there is no better tool than SiSoft’s Sandra 2020. SiSoftware SANDRA (the System ANalyser, Diagnostic and Reporting Assistant) is a consummate information & diagnostic utility in a single complete package. It is able to provide all the information about your hardware, software and other devices for diagnosis and for benchmarking. Sandra is derived from a Greek name that implies “defender” or “helper”.
There are several versions of Sandra, including a free version of Sandra Lite that anyone can download and use. It is highly recommended! Sandra 2020 R8 is the latest version, and we are using the full engineer suite courtesy of SiSoft. Sandra 2020 features continuous multiple monthly incremental improvements over earlier versions of Sandra. It will benchmark and analyze all of the important PC subsystems and even rank your PC while giving recommendations for improvement.
We ran Sandra’s intensive benchmarks and charted the results summarizing our CPU-related benchmark testing. As with all of the following charts, the performance results of the ASRock Steel Legend motherboard at stock CPU speeds are first compared with the stock performance results of the EVGA FTW motherboard at stock and then with an all-core 5.1GHz i9 overclock.
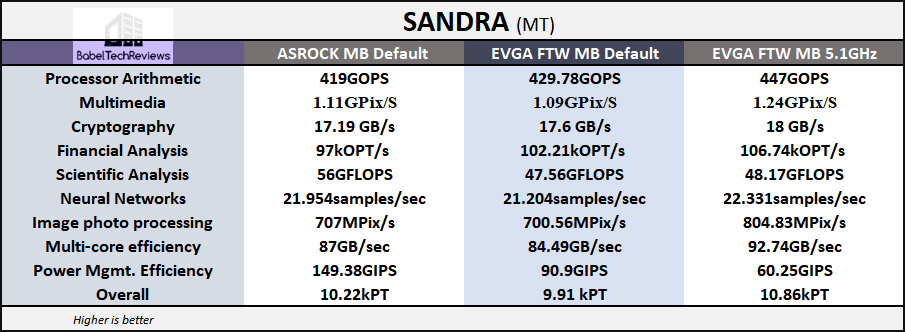
Generally Z490 motherboards using the same CPU will give very similar results. Interestingly, the power management efficiency of the ASRock motherboard is higher than the EVGA board, and the FTW’s efficiency decreases as the power demands go up from overclocking.
A faster CPU has better results when it plays a major part in the calculations. When the tests are GPU oriented, the graphics card does most of the work. In the Sandra CPU benchmarks, overclocking the 10900K to 5.1GHz brings higher performance over stock.
We next feature AIDA64.
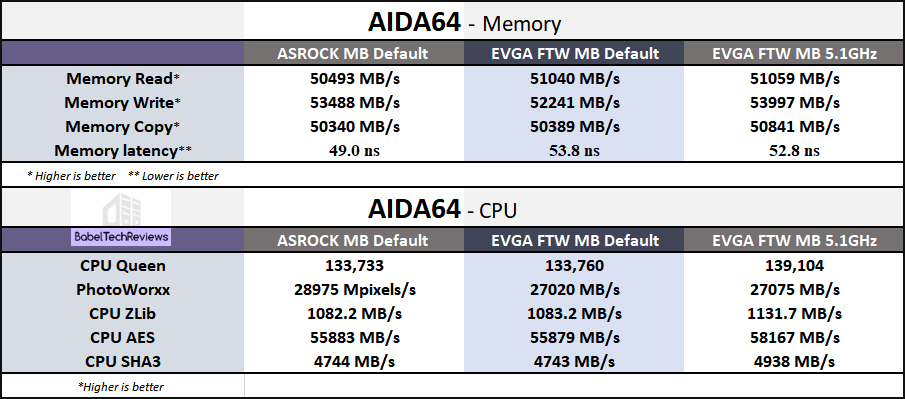
AIDA64 v6.00
As the successor to Everest, AIDA64 is an important industry tool for benchmarkers. Its memory bandwidth benchmarks (Memory Read, Memory Write, and Memory Copy) measure the maximum available memory data transfer bandwidth and its custom CPU benchmarks measure performance and give scores to compare against other popular CPUs.
AIDA64’s benchmark code methods are written in Assembly language, and they are extremely optimized for every popular AMD, Intel and VIA processor core variants by utilizing the appropriate instruction set extensions. We use the Engineer’s full version of AIDA64 courtesy of FinalWire. AIDA64 is free to to try and use for 30 days.
The AIDA64 Memory Latency benchmark measures the typical delay beginning from when the CPU reads data from the system memory. Memory latency time means the time is accurately measured from the issuing of the read command until the data arrives to the integer registers of the CPU. It also tests Memory Read, Write, and Copy speeds besides Cache.
CPU Queen is an integer benchmark that focuses on the branch prediction capabilities of the CPU. It finds the solutions for the classic “Queens problem” on a 10 x 10 chessboard. CPU PhotoWorxx performs common tasks used during photo processing which stresses the SIMD integer arithmetic execution units of the CPU and also the memory subsystem. ZLib is a compression benchmark, while AES focus on Advanced Encryption Standard data encryption. SHA3 benchmarks use a standard hashing algorithm.
Here is the summary chart of the multiple AIDA64 memory benchmarks.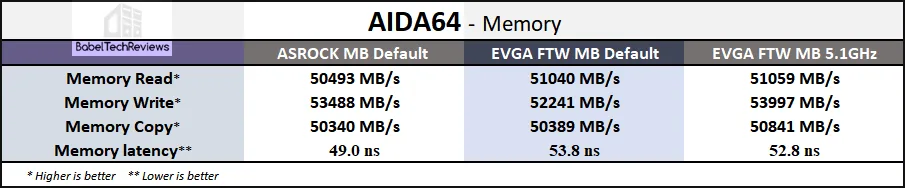 As the CPU is overclocked, the bandwidth increases and the benchmark scores also scale favorably with overclocking.
  The performance results are similar between the ASRock and the EVGA motherboards when the CPU is at the same stock clocks, but the FTW’s 5.1GHz overclock delivers consistently higher performance.
Let’s look at PCMark 8 next to see if its benchmarks can reflect CPU speed increases.
PCMark 8
PCMark 8 has a great Creative test which uses real world timed benchmarks including web browsing, video group chat, photo, batch, and video editing, music and video tests, and even mainstream gaming. Since the PCMark 8 Storage Test does not test the CPU, we only used the Creative benchmark suite.
Here are the ASRock Steel Legend results with the i9 at stock settings – 9137.
Overclocking the i9-10900K to 5.1GHz in the ASRock motherboard brought no performance increase and delivered the same score.
Next are the stock i9 results in the FTW motherboard – 9715.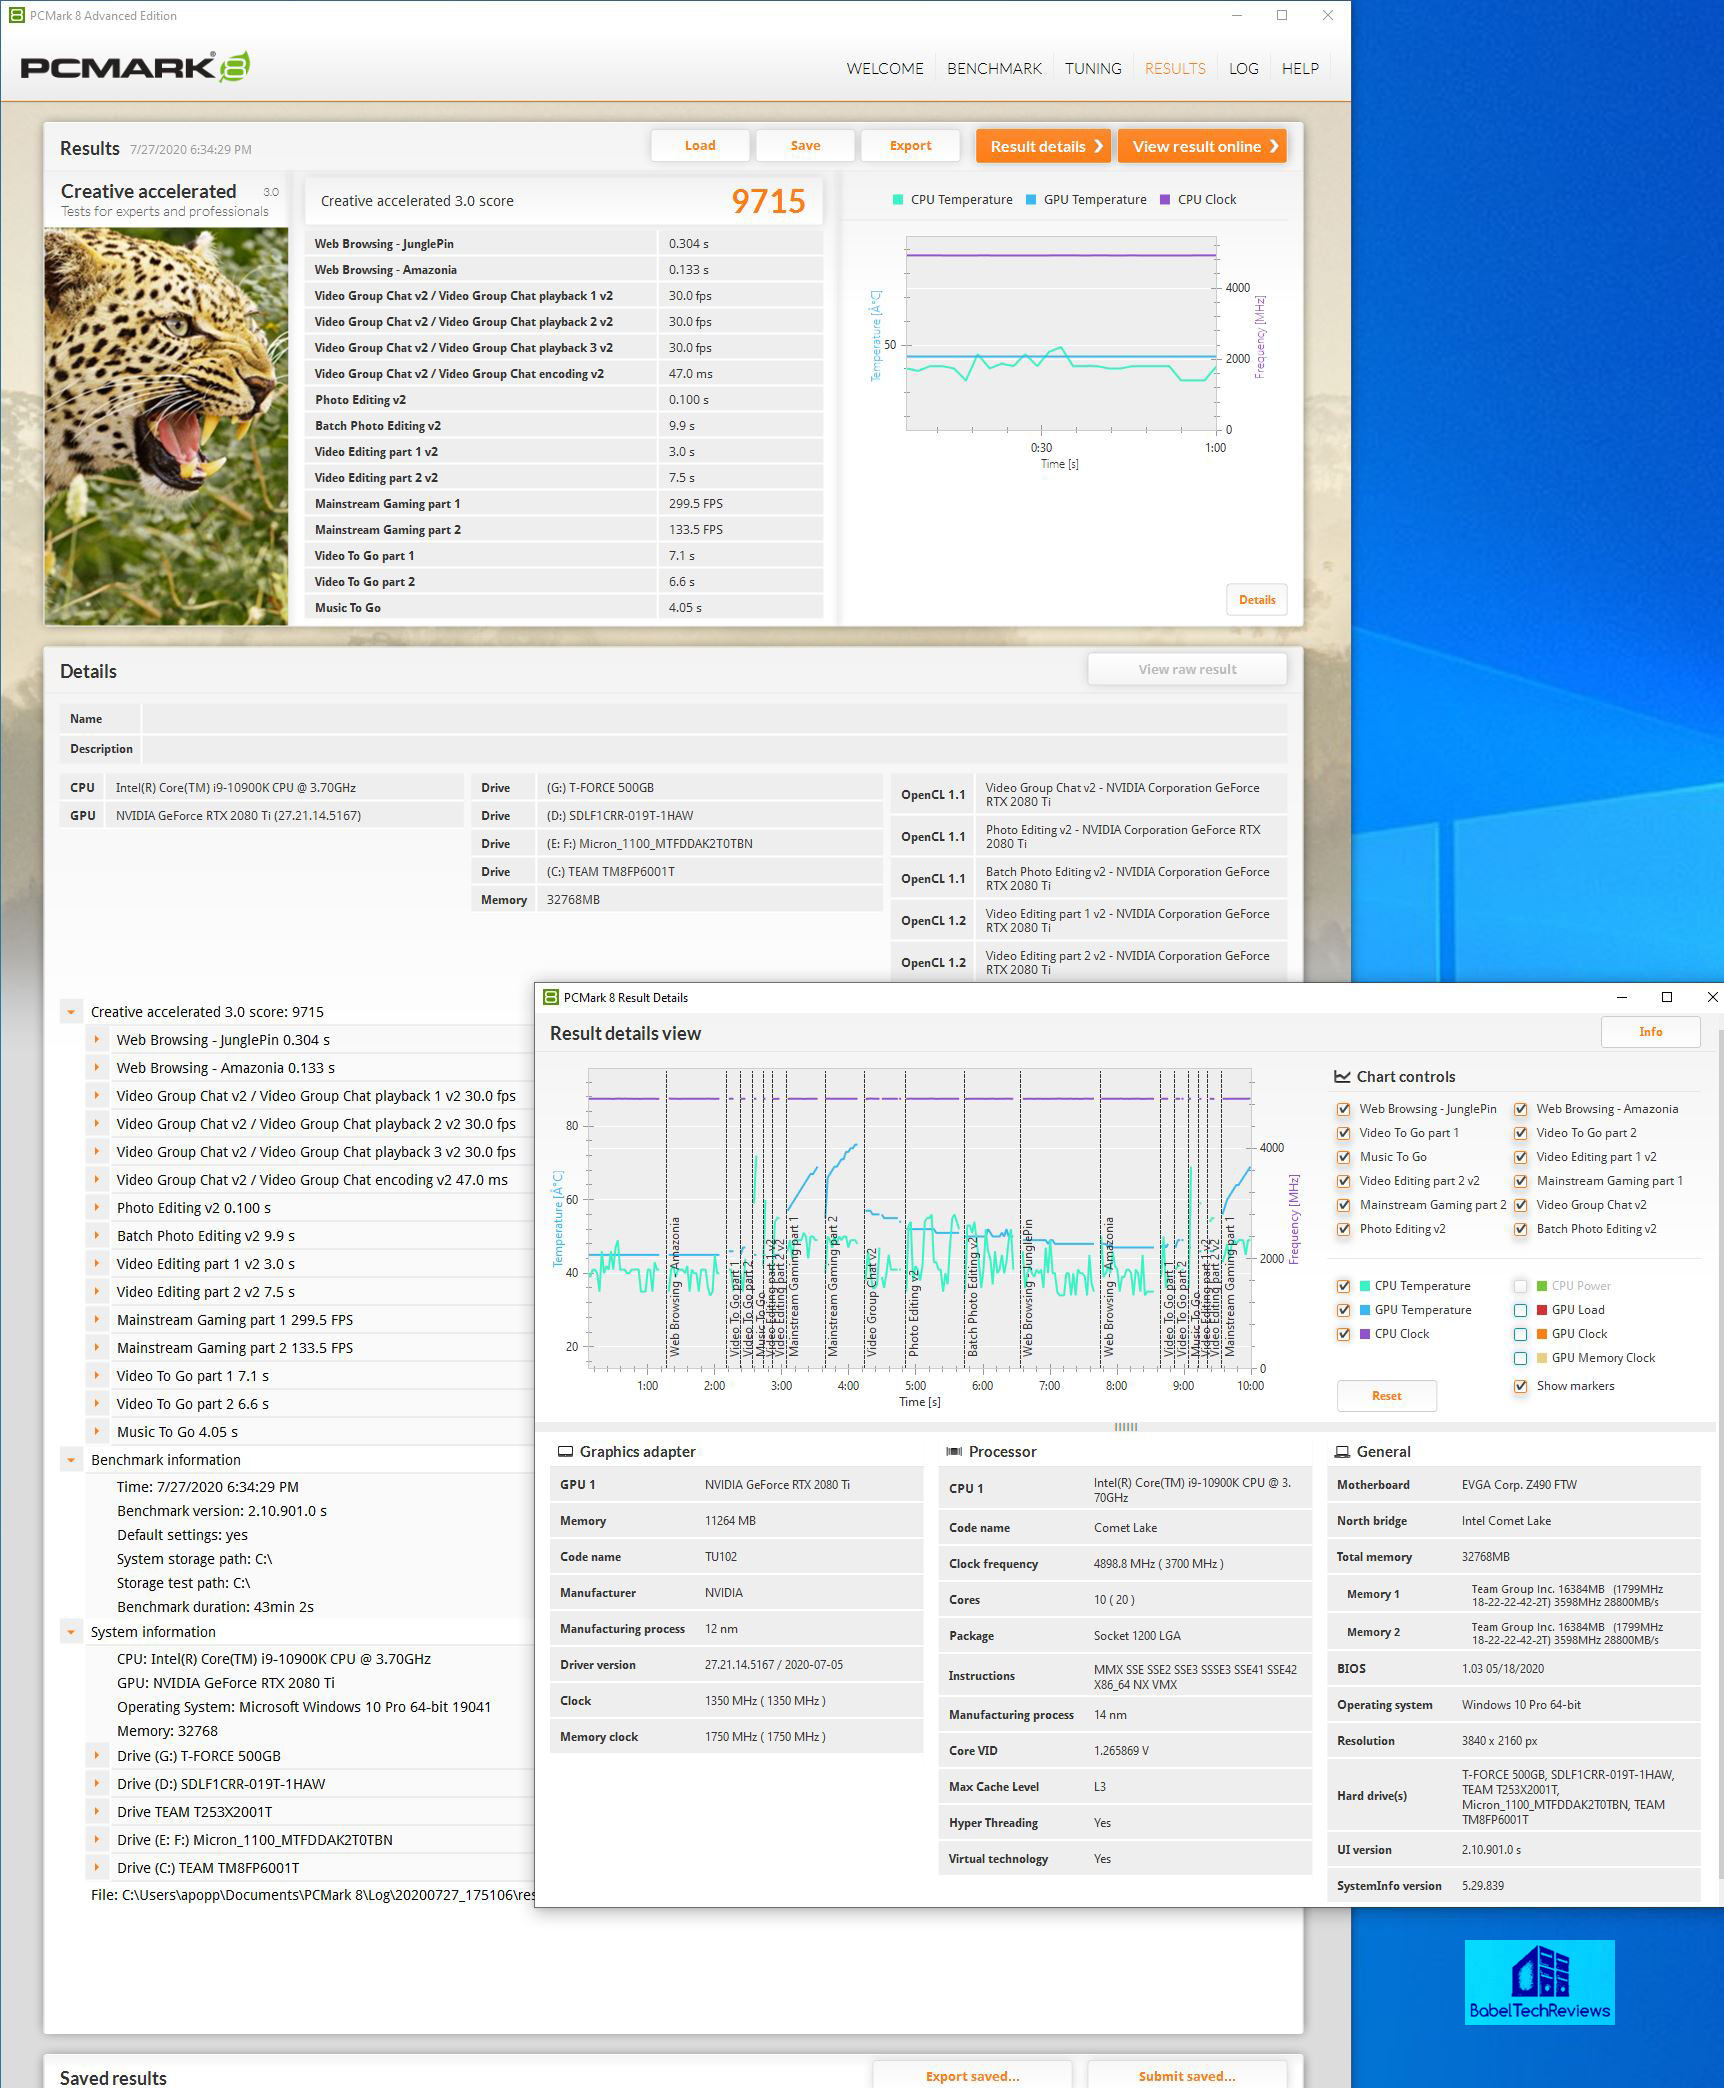
It’s a somewhat shocking comparison that may lead one to suspect that some of the demanding and prolonged PCMark 8 benchmarks may cause the ASRock motherboard to also throttle the i9 clocks even at stock settings.
Here are the results of the i9-10900K on the FTW motherboard now overclocked to 5.1GHz – 9967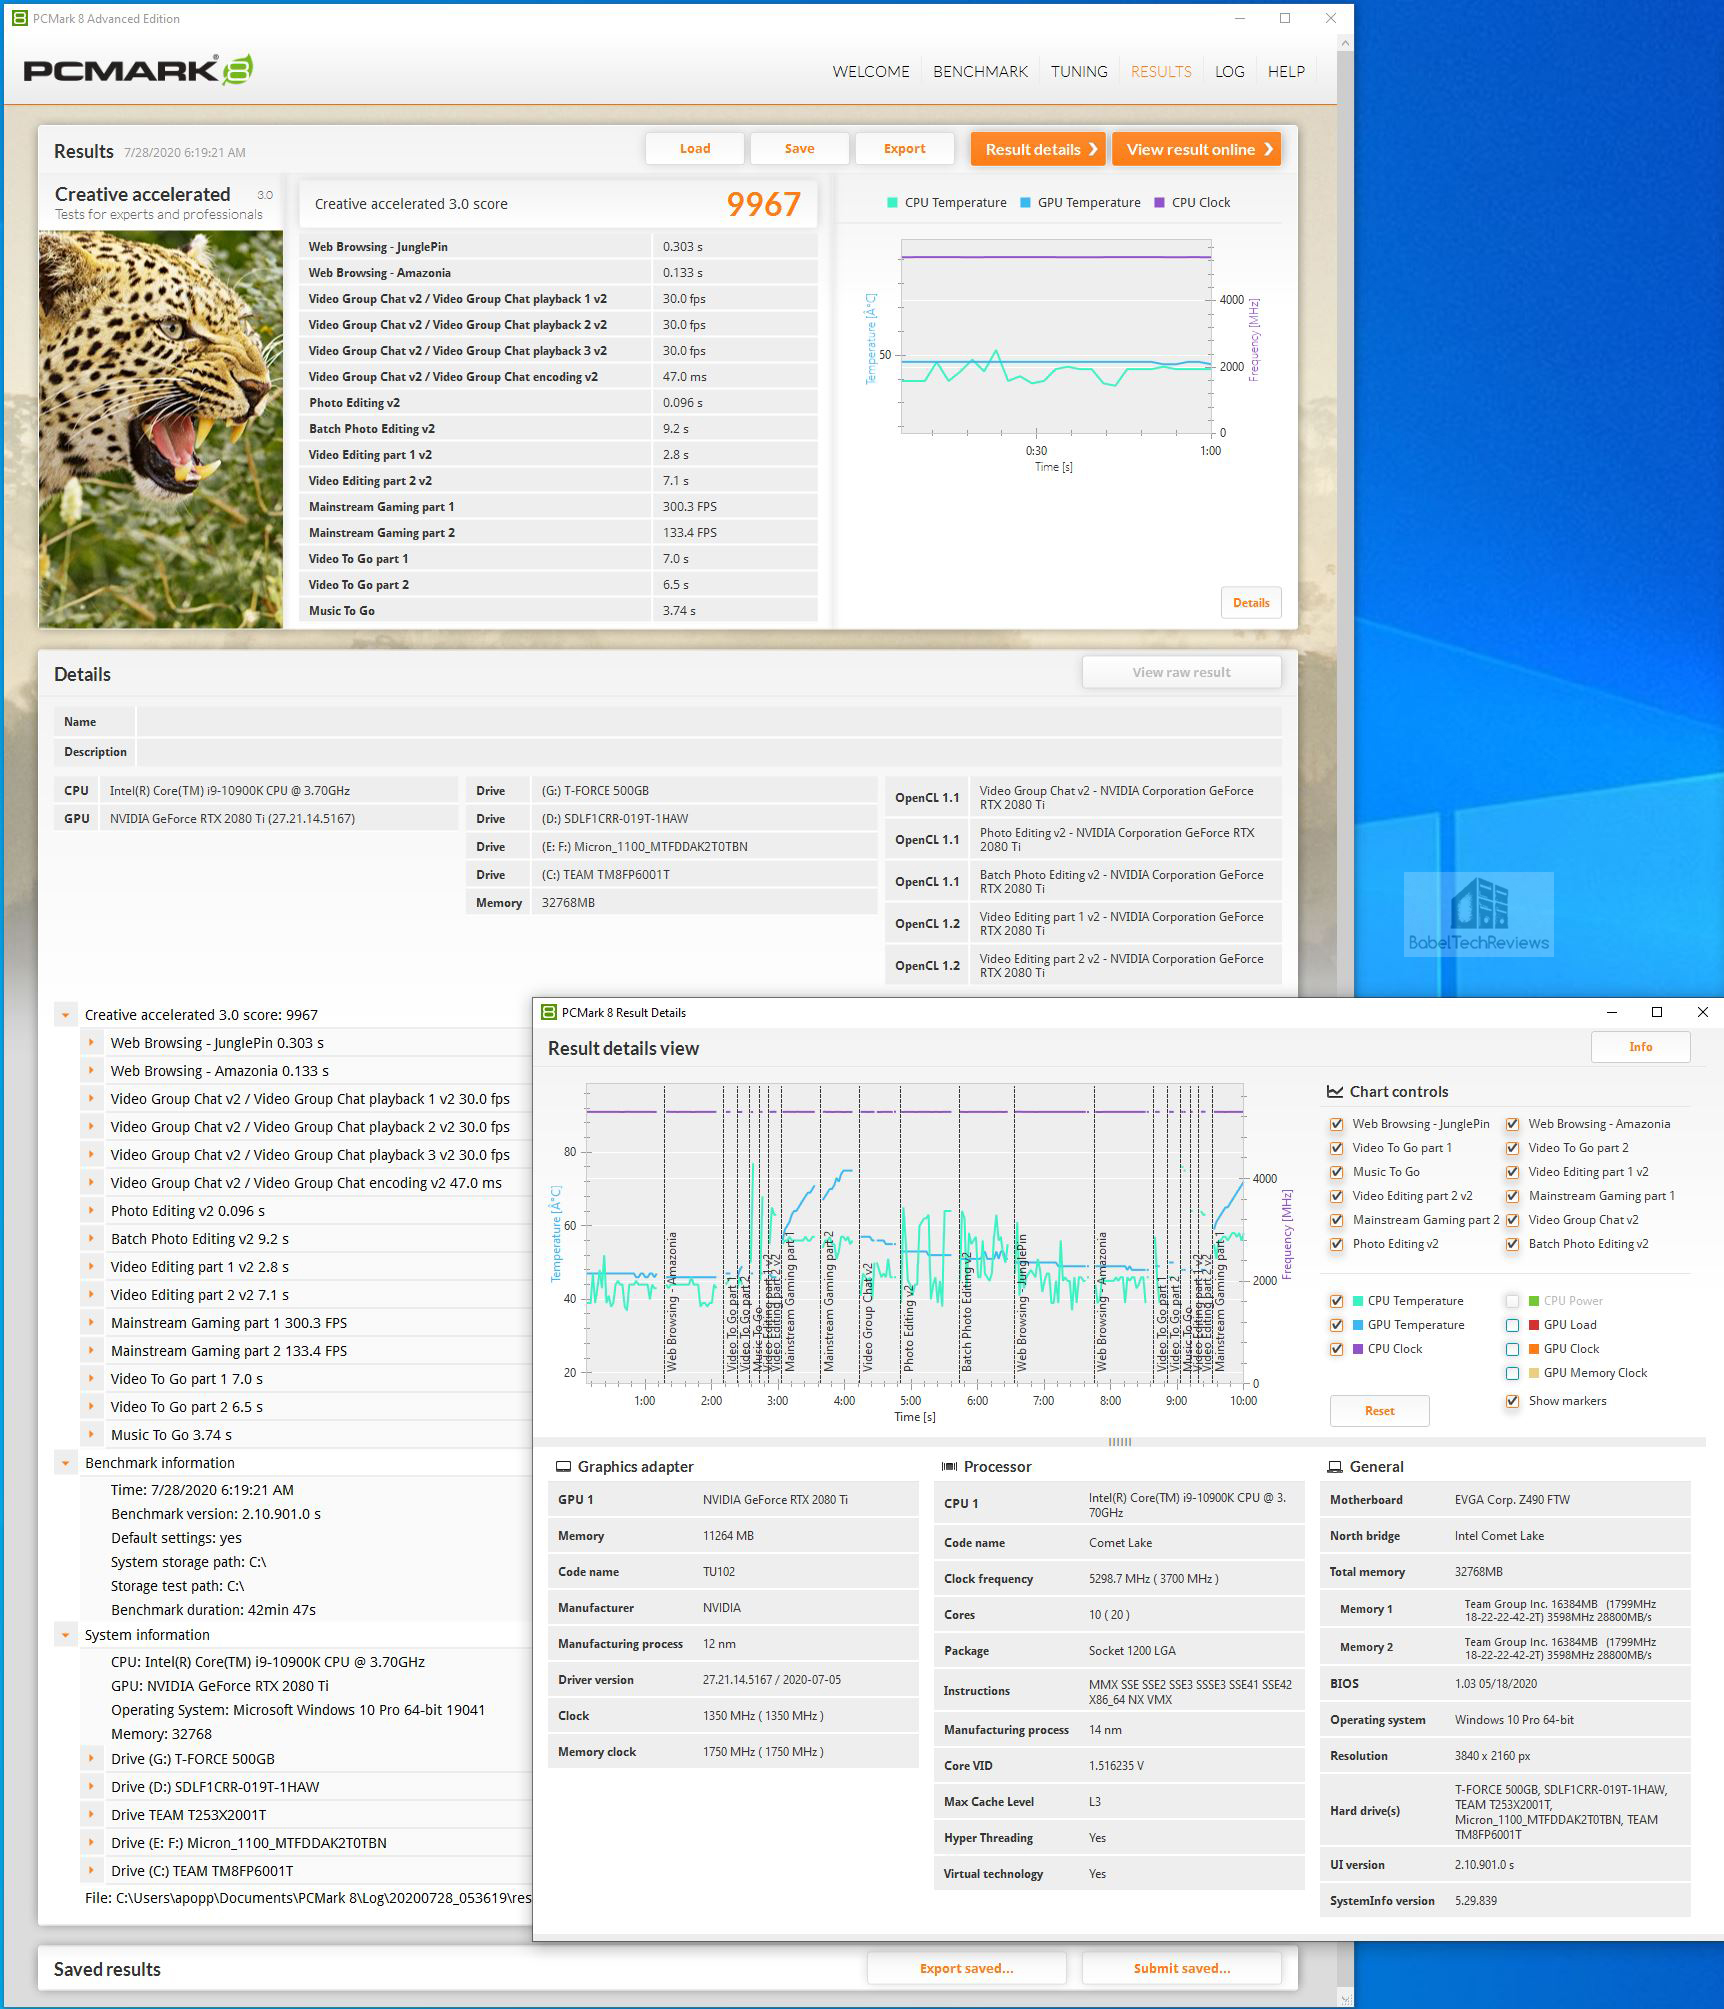
In contrast to using the ASRock motherboard, overclocking the i9 to 5.1GHz in the FTW motherboard brought increased performance as evidenced by the improved score. Here is the summary chart.

We may perhaps infer from the summary chart that increasing the CPU speed to 5.1GHz with an all core overclock may help increase overall PCMark 8 performance as reflected by the results.
PCMark 10 is next.
PCMark 10
The PCMark 10 benching suite is the follow-up to PCMark 8 and it also uses real world timed benchmarks which include web browsing, video group chat, photo, batch, and video editing, music and video tests, and even mainstream gaming. The PCMark 10 test offers two primary tests and we chose the extended version.
First up is the i9–10900K at stock in the ASRock Steel Legend motherboard – 9848.

Next we overclock the i9–10900K to 5.1GHz in the ASRock Steel Legend motherboard – and it loses performance again – 9636.
Overclocking the i9 to 5.1GHz in the ASRock motherboard resulted in lower performance than at stock settings. So let’s look at the same i9 at stock and also overclocked in the FTW motherboard.
Next are the stock 10900K results in the EVGA Z490 FTW board – 10079.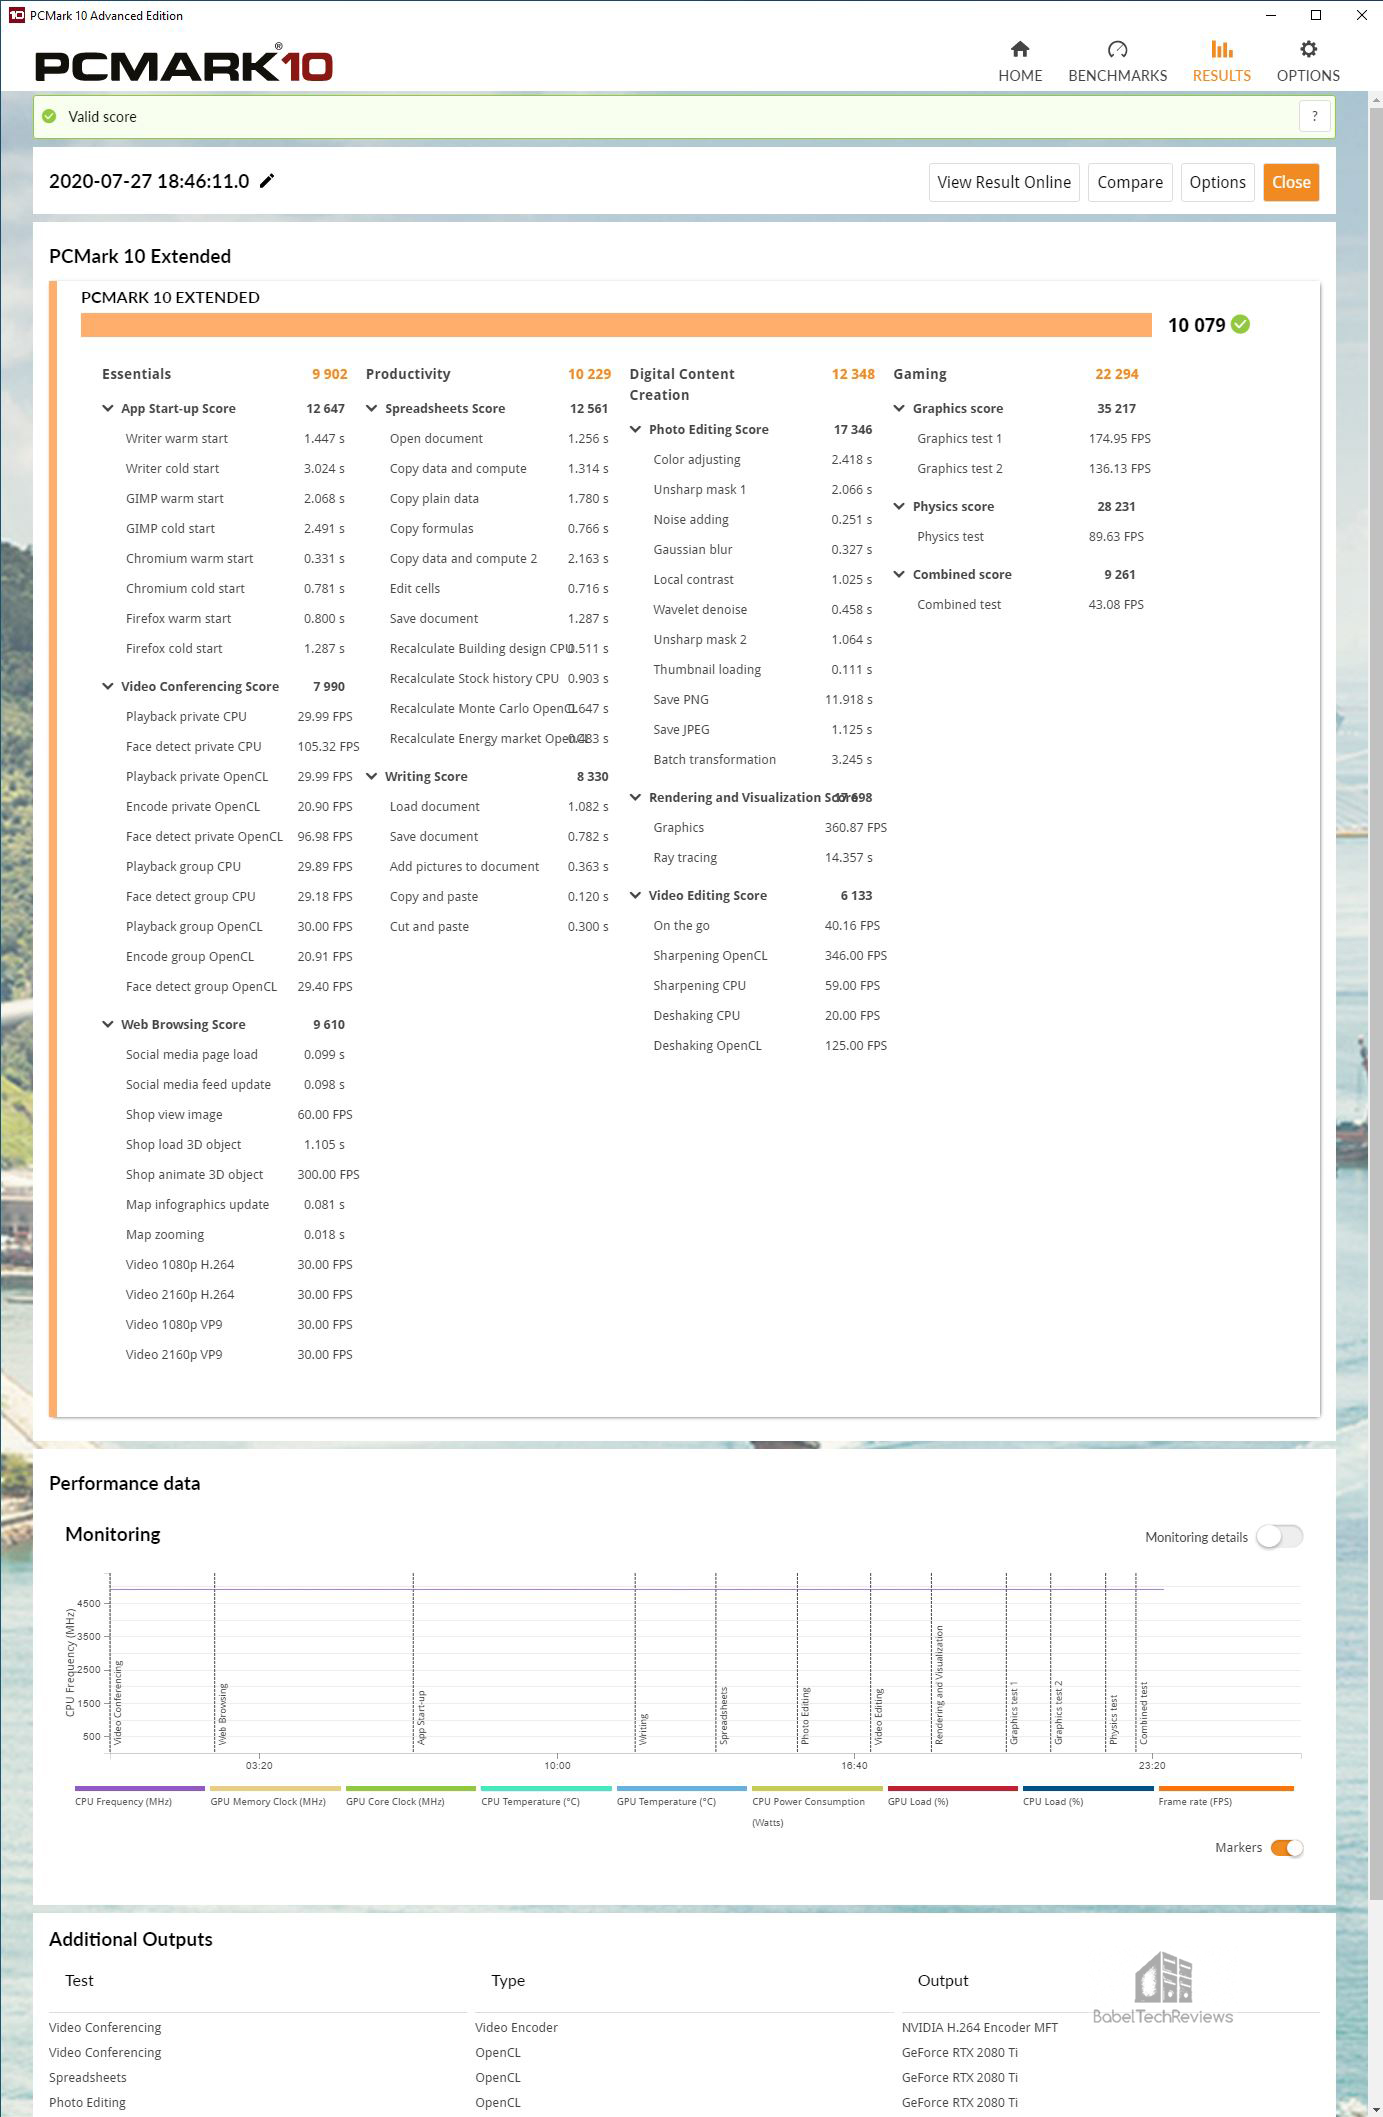
Now lets see the results after we overclock the i9 to 5.1GHz in the FTW motherboard –10568.
Overclocking the i9-10900K CPU from stock to 5.1 GHz in the FTW motherboard makes for a decent performance improvement judging by the increased scores. Here is the summary chart.

We suspect that the ASRock motherboard may not throttle the CPU at stock speeds as it did with PCMark 8’s much longer tests, but overclocking it to 5.1GHz is a waste of time in a vain attempt to gain performance. We found the same issue with our other benchmarks and cannot recommend the Steel Legend for overclocking the i9-10900K based on our experiences with it.
Let’s look at our next synthetic test, RealBench.
RealBench v2.56

RealBench is a benchmarking utility by ASUS Republic of Gamers which benchmarks image editing, encoding, OpenCL, and Heavy Multitasking. Afterward, it gives individual results and an overall score for easy comparison off or online. Some of these tests are affected by CPU and memory speeds.
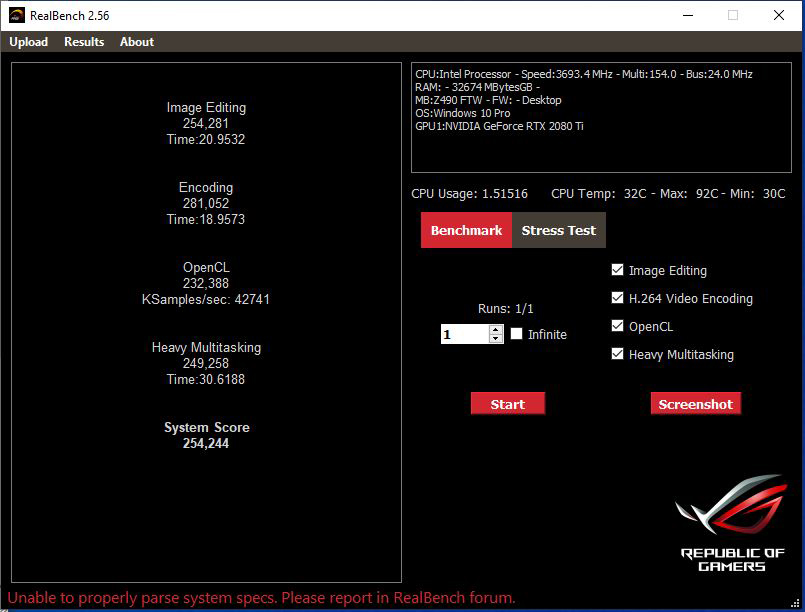
Here is the summary chart.
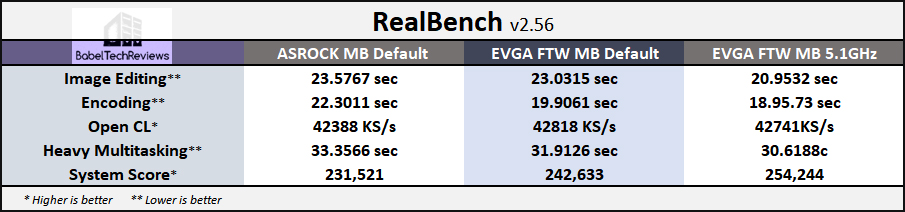 The stock results are close between the motherboards, but the performance and the scores generally increase with higher CPU clocks.
Next we benchmark using Cinebench.
Cinebench
CINEBENCH is based on MAXON’s professional 3D content creation suite, CINEMA 4D. This latest R20.0 version of CINEBENCH can test up to 64 processor threads accurately and automatically. It is an excellent tool to compare both CPU/memory and graphics OGL performance. We focus on the CPU whose results are given is cb, and higher is always better.
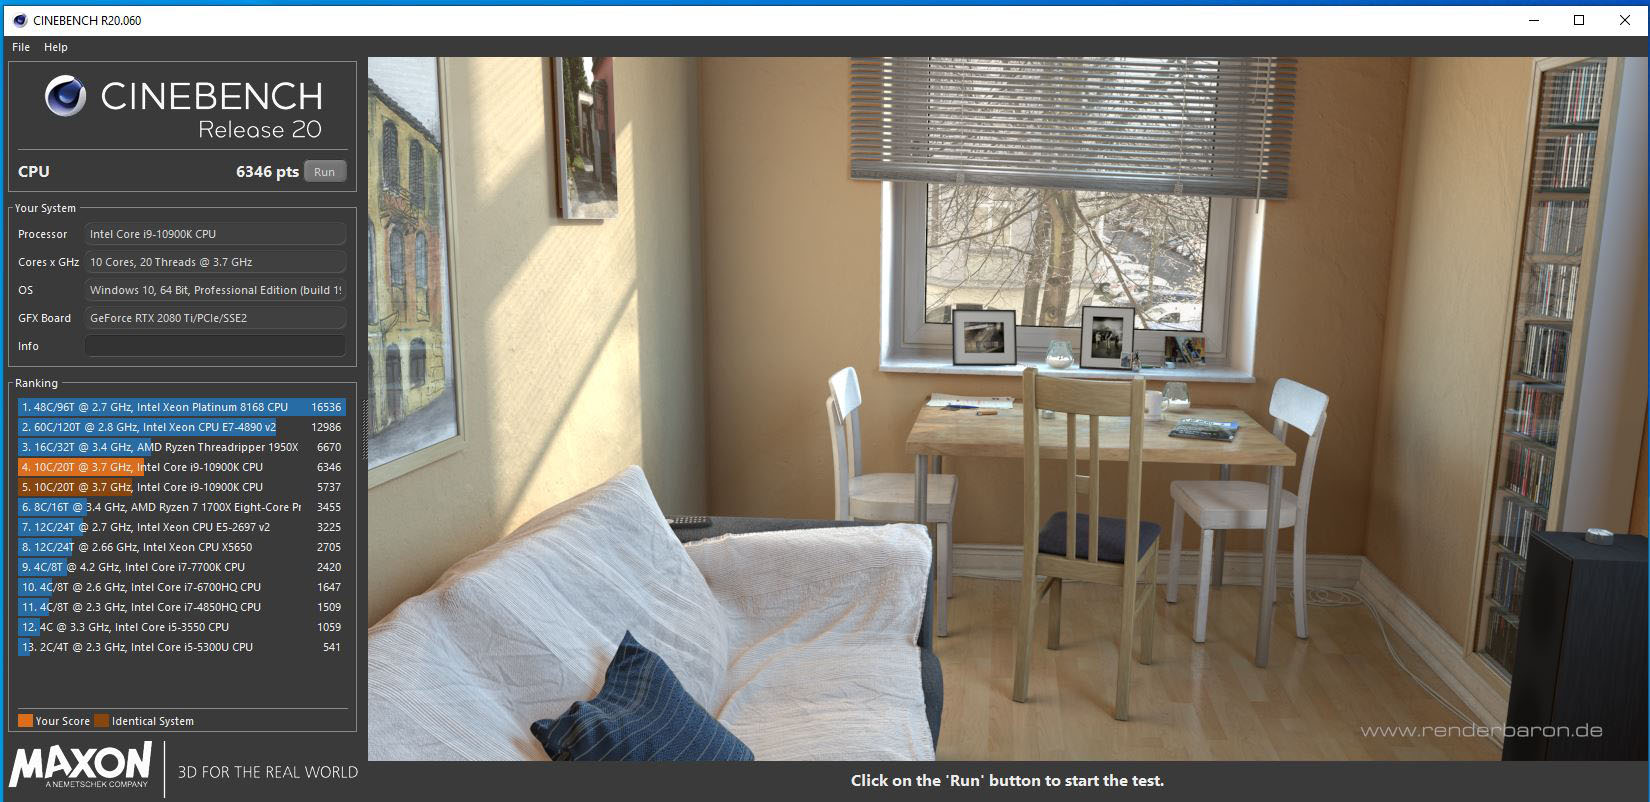
Here is the summary chart.

The ASRock motherboard scores higher but when we overclocked it to 5.1GHz, the score dropped to 5738! In contrast, the same overclock brought a small performance increases using the FTW motherboard. Next up, Novabench.
Novabench
Novabench is a very fast benching utility that spits out a 4 test results and an overall system score. We will focus on the CPU score and bandwidth speeds.
Overclocked, the i9-10900K gains performance overall. Here is the summary chart.

On to Wprime and number crunching.
WPrime v2.10
WPrime is a multi-threaded benchmark which may show the differences in IPC or clockspeeds between CPUs. Here are the tests using 10 threads, and we choose to calculate 1024 million digits and 32 million digits showing multiple runs.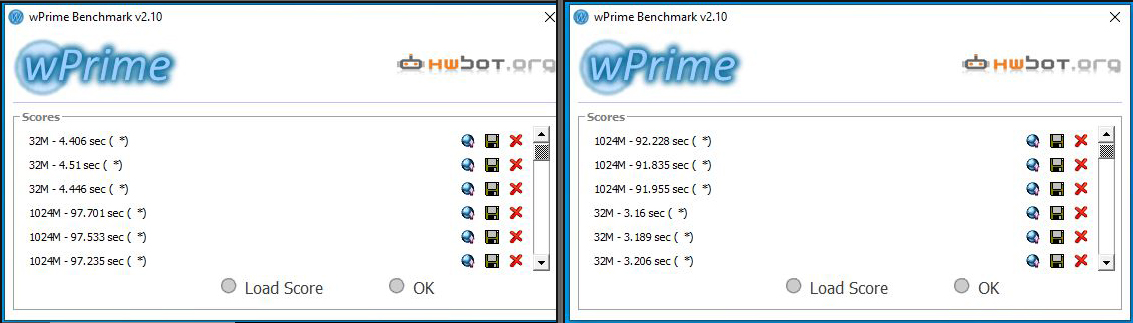
Here is the summary chart:

An overclocked CPU calculates faster than a stock CPU and in all cases of calculation, overclocked is faster than at stock frequencies enabling the CPU to crunch numbers a little faster.
Let’s take a look at Blender.
Blender 2.83
Blender is a very popular open-source 3D content creation suite. It supports every aspect of 3D development with a complete range of tools for professional 3D creation.
We have seen Blender performance increase with faster CPU speeds, so we decided to try several specific Blender 2.83 benchmarks which can measure CPU performance by timing how long it takes to render production files.
For the following chart, lower is better as the benchmark renders a scene multiple times and gives the results in minutes and seconds. This time, we tested the overclocked ASRock motherboard as well as multiple speeds of the 10900K on the FTW motherboard.
 From the chart, the Blender benchmark performance is highest with the i9-10900K overclocked to 5.1GHz in the EVGA Z490 FTW motherboard. Overclocking beyond 5.1GHz delivers less performance.
Next, we move on to game-related benchmarks and games
Game Related Benching
Let’s look at quasi game-related benchmarks starting with 3DMark next.
Fire Strike Physics & Time Spy
Fire Strike Physics depends less on the GPU and more on the CPU which can benefit from increased CPU speeds while Time Spy is more dependent on the video card.
Overclocking again brings performance increases. Let’s look at VR next.
Virtual Reality (VR)
Superposition
Superposition is benchmarked at 720P low settings and we see no real difference in the scores between motherboards other than a small boost by overclocking the i9.

VRMark – Cyan Room
There is virtually no performance difference between motherboards or by CPU overclocking with VR. It is mostly dependent on the graphics card.
 Although a VR experience depends on the GPU, a wireless adapter may make a faster CPU vital to an untethered VR experience. We are going to test our Vive Pro’s Wireless Adapter and will benchmark and compare its VR performance between using an i7-8700K at 4.8GHz and an i9-10900K at 5.1GHz later this month.
Let’s look at three PC games that may scale by increasing CPU speeds.
Gaming Performance Benchmarks
Below is the summary chart of three games that use accurate built-in benchmarks which also appear to be sensitive to scaling by increasing CPU clocks.
The highest settings are used, and the benches were run at 1920×1080 using a stock RTX 2080 Ti Founders Edition. Civilization 6’s built-in graphics benchmark uses frametimes but its AI benchmark measures the turn time in seconds – in both cases, lower is better. Anno 1800 is benched using OCAT and so the averages and the minimums are also expressed in frametimes where lower is better. The Grand Theft Auto V average/minimum results are given in FPS where higher is better.

Although the benchmarking margin of error may cloud the results, there is a trend showing that faster CPU clocks will increase framerates and improve frametimes for certain CPU-dependent games. We are going to follow up this review with an expanded review focusing on gaming as we compare a i7-8700K at 4.8GHz to the i9-10900K at 5.1GHz.
All Summary Charts
Here are all of the Summary charts.


If you are a primarily a gamer, you will get much higher framerates from overclocking your video card than from overclocking your CPU. If you game at 2560×1440, 3440×1440, or especially at 4K, you won’t notice any framerate increase from CPU scaling. However, for other tasks that primarily involve the CPU, overclocking may provide more dramatic results.
Let’s head for our conclusion.
Conclusion
There is no doubt that overclocking an i9-10900K from its stock frequencies of 3.7 GHz – even with Turbo and Velocity Turbo boost – to all-core 5.1GHz provides more performance. But any increased performance from overclocking is dependent on proper voltage delivery and stability from the motherboard plus well-controlled thermals.
We are impressed that the EVGA Z490 FTW motherboard was able to stably take our i9-10900K to 5.1 GHz after we failed to improve CPU performance by any manual overclock with our ASRock Steel Legend motherboard. Of course, there is a large price difference between the FTW and the Steel Legend, but it throttled excessively even at relatively cool temperatures; something the FTW motherboard never did.
As gamers, we see that CPU scaling is evident for the three highlighted games that are not GPU-bound with a small framerate increase when we increase our CPU’s core clocks to 5.1GHz from default. However, since there are issues with running a CPU at high frequency and with higher temperatures which will shorten a CPU’s life, each overclocker needs to balance the negatives against increased performance.
An extreme overclocker who wants every last bit of performance from his CPU will no doubt consider delidding their CPU to attempt to achieve an all core 5.3GHz overclock with watercooling. But a even dedicated watercooling may be insufficient on EVGA’s top motherboard to hit this overclock unless he wins the silicon lottery with a golden CPU.
Intel has pushed the i9-10900K right to its edge to maintain its gaming performance crown. Others may choose to moderate their overclocks, and for us, an all-core 5.1GHz OC provides a good balance for our general benchmarking tests and for 24/7 use with a reasonable voltage and with good temperatures under a full gaming load.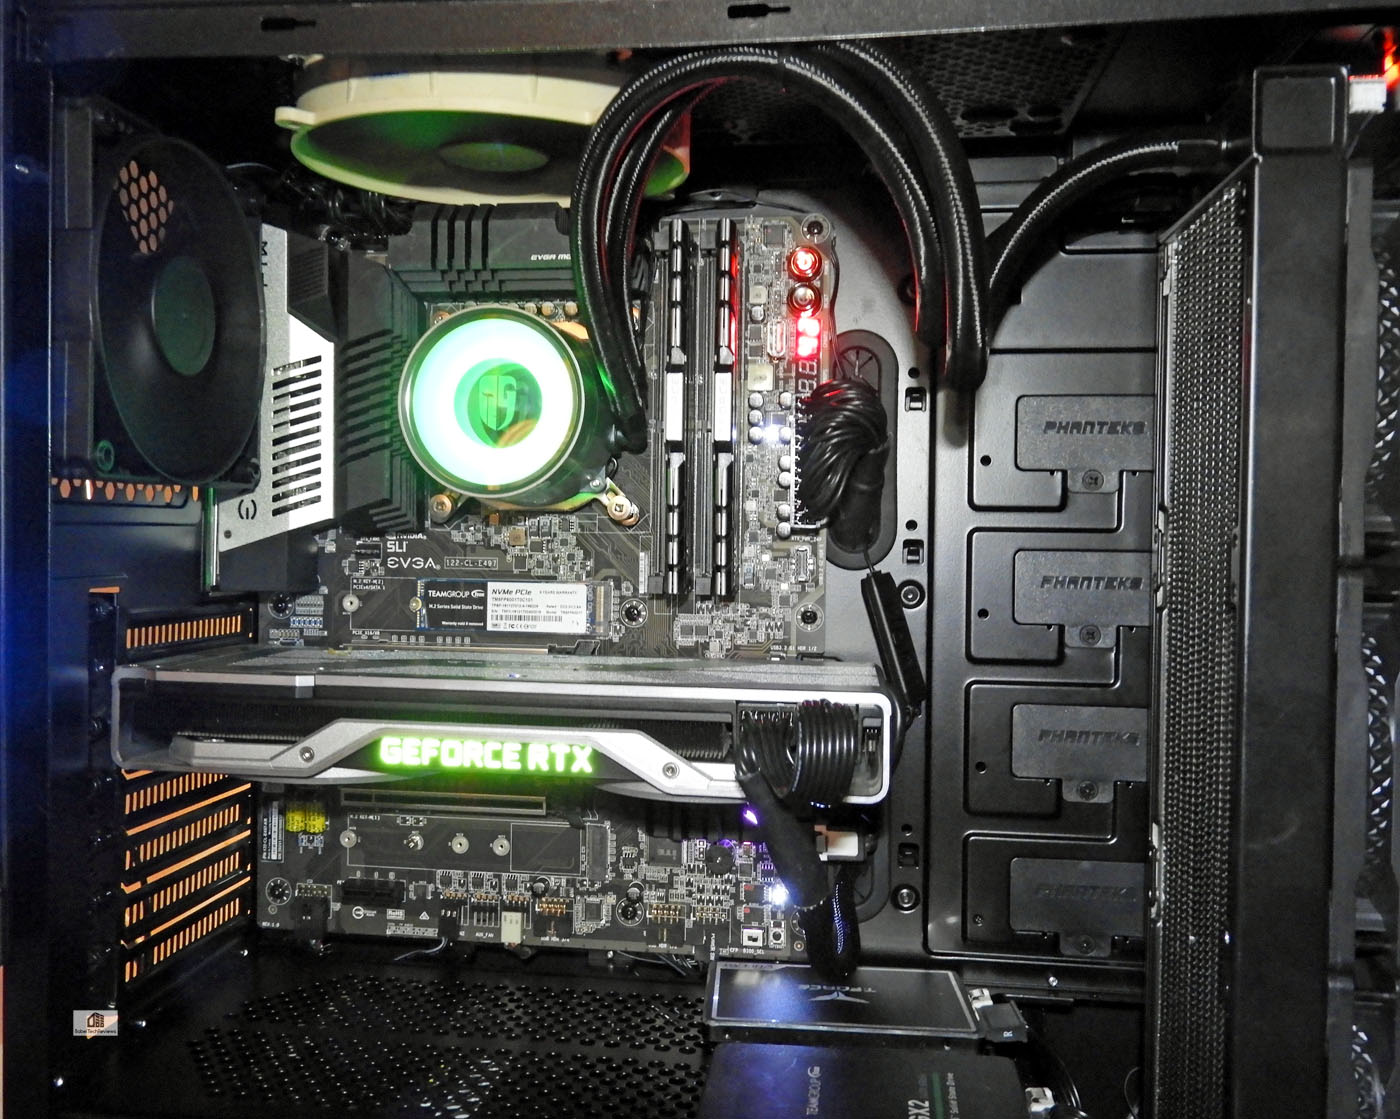
If you are upgrading to an i9-10900K, the EVGA Z490 FTW is an excellent choice as a fully-featured motherboard that will provide clean power and great features for overclockers. Intel did not leave a lot room for overclocking, but the FTW will help you maximize what is available.
EVGA Z490 FTW – Pros and Cons
Pros
- The EVGA Z490 FTW is a good-looking conservative industrial design motherboard at a competitive price
- The EVGA Z490 FTW is a fully-featured motherboard with premium components, and it has proved itself to be solid in providing stability for our i9-10900K at 5.1 GHz
- EVGA gives great 24/7 telephone support and 3 years of warranty service if you need help with your motherboard or if you need to RMA. You can also transfer your warranty to the next buyer and set up advanced RMAs for shorter down times
- In multi-tasking, encoding and almost every other task that we tested including gaming, an all core 5.1GHz overclocked Core i7-10900K is faster than at stock, and the FTW has the right overclocking tools to stabilize it
- Plenty of fan headers are available and cable management is easy using the provided FTW motherboard cutouts
- Dual BIOSes are very useful, and together with an external CMOS reset are very helpful for testing extreme overclocks
- The FTW BIOS continues to improve over earlier editions, and it has become less complex, easier to navigate, and more intuitive. Most overclocking tools are in the BIOS.
- The OC Robot is EVGA’s new star overclocking tool for inexperienced as well as well-seasoned overclockers
Cons
- We would have liked more room at the bottom of the board for right angle connectors without having to remove the PSU.
- The external Wi-Fi antennas are a funky solution and they get in the way of other connections.
![]() We feel that EVGA has delivered another good overclocking motherboard in the form of the Z490 FTW. If you are an overclocker, you can choose this board with confidence. The EVGA Z490 FTW motherboard has become BTR’s flagship motherboard and we feel that it deserves BTR’s Editor’s Choice Award. After all, we are satisfied with our i9-10900K overclock and we will continue to use the FTW for benchmarking.
We feel that EVGA has delivered another good overclocking motherboard in the form of the Z490 FTW. If you are an overclocker, you can choose this board with confidence. The EVGA Z490 FTW motherboard has become BTR’s flagship motherboard and we feel that it deserves BTR’s Editor’s Choice Award. After all, we are satisfied with our i9-10900K overclock and we will continue to use the FTW for benchmarking.
We have not finished benching the 10900K. We are going to continue by focusing on gaming as we compare our i7-8700K at 4.8GHz with our i9-10900K at stock and overclocked to see if it is a really worthwhile upgrade.
First we want take a close look at 240Hz gaming with our new Samsung 27″ 2560×1440 display to see if we can tell the difference from a really fast refresh rate compared to gaming at 120Hz or 100Hz. We certainly can tell the difference from playing our 32″ 4K BenQ FreeSync 2 display at 60Hz to a more fluid experience at 120Hz or even 100Hz on our ACER Predator 34″ G-SYNC 3440×1440 display.
Stay tuned!
Happy Gaming!